The students at DFA created the 2019 Unofficial DefCon DFIR CTF hosted by Dave and Matt in Las Vegas last summer. They have hosted multiple CTFs at Champlain College and created a workshop on developing CTFs at OSDFCon in 2019.
The DFA volunteered to create this year’s MUS CTF. Working with this fabulous team from the DFA, we know this year’s CTF is going to be fun and challenging featuring a variety of evidence. But we don’t want to give away too much! The team includes Jack Farley (@JackFarley248), Garrett Mahoney (GarrettMahoney_), Adam Ferrante (@ferran7e), and Jordan Kimball. Space in the CTF is limited so if you would like to participate, register here: https://www.magnetusersummit.com/registration.
So, What is a DFIR CTF?
Regular CTF events are common in the information security field and focus on hacking and exploiting machines to reach a target. Each target or level reached gives you points towards a total score and the harder the target, the more points are awarded. Competing against other teams, the team with the highest score wins.
DFIR CTFs are slightly different as our skillsets don’t
typically involve hacking other computers to reach a goal – but with the same
scoring concepts applied – you can compete against each other for points. A
DFIR CTF has a set image that has been prepared for contestants with questions
that need to be answered during your investigation of that image. The questions
vary in difficulty and are scored accordingly so the more difficult questions
are weighted the most and will give you the most points. The more questions
answered correctly the higher your score and the more likely you are to win
against the other contestants.
For the Magnet User Summit DFIR CTF, you will be provided
with a trial key for Magnet AXIOM, a pre-processed case containing the images,
and the evidence images. However, you are free to use any tool you wish to
complete the CTF.
The Magnet User Summit is three-day event from May 11-13. The CTF will take place May 12 from 4:45-7:45 PM.
CTF Rules
1. No teams, this is an individual contest
2. You can use any tool you chose; this is a knowledge
challenge not a tool challenge
5. Submissions must be entered before the end of the CTF
Challenge
6. You must be registered for the event to participate
7. Only winners names will be revealed
8. If you want to submit under a pseudonym we still need a
real name for prize awards
9. Prizes will be awarded, and winners announced during the
Customer Appreciation Event the same evening as the CTF
The participants who receive the top three scores in the CTF will receive the following prizes:
The CTF Winner will receive a 1-year license of AXIOM, SANS NetWars Continuous, Champlain College Leahy Center for Digital Forensics & Cybersecurity Prize Pack, and a Magnet Forensics prize pack. Additionally, they will be a guest on the Forensic Lunch live from the Magnet User Summit.
The second-place winner will receive a six-month license of AXIOM, Champlain College Leahy Center for Digital Forensics & Cybersecurity Prize Pack and a Magnet Forensics prize pack.
The third-place winner will receive Champlain College Leahy Center for Digital Forensics & Cybersecurity Prize Pack and a Magnet Forensics prize pack.
Since we announced our support of MacOS with AXIOM 3.0 in March 2019, we’ve continued to strengthen our support for Mac investigations with every release since then.
With the release of AXIOM 3.11 around the corner—which will have support for even more Mac artifacts—we thought it would be a good opportunity to catch up with one of our Magnet AXIOM macOS Examinations (AX350) instructors (and one of the lead developers of the course content), Christopher Vance to get his thoughts on his favorite macOS artifacts and why they’re important for examiners doing Mac investigations.
File System Events
Using file system events allows examiners to get an idea of
files that may no longer be on the system. Tracking values such as “Renamed”
allows a user to show a path a file lived on a system before it was potentially
moved to the Trash and permanently deleted. This can also show other Volumes
that may have been attached to the computer.
Quarantined Files
The Quarantined Files artifact allows users to see what
files have recently been checked by macOS’ Gatekeeper. This can include things
that no longer appear in the Safari downloads as well as other file transfers
from things like AirDrop or iMessage.
Recently Used Items
Recently Used Items collects data from several plist files
are represents the data in a very easy to understand view. This can mimic Jump Lists
from Windows and allows examiners to see what documents and applications have
recently been accessed, but potentially what files have been accessed by
specific applications like video players or document editors.
Using these three KnowledgeC artifacts allows an examiner to
timeline device activities and pattern of life usage to see what applications
were being used, when, and potentially what the user was doing with those
applications.
Dive Deeper in Our Magnet AXIOM macOS Examinations (AX350) Class
If you’re looking to deepen your knowledge about Mac
investigations, the AX350 course covers all of these artifacts and more. More
importantly, the class will teach you how to use one artifact to make more
sense of another and chain the data together to tell the whole story in an easy
to understand way.
Whether you’re a seasoned macOS expert, or just doing your
first Mac investigation, AX350 will be beneficial for your investigations. Once
you understand AXIOM, the way the data is presented is going to make the you
feel just as comfortable as if you were examining a Windows, iOS, or Android
system.
About Christopher Vance
Before becoming a trainer full-time and Magnet Forensics’ Manager of Curriculum Development, Christopher was a forensic specialist with Marshall University’s Forensic Science Center and the West Virginia State Police’s Digital Forensics Unit. In a joint position between the university and the police agency, he worked active forensic cases for approximately 8 years.
Most of Christopher’s training has been around mobile forensics.
Christopher’s current interests in forensics include research into mobile
operating systems, macOS, and cloud investigations.
To keep up with Christopher, follow him on Twitter @cScottVance
Each year Lee Whitfield (@lee_whitfield) creates and runs the Forensic 4:cast Awards. This is a great community event created by the community for the community to recognize individuals and organizations that are doing incredible work for digital forensics.
One of the best parts about 4:cast nominations is you can submit as many nominations as you like for each category. Voting is stressful because you are limited to one vote per category and one ballot per individual. But for nominations, nominate ‘em all! There is even a new category for mentor of the year.
As we did last year , Magnet Forensics, is providing the opportunity for some of us to share our personal recommendations for nominations. I tried not to nominate the same people in the same categories as last year, so please check out my nominations from last year as they are each equally deserving this year. This is an incredible opportunity to share my personal nominations and not Magnet Forensics’.
I love this opportunity because I get to share and highlight some of my favorite contributions and contributors to DFIR from 2019. I hope that sharing some of the people I am nominating will inspire some of you to nominate as well or at least introduce you to some awesome DFIR projects and contributions from 2019.
One of the most important things
to note is that these nominations are for work done in 2019. This means there
are some really cool projects that will have to wait till the 2020 nominations
next year like Alexis Brignoni’s ALEAPP, Ian Whiffen’s EPOCH tool, checkm8
integration, and Apple Notes blogs from ciofeca forensics. These are on my list
for next year!
Now for the fun, my nominations for 2020 Forensic 4:cast Awards! Consider nominating these folks, projects, and organizations for their great work, or nominate others. Feel free to share why with the community. I won’t cover every category. Just because someone isn’t listed here does not mean that I do not appreciate and love their work. Thank you all so much to your contributions to the community. I am a big proponent of sharing in DFIR. I can’t wait to see what the community brings in 2020!
DFIR
Non-Commercial Tool of the Year
iLEAPP by Alexis Brignoni – At the very end of 2019, Alexis rounded up his various iOS scripts he had been sharing with the community and put them into one tool iLEAPP: iOS Logs, Events, and Properties Parser. This tool is incredibly useful as it allows examiners to quickly obtain key artifacts from iOS devices. The initial 2019 release included parsing of several key artifacts. One of the great things about this tool is that it is very accessible and easy to use and can help examiners get more information out of full file system images that are now more commonly obtained from Apple devices.
KAPE by Eric Zimmerman – The DFIR world was taken by storm in 2019 by the Kroll Artifact Parser and Extractor. This freeware tool collects and parses data using targets and modules. It is effective in getting key data quickly from both live and mounted systems. I have been fortunate to have used it in developing some AUTOMATE workflows and it has been handy for presenting rapid results before the imaging and full artifact processing portions of the workflow begin providing quick results allowing for rapid decisions.
DFIR Show of
the Year
This Month in 4n6 by Phill Moore – You may be familiar with the weekly roundup blogpost that Phill Moore puts out each month. In addition, Phill puts out a brief monthly round up. These are typically short concise and focus on what Phill assesses are the most important pieces of DFIR information from all the content he has curated for the month. If your time is limited, this is the TLDR of what happened in the DFIR community each month.
DFIR Blog of
the Year
The Binary Hick by Joshua Hickman – Josh introduced his blog in 2019 and went on to share 14 articles last year covering a variety of artifacts including Android Auto, Google Assistant, Google Searches, Apple CarPlay, and Snapchat for Android. What is so great about Josh’s posts is that his articles go in depth. Josh has had one of his blogs posted on DFIR Review, meaning that he has had his blog post undergo a peer review process. If you want in depth articles, especially on mobile forensics topics, The Binary Hick is worth reading. In addition to his articles, Josh created and hosts a variety of much needed public Android images on his blog. These additions in 2019 have been critical in several areas including research, testing and validation of tools, and teaching to name a few.
DFIR Article
of the Year
“Analysis of the AmCache” by Blanche Lagny – If you do Windows Forensics, this paper from Blanche Lagny is a must read. This paper goes in depth to explain the intricacies of data that is stored in the AmCache. As the AmCache is an artifact of execution and program installation, it can be a critical artifact in a variety of investigations. Blanche notes several instances where there is risk to the AmCache being misinterpreted. This paper explores the details of the AmCache not only on different versions of Windows OS, but different builds and the variance that can exist from build to build. The registry key summary included in the appendix is a helpful reference. Blanches research is both detailed and valuable.
“AFF4-L: A Scalable Open Logical Evidence Container” by Dr. Bradley Schatz – This work from Dr. Schatz presented at DFRWS 2019 US and published in the associated conference proceedings is absolutely critical. As a community we have lacked an open source common logical forensic format. With the acquisition of data from cloud services, there is an added need to be able to store logical content in a format that is appropriate for forensics and usable by the entire community. The format proposed in this paper allows for adapting the deduplication concept in the AFF4 format for physical imaging to the AFF4-L format. There is a community need for an open source logical forensic container and this paper provides just that need.
DFIR Social
Media Contributor of the Year
Alexis Brignoni (@AlexisBrignoni) – In addition to sharing his various tools and blogposts on Twitter, Alexis has used his platform to share throughout 2019. He has elevated other programs and tools, raised concerns, and sharing posts of value to digital forensics investigators. He has also used social media to connect people working towards common objectives introducing collaborations of value. Alexis both contributes to and leads the conversation in our field.
DFIR Degree
Program or Training Class of the Year
George Mason University MS Digital Forensics and Cyber Analysis Program – Full disclosure, I am part of the adjunct faculty in this program. I teach here because I believe in the program. I earned my MS from this program in 2014 and joined the faculty in 2016. What is so fabulous about this program is that the instructors are all experts in the field with practitioner experience. The adjunct faculty includes David Loveall, Jared Greenhill, Dr. Simson Garfinkel and Tahir Khan to name just few. Some of the course topics that were taught in 2019 include Memory Forensics, Forensic Artifact Extraction, Malware Reverse Engineering, Mobile Device Forensics, Penetration Testing Forensics, Fraud and Forensic Accounting, Digital Profiling, Forensic Deep Packet Inspection, and Registry Forensics. This is a brick-and-mortar program in the Washington DC Metro area, which is also a hub of digital forensics professionals.
DFIR
Groundbreaking Research of the Year
Checkm8 by axi0mX (@axi0mX) – This work was truly groundbreaking this year. While this is not directly forensics work, the implications to forensics has been incredible. An associated jailbreak checkra1n was also released in 2019. This jailbreak allowed for full file system images to be created of vulnerable iOS devices. Since this exploit is not patchable, devices can be updated to newer version of iOS and still have a Full File System image without the need for waiting for a new jailbreak. This allows researchers to conduct research on the newest versions of iOS. It also has opened access to full file system images in corporate environments that do not have access to law enforcement only tools. This was the most groundbreaking research to hit our field in 2019.
DFIR Newcomer
of the Year
(Treating this category as people who began sharing in 2019 – not necessarily new to the field)
Ian Whiffin (@BlakDouble) – Not only did Ian create five blog posts on his site DoubleBlak Digital Forensics in 2019 covering everything from deconstructing SnapChat Plists to 7 bit PDU, but also created and distributed open source tools like Artifact Examiner, Mushy (a BPlist tool), 7-bit PDU parser, Spoopy for parsing Snap Chat iPhone conversations. Ian has definitely made his public sharing debut impactful. Really looking forward to the 2020 contributions, Ian!
DFIR Mentor of the Year (New Category)
David Cowen (@HECFBlog) — If I were to pick one person who mentors the entire DFIR world simultaneously, it is David. He is truly the epitome of the ultimate forensic teacher and mentor. David has created Sunday Funday challengesto encourage examiners to dig deep into analysis of specific artifacts and then share their results. This has resulted in increased sharing in the community. In addition to the Sunday Funday challenges, David encourages forensic examiners to test their mettle in CTFs. This year he took that mentorship to a new level by having the Digital Forensic Association at Champlain College create the challenges delivered via his platform as host of the Unofficial DefCon DFIR CTF. That CTF also led to a slew of blog write-ups about how to solve the challenges. David also teaches others how to test and how to think outside of the box in learning and understanding artifacts with his Forensic Kitchen episodes he shared in 2019. Dave has truly encouraged us all to be better examiners throughout 2019!
DFIR Resource
of the Year
Digital Forensics Discord Server
by Andrew Rathbum – In previous years, I have always nominated a website, but
this year I am happily nominating the Discord forum. Over the last year, the Digital Forensics
Discord Server has become the place to ask questions and discuss forensic
topics. There are 30 channels covering a variety of topics. This has become one of the most collaborative
environments I have seen in forensics. There are plenty of listservs and
forums, but this is by far one of the most informative and lively resources in
the community.
DFIR Team of
the Year
Digital Forensic Association at Champlain College – The Digital Forensic Association (DFA) is a voluntary club at Champlain College that focuses on digital forensics. The group not only runs and organizes challenges and events for students at Champlain College, but this year provided the capture the flag challenge for the Unofficial DefCon DFIR CTF hosted by David Cowen and Matt Seyer. Keep an eye out for these students as they are the future of our industry. Employers take note!
DFRWS – Full disclosure again, I am on the Organizing Committee for DFRWS US. Again, I volunteer for this organization because I believe in it. DFRWS has quickly become the intersection of Academia and Practitioners. In 2019 DFRWS hosted two conferences, one in Oslo, Norway and one in Portland, Oregon. Each event consisted of hands-on workshops, keynotes, technical presentations of academic papers that were published, and more practitioner focused presentations. These events attract both practitioners and academics which is fantastic because academia gets to inform practitioners and practitioners inform academia in this environment. But if it were just the conference, I would nominate it for show. This international body of forensic volunteers also publish and peer-review the technical papers in a free publication allowing for even broader access to the practitioner community. The folks at DFRWS in 2019 also provided support to the DFIR Review project that does peer-review of practitioner posted blogs as a sub-project of DFRWS. This truly has become the intersection of quality academic publishing and promotion of practitioner content.
Digital
Forensic Investigator of the Year
Okay, I said I wouldn’t list people from last year here. But in case you still haven’t looked at my picks for 2018, each of my nominations from last year; Alexis Brignoni, Sarah Edwards, David Cowen, Phill More, Yogesh Khatri, Brett Shavers, and Eoghan Casey are all still completely deserving of nominating again this year. On to new recommendations for this year.
Eric Zimmerman – As usual, Eric
has contributed immensely to the field. Not only did he introduce KAPE as
discussed above, but he provided updates to a variety of his tools including
Amcache Parser AppCompactCacheParser, MFTECmd, ShellBags Explorer (and SBECmd,
and Registry Explorer. In addition to the tools he builds, Eric created a new SANS
course, Battlefield Forensics, that focuses on getting the answers examiners
need in the shortest amount of time when that time matters.
Hope you appreciate some of my picks. If you haven’t done so, please make your nominations for the Forensic 4:cast Awards. Remember, you can nominate as many as you like per category, so nominate all of the examiners, tools, classes, projects etc. that you want. I am grateful to everyone I mentioned above and everyone one else who shares for each of their many contributions to our community.
On behalf of everyone
at Magnet Forensics, we want that this opportunity to thank all the first
responders and health care professionals who are working around the clock to
ensure the health and safety of our communities around the world during this
global COVID-19 pandemic. Your tireless efforts are unbelievably crucial at
this time, and we are very grateful. We’d particularly like to commend our partners,
friends and customers in law enforcement. Your brave efforts during this time
of heightened risk to your personal well-being is truly appreciated.
Please know that we are here to support you and your
investigations. We are committed to providing the same level of Customer Support
that you’re used to from Magnet Forensics. We’re taking every step possible to
ensure that business goes on as usual while still prioritizing the health and
safety of our employees and customers.
To that end, we’ve also taken steps to cancel or postpone our upcoming in-person events, including our Magnet User Summits in Nashville, Rome, Frankfurt, Paris, The Hague and Stockholm. We will reschedule these events when it’s appropriate to do so, but in the meantime, we’re working hard to deliver all the exciting content virtually. Keep an eye out for future announcements.
If you’re looking to take Magnet Forensics training, we’re proud
to offer nearly every one of our classes in Virtual Instructor-Led or Online
Self-Paced formats. You
can find out all the details here.
We
recognize this is a time of great uncertainty for everyone. Please take care of each other and your
families and we will emerge stronger than before.
Recently Joshua Hickman (@josh_hickman1) author of the Binary Hick released the latest in his series of WELL DOCUMENTED images for the public, and Android 10 image. A week later, he shared an amazing post on Android’s Digital Wellbeing timeline. Every day forensic researchers, like Josh, are finding, documenting and sharing the new artifacts they find — which is awesome. So how do you know when there is something new that might be helpful on a case?
One of the things I like to focus on as a forensic examiner, adjunct professor, and researcher is finding the undiscovered — particularly in mobile examinations. We all know that forensic tools cannot be relied upon to find every piece of evidence from every type of application on every operating system for a myriad of reasons. These reasons include the constant change due to the sheer number of applications, app updates, the time it takes for commercial tools to respond, the fact that your bad actor may be using an “unsupported app” intentionally.
In this blog series, I would like to share the method I have use over the years to find new artifacts and share them. This method can work regardless of your experience. In addition to sharing this methodology and showing how you can apply this to research using all Open Source and free methods, I will also show some features in Magnet AXIOM that aid in helping me with the process, often times faster than without the features. Regardless of if you use AXIOM or not, there is value to be found in this series. This is a process I have been using since before I worked for Magnet Forensics and before AXIOM existed.
So, what is this methodology? Well there are five steps to the process – Discover, Test, Find, Parse, and Script. I have been using this process since I was an examiner in a lab where my job was to find artifacts that were missed by commercial tools. So, lets delve into the first step: Discover.
Discover on Android
The first part of the Discover set is to have a Physical of
File System mobile image. This is
important because with a logical image, you are likely to have only data that
is supported by the file system. If possible, even after taking a logical image
Once you have your image, you will want to look at it. So, let’s look at the image contributed to the community by Josh Hickman. The image and accompanying documentation can be found here. Josh has done an incredible job sharing a host of images with the community over the last year. One of the best things about Josh’s images are that they are well documented. Because this image is available to everyone and well documented, it means you can follow along with the process as well. If in your search, you identify a new artifact, I hope you will share it with the community.
One of the first things I want to know about a device is what applications are installed. That way I can compare what was found to the tool(s) that I have already ran against the image. For Android there are some key areas to look this includes packages.list (data\system\packages.list), packages.xml (data\system\packages.xml), and com.vending.Android (data\data\com.android.vending\databases\library.db).
Locating packages.list and packages.xml in the filesystem.
Packages.list provides a listing of the applications, but
little additional information. If you just want to quickly see what is
installed on the device, this is a great place to start. You can compare the third-party
applications to what was parsed on your device to quickly see if there are
applications of potential interest. By looking at packages.list we can see apps
such as Instagram, MeWe, Wire, and Kik.
packages.list showing applications on the device
However, I tend to look towards packages.xml to get more information to determine what apps may be of interest that weren’t parsed by my commercial tool. Why? Because packages.xml shows me not only the name of the package, but what permissions it has and access. Looking at com.wire and com.mewe I see access to things of interest such as com.google.android.c2dm.permission.RECEIVE. This allows the application to receive messages. This is typical of communication applications. A source that can be used to understand the permissions you see here is the Android Permissions website.
Packages.xml showing permissions for com.wire
Com.android.vending is a commonly referenced source. The library.db of com.android.vending appears to have interesting information in the database including the user, application, and time of download. This is the app that tracks your purchases. However, for users who have changed devices, it can track applications that existed on the previous device and not the device under examination. Also be careful in trusting the attribution to the account. I have done some testing that shows that when two accounts are on the same device, sometimes an app purchase is attributed to the first account (0) when purchased by a different account (i.e. 11). But what is valuable here is this may be a source of discovering applications that have been deleted. There is a great presentation on discovering deleted apps from Alexis Brignoni (@AlexisBrignoni) and Christopher Vance (@cScottVance) from the 2019 SANS DFIR Summit, Tracking traces of deleted applications:
Exploring library.db of com.android.vending
Another place to look is at the files in the data/data directory itself. This contains the folder structure for all the apps. This will only show apps that have data stored here. We will talk about where to find stored data in future parts of this series. Here is what this looks like in the fil system.
Okay, so those locations talk about applications installed on the device or purchased by the user, but what about apps they have been using? That could be of absolute value in discovering what apps you may want to dig deeper into. For Android there are several artifacts that can help us do that on Android devices includes usagestats (\data\system\usagestats\0\…\daily, \monthly, \ weekly, \yearly), usage-history (\data\system\usagestats\usage-history.xml), Batterystats (\data\data\com.google.android.gms\shared_prefs\Baterystats. Xml and /system/baterystats-daily.xml), recent_images (data\system_ce\0\recent_tasks), and snapshots (\data\system_ce\0\shorcut_service\snapshots). For more information on these artifacts, check out my presentation on this research I shared at the SANS DFIR Summit in 2018 and can be found here:
Finding recent_tasks for Magisk in the filesystem
Alexis Brignoni has incorporated these artifacts and others in his Open Source tool ALEAPP. Alexis also has incorporated support for Android 10 usagestats with the help of additional research from with Yogesh Khatri (@SwiftForensics) regarding the protobuf format that is now used in usagestats in Android 10. All these artifacts will help you see the applications that have been being used, some recently, as well as some understanding of frequency. You can then quickly see if some of those artifacts are not being parsed by your forensics tool.
You may have quickly noticed that each of these files does not list a common name for an app, but rather it lists the package name, which appears to look like a reverse domain name. So how do you figure out what application you see in each one of these sources is? The simple answer is: you Google it. The package name is used in the play store as part of the URL for the application. I was curious as to what com.wire was as I hadn’t seen it before. Typically, what I will do is a search for the package name plus the words “play store”. Instantly, I see that it is a secure messaging app. A quick check and, while my forensic tool parsed many chat applications, it did not parse this application.
Search for com.wire in Google Play store
My next step is to look at the features of the app on the Google Play store. The link above will bring me to the Google Play store and show me all the features of the app. It is important to read the description and about the features, so you know some of the features for when you get to the next phase of Test. From the description, I learn that there are private and group conversations, you can share files, documents, and links, and you can set up guest rooms. The application utilizes end-to-end encryption and that it is available on a variety of Operating Systems. I also see from the pictures that group conversations can be video conferences, that you can share locations, and that you can leave voice attachments. These are all features that can be tested. Sometimes reading reviews also exposes features to test including ones not in the description and bugs in the platform that may be of interest, such as a location sent from an iOS device doesn’t appear on an Android device but will Android to Android. I didn’t see this for this app but have in previous analysis of other applications.
Wire description
Additional methods to get data that has been deleted.
Using AXIOM to Find New Apps of Interest
So now you have discovered your app of interest. However, I do want to share some examples of ways that you can use Magnet AXIOM to surface discoverable more quickly. First, there are several artifacts that can help with this including Google Play Installed Applications, Google Play Application Details, Google Play Searches and Installed Applications. You can quickly compare these parsed results to the applications that were parsed by the forensic tool.
AXIOM has artifacts for Android Usage History and Android Power Usage that cover the usage artifacts and battery artifacts. AXIOM places activity related to recent tasks in an artifact called Application Activity. This is useful because it will also include the screenshots as applicable that were saved as part of the recent_taks artifact. This could include otherwise hard to find activity such as Google Pay, an application download, or a chat message. All of these can be found by looking at this artifact on Josh Hickman’s Android 10 image.
AXIOM showing recent_tasks of a downloaded app in the Application Activity – Android artifact
Additionally, you can use the Dynamic App Finder (DAF) when processing in AXIOM to find SQLite databases of potential interest. DAF looks for databases that aren’t already parsed related to conversations, geolocation data, website URLs, and person identifiers. Once the search is complete you can view and configure what was recovered and turn it into an instant artifact. DAF showed me several potential interesting pieces of data from com.wire. I was able to see this as soon as processing was completed, before I started hunting for unsupported apps. More details related to Dynamic App Finder are available in this quick video from Martin Barrow.
Enabling Dynamic App Finder in AXIOM Selecting tables from com.wire in Dynamic App Finder
While the result wasn’t perfect, it did quickly find some chat data that my tool wouldn’t have otherwise parsed. In the result below I can see that there were messages and calls sent using Wire. In the next few parts of the series we will discuss the next steps to parsing this content.
Custom Artifact that was automatically generated via Dynamic App Finder
Now that you have identified an app of interest, what next? This series will continue with posts explaining how to Test, Find, Parse, and Script for data of applications you have deemed potentially valuable. Want to know more? Check out this upcoming webinar, Android Application Artifacts from Tarah Melton on March 31. Look for future methodology posts for parsing unsupported apps!
With Magnet AXIOM Cyber, investigators can now acquire and
analyze data from Microsoft Teams without the need of additional tools or use
of Compliance Center. In this blog we’ll discuss the steps necessary for
investigators to complete to acquire MS Teams data directly into AXIOM Cyber.
Along with the ability to collect from cloud sources such as
AWS, O365, G-Suite, and Teams, AXIOM Cyber enables examiners to remotely
collect evidence from an endpoint with the use of a covertly deployed remote
collection agent.
Provide Administrator Approval for the Magnet Forensics International, Inc
(Teams) Application
To acquire data from
Microsoft Teams accounts, you might need to provide administrator consent for
Magnet Forensics International, Inc (Teams) before logging in to the
application for the first time.
To allow Magnet Forensics International, Inc (Teams) the requested permissions, click Accept.
After you log in
successfully, you’ll be redirected to https://localhost/?admin_consent=True&tenant=<your tenant id>. This page will not load, indicating that you have
successfully granted access to AXIOM Cloud.
Allow Access to All User Accounts Through AXIOM
Configure Azure Active
Directory to allow examiners to log in to all Microsoft Teams accounts
through AXIOM and deactivate user assignment requirements.
Browse to the Azure Portal and log in as an administrator.
To open Azure Active Directory, in the left pane, click All services.
Search for and select Azure Active Directory.
Click Enterprise applications > All applications.
Search for and select Magnet Forensics International, Inc (Teams).
Under Manage, click Properties.
Next to Enabled for users to sign-in, click Yes.
To allow all users in your organization to access the Magnet Forensics application, next to User assignment required, click No.
Allow Access to Specific User Accounts Through AXIOM
If you chose not to allow
access to all user accounts through AXIOM, you can allow access to
specific user accounts.
Browse to the Azure Portal and log in as an administrator.
To open Azure Active Directory, in the left pane, click All services.
Search for and select Azure Active Directory.
Click Enterprise applications > All applications.
Search for and select Magnet Forensics International, Inc (Teams).
Under Manage, click User and groups.
In the Users and groups list, make sure that the users you want to be able to access Magnet Forensics are included in the list. If not, click Add user and choose the user you want to include.
Verify Users Have Permissions for AXIOM
For each user that you want
to be able to access the Magnet Forensics International, Inc (Teams)
application, verify that they have the required permissions.
Browse to the Azure Portal and log in as an administrator.
To open Azure Active Directory, in the left pane, click All services.
Search for and select Azure Active Directory.
Click Enterprise applications > All applications.
Search for and select Magnet Forensics International, Inc (Teams).
Under Manage, click User and groups.
Select a user.
Under Manage, click Applications > Magnet Forensics.
Make sure that the permissions list includes the Microsoft Graph API.
Once
completed, users should be able to login to their organization’s Microsoft
Teams instance to acquire directly from AXIOM. If you have any questions,
please don’t hesitate to reach out to either support@magnetforensics.com or myself at trey.amick@magnetforensics.com
We are passionate about bringing quality training to our customers, to help them keep their communities and workplaces safe. With our customers’ and Instructors’ health our top priority, we have transitioned Classroom Instructor-Led sessions to Virtual Instructor-Led and Online Self-Paced formats. Read more about the options we have available to help you achieve your training goals, while still practising necessary social distancing.
Virtual Instructor-Led Courses
Get all the advantages of our traditional instructor-led learning with our proven Virtual Instructor-Led training course options.
We’ve been offering our Virtual Instructor-Led courses for years and are always pleased to get feedback that the experience is so similar to Classroom Instructor-led training. Our platform supports real time Q&A–not only with the instructors, but also between students. This approach helps provide all the communication and networking opportunities of traditional classroom training, but in a virtual setting. In order to serve you better, we’ve worked with our vendors to secure increased capacity of our virtual machines and ensure the best experience possible.
Virtual Instructor Lead courses available:
Magnet AXIOM Examinations (AX200), For those new to Magnet AXIOM, this course covers cases involving smartphones, tablets, computers and cloud data in a single collaborative interface.
Learn at a speed that works for you, at times that work best for you – all with the same quality of training. The content of our online self-paced courses is not only the same as traditional classroom training, but built with our interactive platform that ensures far more than mere streaming of the lessons. In addition, online self-paced training allows rewinding and review in a way that live training does not.
You’ll get three hours of free Magnet AXIOM training, covering topics like our Timeline Explorer, Connections Explorer, ingesting images from forensics products, Magnet.AI and more. We’re excited to share all our handy tips and tricks.
Space is limited for this initial session, sign-up here!
Looking forward to welcoming you into one of our virtual classrooms soon,
Since 2009, Lee Whitfield (@lee_whitfield) has held the annual Forensic 4:cast Awards in which the community nominates and votes for outstanding work done in digital forensics from around the industry. It seems every year both individuals and businesses raise the bar for outstanding work.
For this year’s awards, I’m nominating the following:
DFIR Social Media Contributor of the Year & DFIR Non-Commercial Tool of the Year
Alexis Birgnoni has truly gone above and beyond with his contributions to the community over the last year. With a Twitter account (@AlexisBrignoni) boasting over 2200 tweets, if you take a moment to scroll through Alexis’ posts it becomes evident very quickly that the community relies both on his research and opinions for their DFIR work.
While he provides exceptional feedback to vendors from across the industry on his thoughts about new features, he has also gone a step further, creating iLEAPP, which leads me to my second recommendation for Alexis: the DFIR Non-Commercial Tool of the Year award. iLEAPP allows investigators to quickly parse logs, events, and preferences from iOS devices. Utilizing this parser, we can quickly identify wireless cellular service information like the IMEI’s and phone numbers, iOS 11, 12, and 13 notifications, the ever popular KnowledgeC database, and Powerlog artifacts. If you haven’t investigated adding iLEAPP into your forensic toolbox I recommend checking it out over on GitHub. You can also read more about it here. Great job Alexis, and I can’t wait to see what you have in store for the community next!
DFIR Resource
of the Year
I’m going to echo Jessica Hyde’s nomination (read more on her nominations here) for this year’s Resource of the Year, which I’m voting for the Digital Forensics Discord Server by Andrew Rathbun ( @bunsofwrath12). Boasting just shy of 3,000 members at the time of this writing, this active community is a fantastic resource for forensicators.
The Digital Forensics Discord has channels ranging from drone, DVR, and network forensics to malware analysis, incident response, and forensic coding. While I always recommend reaching out to vendors directly via support email (such as support@magnetforensics.com), if you encounter problems or having questions, many companies have examiners on the Discord as well, so if questions come up from the community, vendors can respond quickly.
Lastly, I want to thank the community again for both our nomination and for voting for Magnet Forensics in the 2019 Forensic 4:cast awards, helping us win both DFIR Commercial Tool and DFIR Team of the Year.
We value input from the community and build our tools based on that feedback. If you have any questions, please don’t hesitate to reach out at trey.amick@magnetforensics.com
The DFIR community is a tightly knit one and, in the face of
this worldwide pandemic, we want to make sure everyone stays in this together.
While physical distancing means that it was necessary to cancel our in-person
Magnet User Summits around the world, we were determined to find a way to bring
together our customers, partners, and industry experts.
We’ll be bringing the Magnet Virtual Summit to you every day
for the month of May! Thank you so much to our 25+ industry speakers who, over
the last several days, have all raised their hands to join us.
With their partnership, we’re bringing the fantastic thought leadership and product content lined up for our Magnet User Summits, directly to you. With the Magnet Virtual Summit, you’ll get a wide selection of virtual presentations that will help you stay on top of the latest trends in digital investigations. And, our popular hands-on product labs aren’t being left out. These sessions will be brought to you in a BYOD (Bring Your Own Device) format, so you can participate wherever you are.
Virtual DFIR Capture The Flag & The DFIR Fit Run
We’re also excited to still host our Capture The Flag event
in a new virtual format, making it easier for even more people to participate!
This question-and-answer-style challenge will give you the chance to test your
forensic skills and compete for awesome prizes, including a certificate for free
SANS Netwars Continuous, prize packs from Champlain College, and more!
And, we can’t leave out our fan favorite DFIR Fit Charity
Run. We can’t wait to see pics of our DFIR community in their running gear
(even if the running is happening on your indoor treadmill).
Virtual Instructor-Led Training
Our Magnet User Summit Pre-Conference Training &
Certification will also transition to a virtual format. Our Training
team has been offering our Virtual Instructor-Led courses since 2016 and have
always been proud to offer an experience so similar to Classroom Instructor-Led
training. We’ve opened up additional seats to help even more of you dive deeper
into all aspects of Magnet AXIOM, including our popular Cloud Investigations
course.
Can’t Wait to See You in May!
We were really looking forward to meeting up with many of
you this spring. However, we’re thankful
to all our speakers and partners for giving us the chance to share all the same
content with even more of you. And,
we’ll include some fun digital hangouts too. (Beers with Jad anyone?). Join us every day in May for what we hope to
be a memorable and fun virtual series. It’s the Magnet Way!
The Identifiers artifact has been a staple for Magnet AXIOM users for quite some time. The premise of this artifact is relatively simple, yet quite helpful in most investigations: Identifiers will search through all of the recovered artifacts for anything that might uniquely identify a person or user. This could be a real name, username, alias, email address, phone number, etc. — anything that might help an examiner further in their investigation. It can do this by tying additional digital evidence (such as matching up a computer and phone, or assisting and corroborating any open source intelligence) that may have also been gathered to part of the larger investigation.
Anything that might help uniquely identify a person of
interest in an investigation can be quite helpful. Traditionally, our
Identifiers artifact has been focused around people identifiers, but the same
value could be stated for identifying devices as well. There are many times in
past investigations where tracking devices have proved useful. Tracking IP
addresses and hosts through a network intrusion is vital even on an internal
network where there may be lateral movement. Or identifying a specific mobile
device on a Wi-Fi access point via it’s MAC address can also be quite helpful.
Tracking when a mobile device connects and disconnects from a given Wi-Fi
network also helps track the person in possession of the device which has
certainly helped me in many past investigations.
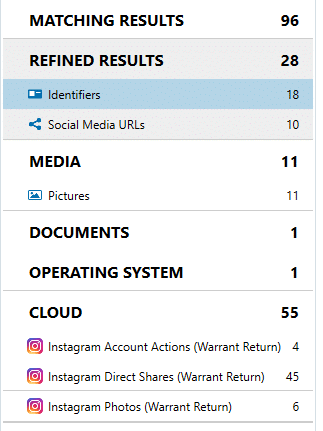
New in Magnet AXIOM 3.11, we’ve added a new artifact to track unique devices by their attributes such as IP address, MAC address, serial numbers, hostname, etc. This new artifact is called “Identifiers – Device” and to avoid confusion we’ve renamed the existing Identifiers artifact to “Identifiers – People”. Both can be found under the Refined Results category.
Both sets of identifiers can make use of the Profiles feature in AXIOM as well. Profiles allow you to build a profile around a particular person (or device) and assign additional identifiers to it. For example, if you identify an email address for your suspect and you also know their real name or alias, you can build a profile pairing these identifiers together allowing you to view any artifact that’s tied to either identifier. Same can be now done for device identifiers where you can tie a specific hostname, IP address, MAC, etc., to a profile and allow any related artifacts to be filtered on when any one of the identifiers are matched.
The Identifiers export also functions with the new device
identifiers as well allowing you to export a list of identifiers outside of
AXIOM for further analysis.
Personally, this new artifact is one I’ve wanted to do for quite some time and am glad we were finally able to add it in. I think it will be quite helpful to examiners and will speed up the process of collecting this valuable information for your investigations.
Beginning in Magnet AXIOM 3.11, the dar file format (or Disk ARchive) is now supported for image processing.
In Cellebrite-generated .dar files, Accessed, Modified, and Changed are stored inside the .dar file. However, the Created timestamp is stored in external .plists, typically found alongside your extraction in the “MetaData” folder.
These metadata plists contain extra information about the iDevice extraction.
For a further explanation of the 4 timestamps on iOS, please check out this blog post from our Jessica Hyde (@B1N2H3X).
In order to incorporate Created timestamps
into your case from these .plists, you must point to the .ufd file in
AXIOM Process.
In the event you do not have these plists, AXIOM can still parse the content as shown in the figures below, however Created timestamps will not be displayed for filesystem entries.
Artifacts view with and without referencing the metadata plists. File System Detail view with and without referencing the metadata plists.
I’ve also created a video walking through the steps of how to load the ,dar file and include the timestamps:
One of the most popular secure messaging apps currently on the market, Signal, stands apart from its competitors with a unique take on development. It’s open source, the subject of numerous independent audits, and ad-free. Signal is widely regarded as a role model showing how secure messaging ought to look.
Today, Signal is wholly owned and maintained by the Signal Foundation, a non-profit based in the US. The organization was founded by Moxie Marlinspike and Brian Acton (co-founder of WhatsApp) in 2018 and has seen widespread use in the mobile secure messaging space.
To any security researcher, Signal provides a fairly unprecedented look under the hood of a production app that is installed and used by millions of devices around the globe whether on iOS, Android, or Desktop (Windows, macOS, Linux). I contend that Signal is an excellent learning aide for anyone looking to:
Improve their understanding of how secure messaging applications actually work – helpful in the areas of reverse engineering, and forensic tool validation.
Improve their understanding of Git/GitHub, specifically how to dig into the history of a specific change or even line of code.
The latter point won’t come as a surprise to you if you’ve read my recent personal blog on Git/Github for forensic examiners. I’m an advocate for any examiner wanting to become more familiar with programming, reverse engineering, and source control platforms like Git.
Today we’re going to investigate a recent change to the Signal app on iOS using a combination of the release notes (iOS App Store) and the Signal-iOS repository on Github.
From the version history, it looks as though in version 3.6.1 released on March 6, there was a change to ‘draft message previews in the conversation list’. Cool – let’s see what potential info we can find about this change on Github.
From the Signal-iOS repo homepage, we’ll begin by pulling up the chronological list of commits to the repo.
To do this, click on the commits label (or via this link).
There is often additional insight about code changes that can be gleaned just by reading through commit messages. From our version history, we know that the commit in question must have landed before March 6th, so I started looking from prior to that date. It wasn’t long before I found this change message from March 2, 2020 which seems like a prime suspect:
Let’s click on that change and for clarity, navigate to ‘Split’ view (or click here) to see all of the files changed on this commit. We can see a change summary at the top:
Okay, cool. The first changed file listed is AttachmentKeyboard.swift, and in this file, the only thing that’s changed is inside a comment. Nothing significant here, but it’s worth noting that the left pane is the old (before the change), and the right pane is the new (after the change). Red highlighting indicates deleted, and green highlighting indicates added.
Next I’ll skip ahead to the Localizable.strings file, where we can see that 3 new lines have been added. Best of all, there’s a comment (line 1244) that gives us a bit of an explanation — this string is a prefix indicating that a message preview is a draft. Let’s keep the variable name HOME_VIEW_DRAFT_PREFIX in the back of our mind as well.
So I’d like to point out, even if you randomly found this commit and were trying to figure out what it did, between the commit message and this strings file, we already have a pretty solid foundation for understanding what might’ve changed.
But we’ve still got more digging to do – the ConversationListCell.m file, which has 14 of the 22 changes, comes next.
I’ve marked up the screenshot a bit to try and fill in some information. From this view we can see that in ConversationListCell.m, inside the function attributedSnippetForThread:
Prior to this change, displayableText was set to thread.lastMessageText. This is consistent with the prior behavior we might expect from Signal. (Note: if you read some of the unchanged code above this, there are other scenarios such as if the conversation is Muted or Blocked, but we won’t be going into those scenarios in this article).
In the new world, we now check to see if thread.draftText has anything in it (thread.draftText.length > 0) and if so, as long as we don’t have any unread messages (!hasUnreadMessages), we use that for the snippet instead. If there is a draft, we also attach our prefix, which should be “Draft: “ (HOME_VIEW_DRAFT_PREFIX) which is presented in italics (NSFontAttributeName : self.snippetFont.ows_italic). Remember, if there are unread messages (!hasUnreadMessages), this no longer applies and the unread message takes precedent.
The last changed file is SignalMessaging/ViewModels/ThreadViewModel.swift where a new property was added called draftText and value assigned, which we can see being used in our ConversationListCell.m above.
Alright! So we’ve made our way through all 4 changed files, and now we are ready to make an educated guess:
Before this change: the “preview message” or snippet is generally based on the last message text (lastMessageText). If there are unread messages, it’s also bolded.
After this change: if there happens to be a “draft” (unsent message), the draft is used as the conversation’s preview snippet and is prefixed by “Draft: “ unless we happen to have an unread message waiting in which case the old behavior applies.
As stated, thus far this is only a theory. We can’t say for sure this code is ever executed. So what do we do? One way is to bust out a test phone with an older version of Signal on it, which I happen to have on hand! We’ll start by writing a draft message, then go back to the conversation list.
Great, so now we have an unsent message – ‘hi’. Let’s look at it in the two different versions of Signal:
So as predicted from our experimentation thus far, the message now appears with an italicized prefix – “Draft: ”.
A rather interesting caveat here: despite the draft message being written today (March 22, 2020) the date shown on the conversation remains 2019-11-29– yet another visual nuance with some potential forensic significance.
Now we have one more test to run — if I send our test device a message back, without clearing the draft, we can check if the unread message overrides the draft portion of the snippet, as expected:
The last thing we will do is review the history of code changes to ensure this particular code hasn’t changed again since March 2, 2020. To do this, we use git blame. You can activate this by clicking a line and the […] button that appears beside it and choosing “View git blame”.
(If you’d like to navigate directly to the blame page, you can follow this link here.)
Git blame allows us to see the detailed history of a file over a period of time. It allows us to see how a file has evolved over time, and even links us to the relevant commits.
We can see that the changes from our “Show drafts on the conversation list” commit are surrounded by edits from 2 years ago! If there were any more recent changes to the code between line 418 to 431, we would see it on here.
Note that the more recent updates are indicated with a deeper orange color on the center vertical border, according to this legend:
Great, but most apps aren’t open source, are these skills likely to be useful elsewhere?
You bet they can! The process we’ve worked through in this blog today could conceivably work for just about any app – instead of Github, we use reverse engineering tools to perform static and dynamic analysis. There we might deal with challenges like code obfuscation, encrypted binaries, anti-debugging methods, and other fun mechanics. But this philosophy of “thinking like a developer” and beginning to understand even a subtle nuance of how an app works, absolutely applies whether you are looking at a totally open source app like Signal or diving into the machine code of a closed source app.
I’m never going to learn Swift/Objective C and Java – all I’ve got time for is a little Python!
You might be surprised to learn that there are a lot of full-time reverse engineers out there who don’t know how to code at all. I first heard this sentiment from folks on SANS FOR610: Reverse Engineering Malware. At the time, I really struggled to understand how such a thing could be possible. But some of the non-coders ended up being some of the most skilled RE folks in the room!
The point is, you don’t need to be an expert with 100% fluency in a language to be able to piece together a theory of how it works. The more exposure you get — to any language — the better equipped you will be to understand how an application might work.
AXIOM and Signal iOS
To finish off, I’m happy to also note that over the last two releases of AXIOM we have updated our support for Signal iOS to work with the latest versions of the app, including the new GRDB. You will still need to obtain a full filesystem and keychain dump (such as with GrayKey), but you can once again bring in content for parsing in the tool.
Magnet AXIOM 3.11 is now available to download within AXIOM or over at the Customer Portal. AXIOM 3.11 brings you new Device Identifiers — with device information like IP addresses and camera serial numbers — as well as support for .dar files from Cellebrite Advanced services and a number of new and updated artifacts, like Signal and Apple Pay.
You may be familiar with person identifiers within AXIOM —
information like usernames, email address, and phone numbers — but with AXIOM
3.11, we’ve introduced Device Identifiers, enabling you to associate device
information such as IP addresses, MAC addresses, and camera serial numbers to a
specific person.
You can now process .dar images created using Cellebrite Advanced
services or from acquiring a device that was jailbroken with checkra1n and they
contain three time stamps (Changed, Modified and Accessed).
Processing the .dar file with the system_metadata.plist will
allow for Creation times to be included in your evidence. Processing a .dar
file without the accompanying system_metadata.plist will result in a fully
processed case without Creation times. In order to load both files, please
point AXIOM to the .ufd file when loading your evidence.
Enhancements to ADB (Unlocked) Acquisition for Android Devices
AXIOM 3.11 introduces enhancements to the ADB (Unlocked) acquisition process for Android devices, allowing you to perform more targeted acquisitions by selectively choosing the acquisition methods used.
Now you can selectively choose to acquire live data from the device, attempt to perform a device backup and SD card acquisition, and acquire data via the Magnet acquisition agent which attempts to collect information including contacts, calendar data, downloads and more.
If you’re already using AXIOM, download AXIOM 3.11 over at the Customer Portal. If you want to see how AXIOM 3.11 can help you find the evidence that matters, request a free trial today!
Introducing one of our newest Magnet Forensics Trainers, Jerry Hewitt.
Jerry comes to us from an extensive background in UK law enforcement and, as a trainer, loves learning from his students. Check out our interview with him below!
MF: Tell us about your life before becoming a Trainer.
JH: Like many people I followed my fathers’ footsteps into Law Enforcement. I have always had an interest in technology and gadgets. I remember the excitement of getting my first electronic calculator and LED digital watch!
Building my fist ZX80 Sinclair computer in the late 1970’s was my start in computing. Becoming a licensed Amateur Radio Operator in the early 1980’s lead me to connect the two hobbies and my life with computers well and truly started.
While this was going on, I was a proud member of Northumbria Police. Moving from Uniform beat patrol to the Motor Patrols Department and then Air Support where I was the training officer. It was during my time there that I managed to link up some maritime navigation software on a laptop to a Tank, Trimble GPS system, giving us or first moving map display, back in 1995.
Some time spent as an authorised firearms officer (Not that many of us at the time in the UK) then eventually into the Criminal Investigation Department (CID). At the same time, I worked as a remote staffer with AOL UK, yep, I do still have an AOL Email address, in the Computing Help Forum where I tried to assist members with their PC Problems. During my time in CID I investigated a great deal of cases which involved Child Sexual Exploitation and Digital Forensics.
In 2009, after thirty years’ service, I retired from the Police Force only to go back three months later, as a High-Tech Crime Unit Forensic Investigator. It was during this time that I first came across JadSoftware’s Internet Evidence Finder (IEF). Six years after that and I became the Digital Forensic Unit Manager running a team of 30 staff and, with other stakeholders, helped make Northumbria Police DFU the excellent Unit it is today.
MF: What made you want to be a Trainer?
JH: Throughout my career I have been involved in the training of staff. I have been a Tutor Constable in both the uniform branch and in the CID. I have trained staff to use technical airborne equipment such as thermal imaging cameras, complex radio systems, GPS and Tactical tracking equipment, along with airborne navigation and police tactics. Even recently, I regularly provided classroom inputs to police officers and staff, lawyers and judges.
I really enjoy standing in front of a group of people and, hopefully, holding their attention. It’s a great feeling when the presentation takes on a life of its own and everyone participates. To see people learning the subject, then questioning it, and then using the imparted knowledge to dig deeper, is very rewarding. My aim is always to teach what they need but then send them away wanting to know more. Hopefully, I’ll get some feedback to improve my skills too!
MF: What type of training have you taken part in personally? What is your favorite part of the role?
JH: Due to the diverse nature of UK Policing I can’t remember a time when I hadn’t just been on a course, was about to go on one or was fighting to get the course I wanted. Everything from Advanced Driving techniques, Firearms training, Air Support courses and eventually CID training. Then after moving into the world of Digital Forensics completing a variety of courses both internally and externally where my Forensic skills were improved.
MF: What excites you the most about a new class?
JH: I always enjoy meeting new people. I know that I will learn something from them and that I will, hopefully, be able to improve their knowledge and understanding too. I really enjoy the diversity and, though sometimes the low-ball questions can put you on the spot, I like the fact I will be challenged as I will try to challenge the students.
Its nice when the class runs smoothly, but sometimes it’s the ones where things go wrong that end up being the most memorable. Fire Alarms and blue screen of death are always fun to deal with.
MF: Do you ever learn anything from the students?
JH: Even though I may teach the same topics over and over, each session is as unique as the students, every day is a school day for me too.
We all know just how hard it is to keep up with all the new devices, trends, apps and software. We are all constantly playing catch up so as the students can come from a variety of backgrounds there are always some new tips and tricks that they can bring into the lesson and, when they do, I will be happy to share to the next group
MF: Is there a particular moment that stands out the most to you in your career in the classroom?
JH: It wasn’t so much classroom based as helicopter based. I was completing the final check ride for a Police Air Observer who was reaching the last few days of his training course. He was a keen student but, sadly, I didn’t think he had the aptitude to navigate from the air and deal with all the other issues that were going on in his headset. This flight was ‘make or break’, and he knew it. I had tried all sorts of variations to try and teach him, but I was running out of ideas and even doubted my own ability. Half an hour into the flight he looked up and wow!! He had done it. He knew where we were, found the target, had dealt with the radios and formulated the tactics. On his very last flight he got it …. I am not sure who was happier, him or me. That was a great moment, and he got to do the job he had always wanted to do. More of those moments please… maybe on the ground this time though!
Lately, we have had to move the training online, thanks to COVID-19 virus. Challenging times but these will be met.
MF: What do students get out of training in person that they can’t get on their own?
JH: Self teaching has its merits, but it doesn’t always mean that you will find the best way of completing the task. The best way can sometimes be a simple keystroke or an in-depth analysis. Having an instructor with experience and knowledge can set the student down the right path. Where there are numerous people in the group, they will bounce ideas off each other during the breaks and even over lunch or dinner. Shared knowledge and experiences are invaluable, though it does mean that, as an instructor, you can end up with some really difficult questions to get answers for!
Learning is an enriching experience; people make it even more so.
MF: How prepared do you feel students are to use Magnet Forensics products after taking the training course?
JH: From my previous experience, every student that has carried out product specific training has always returned to their role with more knowledge and more confidence in their own ability and in that of the product.
MF: What is most unique about Magnet Forensics’ approach to training?
JH: Magnet Forensics’ ethics very closely match that of UK Law Enforcement. Their approach is to give the tools to Investigators and examiners to get the job done. Magnet Forensics Trainers have a solid background in Law Enforcement where it is all about the artifacts and how they relate to the investigation. The training is based on this model so the right data can be extracted and reported on in the best fashion possible.
MF: Why do you think certification is important to examiners?
JH: In the UK, Law Enforcement is going through a difficult but necessary process in having their methods for Digital Forensics accredited and validated. It is only right that the competency of the DFU Investigators can also be seen. Having a Magnet Certified Forensic Examiner certificate shows to all that the relevant training has been carried out on the tool that is in use. It lends credibility to the evidence and the Investigator.
MF: How do you manage to keep up on the latest trends in digital forensics?
JH: I have been passionate about technology for a long time. I like to watch trends and am always interested in what’s new. The Internet of Things means that there are always new toys and gadgets on the market. Ask my wife, our house has voice activated everything! There is always something new coming out and I always will try and get the opportunity to see how that device’s data could be used in an investigation. Where I can I go to trade shows or simply spend time scouring the internet forums. Research and development is something every forensic investigator needs to have a passion for. Meeting peers is a great way of learning and is something that should be encouraged. I have just enrolled in an online course for Open Source Intelligent, this will give me a better insight when I am teaching this topic.
MF: What trends do you see coming down the pipeline in digital forensics?
JH: As long as there is not a slowdown in technology due to COVID-19, I think the biggest change we are facing is the move from offline data storage and dead box forensics, to Online Cloud and Mobile evidence. With the imminent arrival of 5G and the change of user habits this will be where the evidence is found in the future … Watch this space!
Thank you, Jerry! Welcome to the Training team and to Magnet Forensics overall—we look forward to seeing your future contributions.
We’re proud to announce the availability of Magnet OUTRIDER —a new way to help you quickly find CSAM to prioritize or flag devices for additional examination.
In addition to previewing material, OUTRIDER can help you by empowering Investigators on your team by quickly identifying apps on a suspect’s device and giving your team real-time intel for interviews.
Magnet OUTRIDER can help you get a head start on your examinations, by helping you see which devices to prioritize when back at the lab and what to look for when beginning the exam.
Customizable keyword lists quickly locate files of interest with one or more hits of the keyword in the file name
Locate potentially nefarious apps including encryption, P2P, dark web, anti-forensics, cryptocurrency, cloud storage, and virtual machines
Little to no training is required to get started
Integration with Magnet AXIOM allows you to ingest and automatically surface artifacts from files that were saved by OUTRIDER
See OUTRIDER in Action in a Live Webinar on April 16
On Thursday, April 16 at 11:00 AM EST, we’ll be presenting a special webinar where we’ll talk about the development of OUTRIDER—including the refinement that came from further following international officer feedback.
Sgt. John Bedell of the Maryland State Police will join us to highlight how OUTRIDER has been successfully used in investigations, helping investigators identify key pieces of evidence for collection and analysis.
We received a lot of great responses from our initial announcement of OUTRIDER, with a number of users trialing it for free and seeing for themselves how they can perform lighting fast previews of computers and external drives through an ultra-simple approach.
We’ve been very thankful to everyone who’s contributed feedback on OUTRIDER, and we’ve been very happy to be able to make the product stronger based on it.
Google accounts with G Suite administrator privileges often have access to more data than typical user accounts. With an Administrator account, not only can you access user account Gmail and Drive contents but also audit lots providing more in-depth analysis into your G Suite environment. When utilizing G Suite administrator privileges, you can choose to access data from both the admin and user accounts or the admin account only.
In this blog, we’ll walk through the initial setup required for using Magnet AXIOM Cyber in your G Suite investigations.
Along with the ability to collect from cloud
sources like G-Suite, O365, and Slack, AXIOM Cyber enables examiners to
remotely collect evidence from an endpoint with the use of a covertly deployed
remote collection agent.
To allow AXIOM Cyber access to the data from user accounts under an
administrator’s G Suite account, you will need to open the Google Admin console
and configure the administrator account to give read-only access to user data
in the domain.
When you log in to the G Suite admin account
through AXIOM Process, these settings authenticate automatically. If you don’t
want Magnet AXIOM to continue to have access to the user accounts after
acquiring your evidence, you can remove these API settings from the Google
Admin console at any time.
To configure the Google Admin console, complete the
following steps:
Browse to admin.google.com and log in to the administrator’s account.
Click Security > API reference.
Under API access, select the Enable API access option.
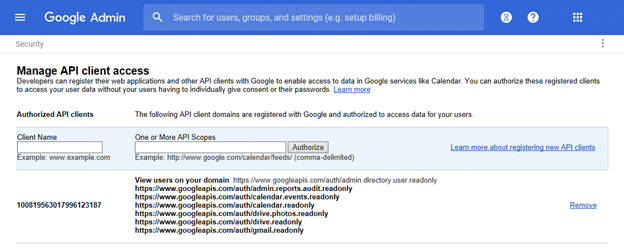
Under Advanced settings, click Manage API client access.
In the Client Name field, provide the following client name: 100819563017996123187
Copy all of the following API scopes, separated by commas, with no spaces:
In the One or More API Scopes field, paste the copied text. API scopes must be separated by commas, with no spaces.
Click Authorize.
This screen shows correctly configured Client ID and API scopes:
After you’ve updated the settings in the Google Admin console, it might take some time for AXIOM Cyber to authenticate the settings. In AXIOM Process, click Access admin and user accounts. AXIOM Process authenticates the updated settings and takes you to the Select Google services screen. If you have any questions, please don’t hesitate to reach out to either support@magnetforensics.com or myself at trey.amick@magnetforensics.com
Hey all! Tarah Melton here, Forensic Consultant with Magnet Forensics, and I’m bringing to you today a hopefully useful resource when working an investigation that involves Personally Identifiable Information.
Back story: I was approached by a customer for some guidance, who asked, are there any available pre-built PII keyword lists or any other PII specific features available for such a case?
On a venture to assist a customer, I did my own digging, and came across a few great resources in respect to PII keywords, but I unfortunately was unsuccessful in finding one single wide-ranging list of PII keywords for the DFIR community.
But! Whenever I come up short and cannot find the answer, I look to my colleagues and fellow forensicators for an assist. I reached out to Jessica Hyde, Director of Forensics here at Magnet Forensics, who did some digging of her own and came to the same conclusion.
We decided we needed to fix this issue. Not only for the sake of this customer, but for the DFIR community as a whole. I began compiling some of the more common types of PII that you might come across in an examination and utilized the resources listed below to create a comprehensive keyword list for DFIR examiners. Another big shout out to Mike Williamson, one of Magnet’s Technical Forensic Consultants, for assistance and sanity checks on some of the REGEX keywords. We truly have an amazing forensic army here at Magnet Forensics!
You can access the list here at DFIR.training in a .txt format which is easily importable into Magnet AXIOM. The list contains both plain text and regular expression keywords. Here are just a few of the REGEX keywords you’ll find there.
Physical Addresses – This REGEX keyword, adapted from bounteous.com, is an attempt to surface common suffixes of an address. Of course, the shorter ones will generate some false positives, so edit as you see fit!
US Phone Numbers – Also adapted from bounteous.com, this expression will find phone numbers from the United States, with or without an area code or extension.
US Social Security Numbers – Following the rules of US SSNs, this REGEX keyword attempts to find as few false positives as possible. The resource linked is from oreilly.com.
Additional keywords found in the PII keyword list on DFIR.training were found here. And a HUGE shout out to Brett Shavers for hosting the DFIR.training site which houses a TON of other keyword lists and additional resources for the DFIR community.
If you are looking to share with the DFIR community, it’s a great place to submit resources you find useful in your own examinations! Also check out this blog from Jamie McQuaid, Technical Forensic Consultant here at Magnet Forensics, that details utilizing keyword lists in Magnet AXIOM, and this recorded webinar from myself and Trey Amick that shows these keywords in action in Magnet AXIOM Cyber.
So fellow examiners, if you are working an investigation involving PII, and need a starting point of what to search within AXIOM, check out this keyword list for a head start. We encourage you to update, modify, and add to this list to benefit the greater DFIR community! And as always, if you need any assistance with AXIOM, REGEX, or anything in DFIR, please do not hesitate to reach out to me (tarah.melton@magnetforensics.com) or any of us here at Magnet Forensics. One of our experienced forensic examiners will be able to assist!
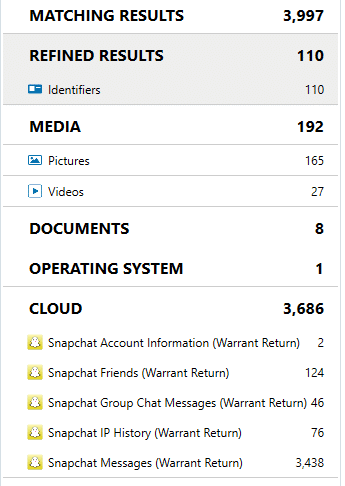
Snapchat Warrant Returns are one of the supported platforms for analysis in AXIOM. With the Cloud feature, you can load the .zip file you receive from Snapchat into AXIOM and be able to parse a wide array of content alongside your other evidence in the case. This will allow you to timeline Snapchat artifacts alongside the mobile phone or other returns you process in AXIOM.
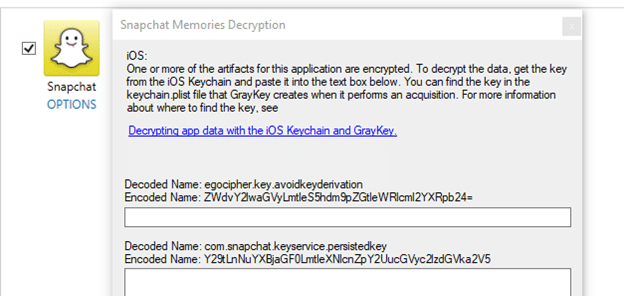
In some instances, you may not have the information you need to parse Snapchat from an iOS device which will make warrant return content even more valuable. For AXIOM to parse content from Snapchat, you will need data from the iOS keychain. This may not be available to you, so you may be relying on the content from a warrant return.
Figure: Entering decryption information for iOS parsing of Snapchat from a File System iOS image
With a warrant return it is much simpler as you simply load the .zip file you received for the return. There are several artifacts that are parsed from Snapchat Warrant Returns including account Information, Friends, Group Chat Messages, IP History, Messages, Pictures, and Videos. The support includes display of emojis that may be valuable to understanding the context of the conversations. The IP History Artifact provides not only the IP address, but also the times associated with login and logout.
Figure: Snapchat Warrant Return artifacts
If you have any comments or questions feel free to reach out to me at Jessica.hyde@magnetforensics.com. Has something changed in a Snapchat return you have received? Is there more data available you would like us to support? Please, drop us a line and let us know.
AXIOM Cloud supports warrant returns from a variety of providers including Instagram. Instagram warrant returns can contain a wealth of data and are available in two formats; namely .pdf and .zip. AXIOM can process warrant returns from Instagram in the .zip format. According to Instagram, the content of the records in both the PDF file format and the .zip file are the same. If you would like to review the results in AXIOM, ensure you have the .zip file available.
So, what content will you find when you process an Instagram return? You will be able to see artifacts of Photos, Direct Shares, and Account Actions. Direct Shares includes chat history that can be viewed in a conversation that includes pictures shared inline.
Figure: Artifacts from an Instagram Warrant Return
So how do you load these returns? What does the content look like? Check out Tarah Melton’s video of processing a Instagram Warrant Return:
If you have any comments or
questions feel free to reach out to me at Jessica.hyde@magnetforensics.com. Did something break in our
support of an Instagram return you have received? Is there more data available
you would like us to support? Please, drop us a line and let us know.
Did you know AXIOM has built in support for Google Warrant Returns as part of our Cloud Warrant Returns feature. If you have received a return from Google in a .zip format, you can load it into AXIOM and process that evidence alongside other evidence in your case. Google Warrant Returns can be highly valuable as the content may be from multiple devices including from an Android phone, Gmail, or a Chromebook.
Google Warrant Returns include a variety of data including chats, login history, search history, pictures – including saved screenshots, documents, and emails. One of the interesting issues with parsing Warrant Returns is that we are not able to create test accounts and get the data back. Therefore, sometimes there are artifacts we are unclear on. For example, we are unsure if the Chats artifact is always for Google Hangouts. In one instance, I see that the chats are also in screencaps of Hangout messages, showing that the chat can be that content. However, in another sample return, there are chat messages, but the user hasn’t signed up for Hangouts. This is where we need to work with the community to learn from what we are each seeing to more clearly understand the content parsed from these returns.
Figure: Some artifacts from a Google Warrant Return
What if you have account details and don’t know about an associated device? As part of the Google Warrant Return Devices artifact, you may be able to identify additional devices associated with the account that may be of interest. The example below shows the parsed result of the devices information from a Google Warrant Return that may assist in knowing about additional devices. In addition, the Cloud Google Account Information Artifact lists the services that the user signed up for such as Hangouts, Gmail, and YouTube for example.
Figure: Redacted Cloud Google Devices artifact from a Warrant Return
Magnet AXIOM also supports other
cloud content from Google including Takeouts and our own cloud acquisition
process. Our cloud acquisit via signing in with credentials, token, or external
browser authentication. Google Takeouts contain data that can be acquired by
doing a self-archive of the account with credentials. Do you have a Warrant
Return on a case where you have the ability (legally and technically) to also
perform a cloud acquisition and a Google Takeout? The community would love to
know what differences you find between the different methods and what content
is available in each.
If you have any comments or
questions feel free to reach out to me at Jessica.hyde@magnetforensics.com. Has something changed in a
Google return you have received? Is there more data available you would like us
to support? Have you compared the results between different Google cloud
acquisitions? Please, drop us a line and let us know.


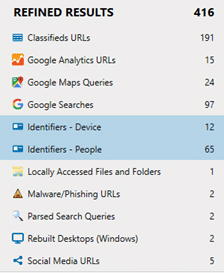
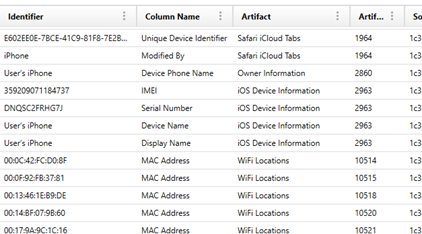

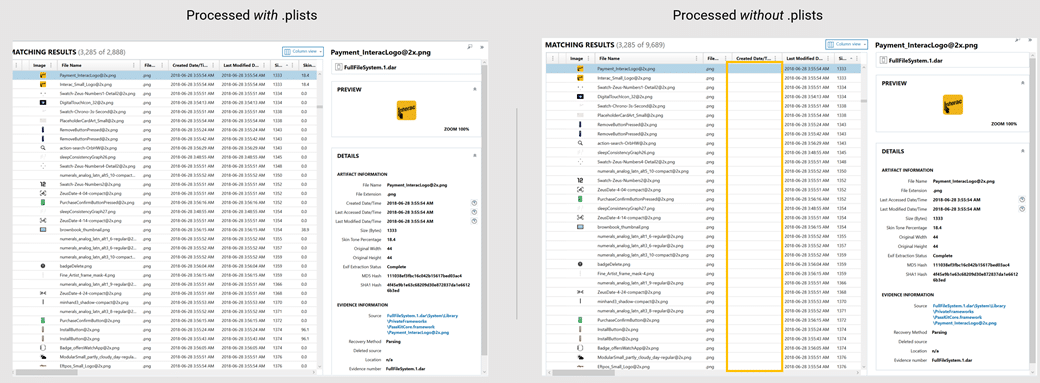
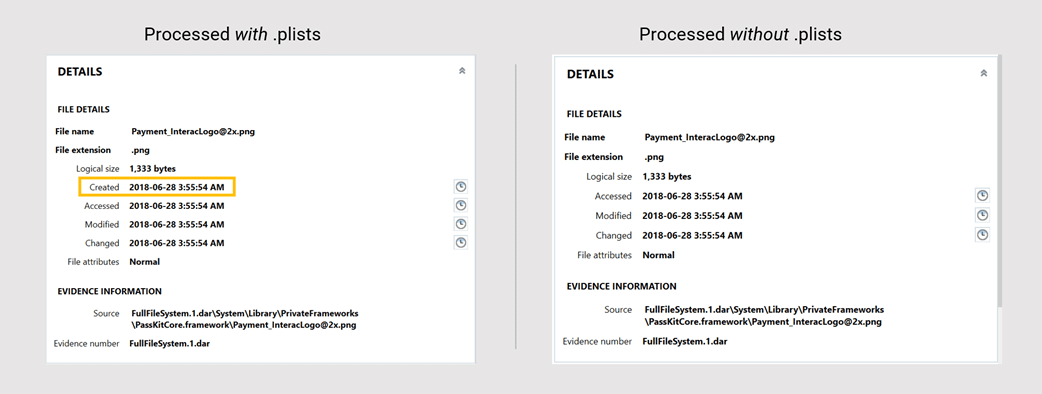


 Introducing one of our newest Magnet Forensics Trainers, Jerry Hewitt.