Quantcast
Channel: Magnet Forensics
Viewing all 1197 articles
Browse latest View live

IEF: Now Recovering Business Applications & OS Artifacts

$
0
0

Get More Digital Evidence with One Search

Recovering Business Applications & OS Artifacts

This is the first blog post in a series of five about recovering Business Applications & OS Artifacts for your digital forensics investigations.

With the June release of our latest version of INTERNET EVIDENCE FINDER (IEF), we introduced a new Business Applications & Operating System Artifact module to enable the recovery of a host of new artifact-types including corporate email, instant messaging, document files and OS artifacts.

While IEF’s roots are grounded in the recovery of Internet-based artifacts like browser history, webmail, social networking and chat apps, we recognize that Internet artifacts are only a subset of the potential evidence that can be found on mobile devices and computers. It then became clear through customer feedback that there is a desire in the forensics community to recover more kinds of digital evidence with IEF to get a holistic view of what a suspect has been up to:

“You guys are great at recovering webmail, I would love to see native email recovery like Outlook as well.”

“We use MS Lync in our office, and it would be great if you recovered it just like you recover other chat applications on PCs and mobile devices.”

“IEF recovers so many pictures in my investigations, any chance we’ll see the same capabilities with documents?”

“It would be great if IEF reported OS artifacts like USB devices, jumplists, prefetech, etc. the same way Internet artifacts are reported.”

So, we decided to release our new Business Applications and OS Artifacts module just for you, including evidence recovery capabilities for the following artifacts to make your life easier:

Native Email

Many customers love how IEF recovers webmail, but wanted us to expand these searches to include native email clients like Outlook and Thunderbird. New with the Business Apps & OS Artifacts module, we’ve added support for Outlook PST and OST files, as well as MBOX email format commonly used by Mozilla Thunderbird and other Linux based email clients.

Enterprise Chat

Traditionally, IEF has supported many chat and social networking applications across PCs and mobile devices, but a lot of our enterprise customers have requested support for Microsoft Lync for their internal investigations. IEF can now recover chat messages, call logs, and file transfers for Lync and Office Communicator, assisting examiners investigate policy violations, fraud or other corporate cases.

Documents

Document recovery can be vital to almost any investigation. Whether they’re found in allocated or carved from unallocated space, proper document analysis can provide not only the contents of a document, but the EXIF and metadata around ‘who’ created a document file, and ‘when’ it was created .

Windows OS Artifacts

Many customers already run IEF as the first step in their search for digital evidence to recover Internet artifacts. They then use other forensic tools to pull Windows OS artifacts like jumplists, shellbags, prefetech files and USB devices (among other things).  We’ve now made this kind of data available with one IEF search, so customers can  find even more evidence quickly and efficiently without having to run multiple searches, or waste time aggregating results from multiple tools.

Over the coming weeks, I look forward to blogging about different tips and techniques you can use to find important business applications and OS artifacts, as they often provide a wealth of information on a user’s activity and are valuable pieces of evidence.

As always, feel free to get in touch with me by emailing jamie(dot)mcquaid(at)magnetforensics(dot)com. Or, you can ask me a question here.

Related resources you might be interested in:

  1. Read the next blog in our series: How to Analyze USB Device History in Windows
  2. See what IEF is all about: Attend a Demo
  3. Try IEF for Free:

Jamie McQuaid
Forensics Consultant, Magnet Forensics


How to Analyze USB Device History in Windows

$
0
0
Analyze USB Device History in Windows

This is the second blog post in a series of five about recovering Business Applications & OS Artifacts for your digital forensics investigations.

Whether you’re a corporate examiner working an intellectual property theft, or a law enforcement investigator searching for illicit images, most forensic examiners have investigated the USB device history of a computer.  When examining USBs, it’s just as important to identify the user who connected the device, as it is to analyze the data that may have been transferred to or from the system.

There are five key pieces of information that need to be found when investigating USB device history.  With the data from each of these sources, investigators can better understand how USB devices have been used on a given system, and possibly how a suspect might have used a USB device in the commission of a crime or incident.

The majority of the artifacts associated with USB device history are located in the Windows registry of a computer, and can be parsed by tools such as Internet Evidence Finder (IEF), Harlan Carvey’s RegRipper, AccessData’s Registry Viewer, or manually with Windows regedit.

5 Key Artifacts That Need to be Found When Investigating USB Device History:

  1. The USBSTOR located in the SYSTEM hive (SYSTEM\CurrentControlSet\Enum\USBSTOR) USBSTOR contains details on the vendor and brand of USB device connected, along with the serial number of the device that can be used to match the mounted drive letter, user, and the first and last connected times of the device.
  2. The MountedDevices key (SYSTEM\MountedDevices)  Allows investigators to match the serial number to a given drive letter or volume that was mounted when the USB device was inserted. It’s possible that the investigator won’t be able to identify the drive letter if several USB devices have been added, since the mapped drive letter only shows the serial number for the most recently mounted device for each letter assigned.
  3. The MountPoints2 key found in a user’s NTUSER.dat hive (NTUSER.dat\Software\Microsoft\Windows\CurrentVersion\Explorer\MountPoints2) This information will reveal which user was logged in and active when the USB device was connected. MountPoints2 lists all of the device GUIDs that a particular user connected, so you might need to search through each NTUSER.dat hive on the system to identify which user connected a particular device.
  4. The USB key in the SYSTEM hive (SYSTEM\CurrentControlSet\Enum\USB)  This key provides investigators with vendor and product ID for a given device, but also provides the last time the USB device was connected to the system. Using the last write time for the key of the device serial number, investigators can identify the last time it was connected.
  5. The setupapi log (ROOT\Windows\inf\setupapi.dev.log  for Windows Vista/7/8)(ROOT\Windows\setupapi.log for Windows XP)  Searching for the serial number in this file will provide investigators with information on when the device was first connected to the system in local time. Examiners must exercise caution, as unlike the other timestamps mentioned in this article which are stored in UTC, the setupapi.log stores its data in the system’s local time and must be converted to UTC to correctly match any timeline analysis being performed by the investigator.

Unfortunately investigating USB devices isn’t always that easy, as there are scenarios where the USB doesn’t interact with the system as described above. This is where devices using the Media Transfer Protocol (or MTP) are introduced.

How to Investigate MTP Devices

Originally designed for portable media devices such as MP3 players, MTP (Media Transfer Protocol) devices aren’t quite as common as USB devices and keys, but they are quite popular with mobile devices including Android, BlackBerry and Windows Phone. Different drivers are used on a Windows system when an MTP device is connected, versus when a traditional USB mass storage device is.

One major difference for forensic investigators looking at MTP device history is that because an MTP device is not a USB mass storage device, it doesn’t produce an entry in the USBSTOR key in the SYSTEM hive, nor will the MountPoints2 key in the NTUSER.dat hive list a drive letter for an MTP device because Windows does not assign drive letters to MTP devices. It is important to recognize these changes as investigators rely on these locations to enumerate the USB devices connected to a computer.

Nicole Ibrahim has written and presented on MTP devices extensively, and anyone looking for additional information should check out her blog post or SANS DFIR Summit presentation.

Making USB Analysis Easier with Internet Evidence Finder (IEF)

Above, we discussed a number of ways to manually identify USB devices connected to a system, but collecting all the information from various registry keys and logs can be incredibly time consuming, which is why forensic tools are key to help you automate the collection process.

Internet Evidence Finder can now recover USB device history, which means the artifacts that need to be collected for each USB entry can be automatically found by the software, organized and presented to the investigator, saving them the time it takes to do the manual work.

Here’s an example of what a USB artifact looks like after it has been found by an IEF search:

  1. Device serial number from USBSTOR
  2. Last assigned drive letter from MountedDevices
  3. Associated user account from MountPoints2
  4. Last time connected from USB
  5. First time connected from setupapi.log

IEF will parse the registry hives and setupapi.log locations mentioned above, then present the investigator with details on all of the USB and MTP devices connected to a system. Associated user, mounted drive letter, first and last time connected as well as many other details are recovered and organized for the investigator to quickly analyze and determine what is relevant to their investigation.  Examiners must still understand the locations and details around a particular artifact if they are to successfully analyze its significance, but much of the manual collection work is done automatically for the investigator, so they can focus on the analysis of the data.

As always, feel free to get in touch with me by emailing jamie(dot)mcquaid(at)magnetforensics(dot)com. Or, you can ask me a question here. 

Related resources you might be interested in:

  1. See what IEF is all about: Attend a Demo
  2. Try IEF for Free:

Jamie McQuaid
Forensics Consultant, Magnet Forensics


Forensic Analysis of LNK files

$
0
0

This is the third blog post in a series of five about recovering Business Applications & OS Artifacts for your digital forensics investigations.

What are LNK Files?

LNK files are a relatively simple but valuable artifact for the forensics investigator. They are shortcut files that link to an application or file commonly found on a user’s desktop, or throughout a system and end with an .LNK extension. LNK files can be created by the user, or automatically by the Windows operating system. Each has their own value and meaning. Windows-created LNK files are generated when a user opens a local or remote file or document, giving investigators valuable information on a suspect’s activity.

Why are LNK Files Important to Your Digital Forensics Investigation?

LNK files are excellent artifacts for forensic investigators who are trying to find files that may no longer exist on the system they’re examining. The files might have been wiped or deleted, stored on a USB or network share, so although the file might no longer be there, the LNK files associated with the original file will still exist (and reveal valuable information as to what was executed on the system).

The Key Artifacts That Need to be Found When Investigating LNK Files

LNK files typically contain the following items of evidentiary value:

  1. The original path of the file
  2. MAC times of the original file; not only will a LNK file contain timestamps for the LNK file itself, it will also contain MAC times for the linked file within its metadata as well
  3. Information about the volume and system where the LNK file is stored. This will include volume name, serial number, NetBIOS name, and MAC address of the host where the linked file is stored
  4. Network details if the file was stored on a network share or remote computer
  5. File size of the linked file

Let’s take a look at an example:

I have a Windows 7 virtual machine that Windows has automatically created a LNK file named “Win7 SIFT Workstation.vmx.lnk”. Below is the raw output of the LNK file and while we can see quite a bit of valuable data as mentioned above, it does require some interpretation:

Making LNK File Analysis Easier with Internet Evidence Finder (IEF)

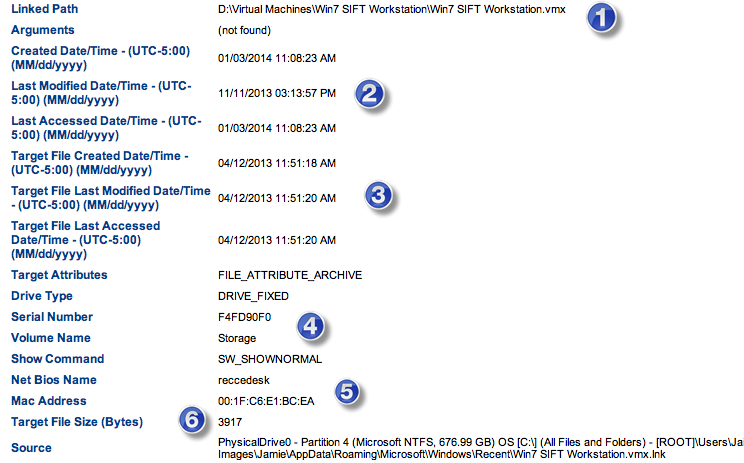
IEF takes this data and cleans it up for the investigator, providing a wealth of information about “Win7 SIFT Workstation.vmx.lnk” including the linked path, computer and volume information where it was first run from (including the MAC address of the computer), and most importantly, timestamps around the LNK file and the original VMX file. The ‘date-created’ MAC time for the LNK file will tell the investigator when the file was first opened, and the ‘date-modified’ time will identify when the file was last opened by the user. Additionally, inside the LNK file are timestamps related to the creation and modification dates of the original VMX file.

We can see below that IEF has taken the raw data above, sorted and organized it for the investigator in a far easier format:

  1. Path of the VMX file being linked to
  2. MAC times for the LNK file
  3. MAC times for the linked VMX file
  4. Volume name and serial number
  5. NetBIOS name and MAC address of source computer
  6. File size of the linked VMX file

By adding LNK artifacts to IEF, our aim is to simplify the recovery of this well-known artifact, and improve the efficiency of your investigations by letting you find more types of evidence with one search and tool.

As always, feel free to get in touch with me by emailing jamie(dot)mcquaid(at)magnetforensics(dot)com. Or, you can ask me a question here.

Related resources you might be interested in:

  1. Read the next blog in our series: Forensic Analysis of Prefetch Files in Windows
  2. See what IEF is all about: Attend a Demo
  3. Try IEF for Free:

Jamie McQuaid
Forensics Consultant, Magnet Forensics


Forensic Analysis of Prefetch files in Windows

$
0
0

This is the fourth blog post in a series of five about recovering Business Applications & OS Artifacts for your digital forensics investigations.

What are Prefetch Files?

Prefetch files are great artifacts for forensic investigators trying to analyze applications that have been run on a system. Windows creates a prefetch file when an application is run from a particular location for the very first time. This is used to help speed up the loading of applications. For investigators, these files contain some valuable data on a user’s application history on a computer.

Why are Prefetch Files Important to Your Digital Forensics Investigation?

Evidence of program execution can be a valuable resource for forensic investigators. They can prove that a suspect ran a program like CCleaner to cover up any potential wrongdoing. If the program has since been deleted, a prefetch file may still exist on the system to provide evidence of execution. Another valuable use for prefetch files is in malware investigations which can assist examiners in determining when a malicious program was run. Combining this with some basic timeline analysis, investigators can identify any additional malicious files that were downloaded or created on the system, and help determine the root cause of an incident.

The Key Artifacts That Need to be Found When Investigating Prefetch Files

Prefetch files are all named in a common format where the name of the application is listed, then an eight character hash of the location where the application was run, followed by the .PF extension. For example, the prefetch file for calc.exe would appear as CALC.EXE-0FE8F3A9.pf, where 0FE8F3A9 is a hash of the path from where the file was executed. These files are all stored in the ROOT/Windows/Prefetch folder.

Calculating the original path of the application from the hash provided in the prefetch file is relatively easy, but can be time consuming. Depending on the version of Windows the file was taken from, a different hashing function is used. One function is used for XP/2003, a different one for Vista, and another is used for 2008/7/8/2012. Both the Forensics Wiki and Hexacorn blog go into excellent detail on prefetch files, and provide scripts for investigators to calculate the original path.

The location of the executable can be just as important as any timestamp data. Most seasoned malware investigators can recognize the added concern of a known file executing from a temp folder, versus a more legitimate location such as the Windows\system32 folder.

While the information found in the filename can be quite valuable, the contents of a prefetch file contain a wealth of information as well. Below is a partial screenshot of the raw data included with the prefetch file for calc.exe:

Analyzing prefetch files is relatively straightforward. Beyond the name and path mentioned previously, prefetch files contain details on the number of times the application has been run, volume details, as well as timestamp information detailing when the application was first and last run. For Windows 8+, prefetch files now contain up to eight timestamps for when an application was last run, giving investigators several additional timestamps to help build a timeline of events on a system.

Making Prefetch File Analysis Easier with Internet Evidence Finder (IEF)

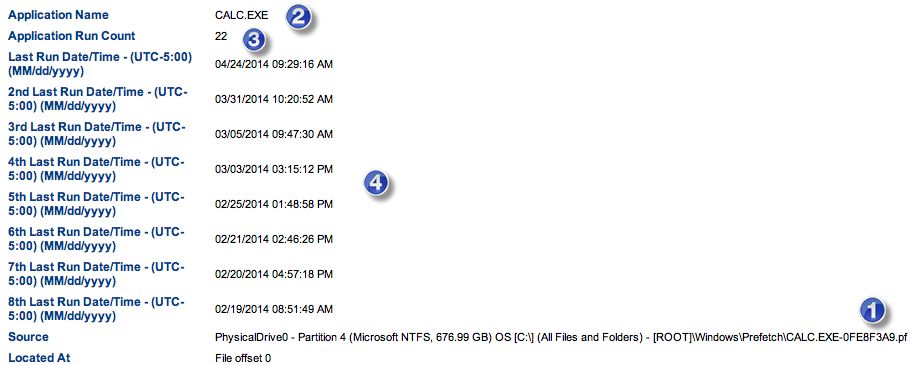
The below screenshot shows a search result for a prefetch artifact (same calc.exe file referenced and shown above). However, IEF has collected and organized the timestamps and additional details contained in the prefetch file, plus reported them to the investigator in an easy-to-read format:

  1. Hash of the original path of the application
  2. Application name
  3. The number of times the application was run
  4. Timestamps for the last 8 times the application was run (Windows 8)

By adding these timestamps to our prefetch analysis, investigators can use tools like IEF Timeline or log2timeline to map out the applications that a suspect has run on a system over a given time, or identify any malicious executables that might have run during an incident.

Prefetch files are just one of many Windows OS artifacts that help investigators understand what a user was doing on a system at a particular time. All Windows OS artifacts should be examined together to uncover the bigger picture of an incident or investigation.

As always, feel free to get in touch with me by emailing jamie(dot)mcquaid(at)magnetforensics(dot)com. Or, you can ask me a question here. 

Related resources you might be interested in:

  1. Read the next blog in our series: Forensic Analysis of Windows Shellbags
  2. See what IEF is all about: Attend a Demo
  3. Try IEF for Free:

Jamie McQuaid
Forensics Consultant, Magnet Forensics

Forensic Analysis of Windows Shellbags

$
0
0

This is the fifth and final blog post in a series about recovering Business Applications & OS Artifacts for your digital forensics investigations.

What are Shellbags?

While shellbags have been available since Windows XP, they have only recently become a popular artifact as examiners are beginning to realize their potential value to an investigation. In a nutshell, shellbags help track views, sizes and positions of a folder window when viewed through Windows Explorer; this includes network folders and removable devices.

Why are Shellbags Important to Digital Forensics Investigations?

One might ask why the position, view, or size of a given folder window is important to forensic investigators. While these properties might not be overly valuable to an investigation, Windows creates a number of additional artifacts when storing these properties in the registry, giving the investigator great insight into the folder, browsing history of a suspect, as well as details for any folder that might no longer exist on a system (due to deletion, or being located on a removable device).

The Key Artifacts That Need to be Found When Investigating Shellbags

For Windows XP, shellbag artifacts are located in the NTUSER.dat registry hive at the following locations:

    • HKCU\ Software\Microsoft\Windows\Shell
    • HKCU\Software\Microsoft\Windows\ShellNoRoam

For Windows 7 and later, shellbags are also found in the UsrClass.dat hive:

    • HKCR\Local Settings\Software\Microsoft\Windows\Shell\Bags
    • HKCR\Local Settings\Software\Microsoft\Windows\Shell\BagMRU

The shellbags are structured in the BagMRU key in a similar format to the hierarchy to which they are accessed through Windows Explorer with each numbered folder representing a parent or child folder of the one previous. Within each of those folders are the MRUListEx, NodeSlot, and NodeSlots keys:

    • MRUListEx contains a 4-byte value indicating the order in which each child folder under the BagMRU hierarchy was last accessed. For example if a given folder has three child folders labelled 0, 1, and 2 and folder 2 was the most recently accessed, the MRUListEx will list folder 2 first followed by the correct order of access for folders 0 and 1
    • NodeSlot value corresponds to the Bags key and the particular view setting that is stored there for that folder. Combining the data from both locations, investigators are able to piece together a number of details around a given folder and how it was viewed by the user
    • NodeSlots is only found in the root BagMRU subkey and gets updated whenever a new shellbag is created

Below is an output from the Windows Registry Editor showing shellbag data for a particular folder (My Computer:E:\IEF – 64 – FOR508\) as well as a number of additional folders stored under the user’s mounted E volume:

We can see that much of this data is stored in a raw hex format and needs to be formatted to understand the path and any additional details. You will need to collect data from each value in the hierarchy to piece together the path of the folder and then use data found in the Bags key to find additional details on the icons, position, and timestamp details.

Making Shellbag Analysis Easier With IEF

IEF can now take the above details from the NTUSER.dat and UsrClass.dat hives and organize the results into an easy to read and interpret format for investigators. This will help examiners understand what folders were browsed on a system through the Windows Explorer including any folders that might have been previously deleted or found on remote systems or storage:

    1. The path of the folder being analyzed
    2. The last write time of the BagMRU registry key
    3. The last write time of the Bags registry key

Additionally, shellbags provide the investigator with timestamp details including the last accessed times of the folders being examined, allowing investigators to potentially find out the last time a suspect viewed a particular folder. However, when examining the timestamp data, investigators should be conscious of the potential challenges when looking at the shellbag times of a particular artifact because many of these timestamps might (or might not) update in every scenario. Dan Pullega has done some excellent testing and analysis on these timestamps, and any investigator wishing to include this data in their analysis should read his work.

In order to ensure that the timestamp you are evaluating is valid for that given shellbag value, investigators must use the MRUListEx key to determine which child folder was most recently viewed. Currently IEF version 6.4.1 does not report the MRUListEx value for shellbags so the investigator must verify this with the registry manually, however, we will be adding this feature soon.

Adding shellbags to your analysis will help build a timeline of events, as a user might have traversed through a system going from folder to folder. It may also help refute claims that a suspect might not have known certain files or pictures were present on a system. While proper shellbag analysis can be challenging, the data included in the artifacts can be vital to investigations to determine what a user was doing on a system during a given incident.

As always, feel free to get in touch with me by emailing jamie(dot)mcquaid(at)magnetforensics(dot)com. Or, you can ask me a question here.

Related resources you might be interested in:

  1. Read other blogs we’ve written on Business Apps & OS Artifacts: Visit Our Resources Center
  2. See what IEF is all about: Attend a Demo
  3. Try IEF for Free:

Jamie McQuaid
Forensics Consultant, Magnet Forensics


Criminal Investigation of a DDos Attack

$
0
0

Webinar - Criminal Investigation of a DDos Attack

Learn how digital evidence played a vital role in a real-life Distributed Denial of Service attack. Darren Sabourin, Principal at Resolute InfoSec Inc, and Jad Saliba explain how Internet evidence was used to:

  • Determine a user’s actions
  • Show clear intent
  • Obtain a criminal conviction

Designed for digital forensics professionals who investigate network-based attacks, this webinar demonstrates techniques for finding critical evidence when performing host-based forensics, using tools such as Internet Evidence Finder and EnCase.

To watch this webinar and learn more about host-based forensics, fill out the contact form on the right.

The New World of Mobile Investigations: Finding Important Evidence in Third-Party Applications

$
0
0

This is the first blog post in a series of five about recovering third-party mobile chat applications for your digital forensics investigations.

Over the last few years, we have seen a massive shift in the mobile communications market. Smartphones have taken over the world, and mobile users spend the majority of time on their devices emailing, browsing the web, using social media and/or chatting with others using various applications.

I’m stating the obvious when I say that these behaviors have had an enormous impact on the world of mobile forensic investigations. Before I touch on what this means to today’s digital forensics investigator, let’s take a walk down memory lane…

Remember the Good Old Days of Mobile Forensics?

Do you remember the good old days of mobile forensics (pre-smartphone era) when the biggest obstacle was the acquisition of physical or logical images? The enormous variety of mobile handsets, platforms and chipsets made it challenging to acquire an image for each and every device that landed on your desk.

Tools like Cellebrite’s UFED and Micro Systemation’s XRY largely overcame this problem by offering broad support for thousands of different handsets. Once you acquired an image, the primary sources of evidence you needed to recover were standard; text messages (SMS and MMS), call logs, contact lists, photos and data from a handful of other native mobile phone applications.

Smartphones Have Changed the Game…and Created New Problems

Now that the mobile device market has mostly standardized on two operating systems (Android and iOS), we’re seeing a general decline in the variety of handsets and file systems. ‘Device variety’ is becoming less of an issue.

Today’s mobile forensics investigator has a new problem on their hands – recovering and analyzing data contained within thousands of widely-used third-party applications.

This problem was recently highlighted in an article by AccessData on Officer.com that went on to explain that ‘Law enforcement does not have a grasp on the ‘mobility’ shift; the world of the mobile device application, and the likelihood of evidence being contained within an application’s data on a mobile device.’

The sheer number of mobile apps out there is overwhelming, and it seems like new ones emerge and explode in popularity all of the time. Furthermore, each application (on each device) stores data in a different way. If an investigator isn’t up-to-date on the apps people are using, or doesn’t know where to look for data, critical evidence is likely being missed.

The Question

How can today’s investigator keep up with the rapidly evolving world of third-party applications? Then find, interpret and analyze the potential evidence they contain?

On the Magnet Forensics blog this month, we’ll start to tackle this problem by offering up tips and tricks on how to effectively find and analyze data contained within popular third-party mobile chat applications.

Why are we starting with this category? New world chat apps like Kik Messenger and WhatsApp have exploded worldwide, and usage is on pace to surpass old-world chat options like SMS.

The Rise of Mobile Messenger Apps vs. SMS

This data shows that it’s imperative that forensic professionals are prepared with the knowledge and tools necessary to efficiently recover data from third-party mobile chat applications.  They are rich sources of evidence in the new world of mobile forensics that you don’t want to miss.

As always, please let me know if you have any questions, suggestions or comments. I can be reached by email at jamie(dot)mcquaid(at)magnetforensics(dot)com.

Here are some related resources you might also be interested in:

  1. Read the next blog in our series: Recovering Kik Messenger Forensic Artifacts
  2. See what IEF is all about: Attend a Demo
  3. Try IEF for Free:

Jamie McQuaid
Forensics Consultant, Magnet Forensics


Recovering Kik Messenger Forensic Artifacts

$
0
0

This is the second blog post in a series of five about recovering third-party mobile chat applications for your digital forensics investigations.

With over 150 million users worldwide, Kik Messenger has exploded in popularity because of its cross-platform functionality and zero-dollar price tag. Kik allows users to send messages and files to contacts using iOS, Android, and Windows Phone devices.

Why are Kik Messenger Artifacts Important to Your Mobile Forensics Investigations?

In today’s world where mobile phones are the technology of choice used by millions to communicate, chat applications like Kik Messenger are often used in the commission of crimes like online harassment, or to plan or facilitate crimes like drug trafficking, robbery or murder.  More and more digital forensics examiners are seeing the need to investigate Kik Messenger as a vital source of evidence, and the ability to recover data from this app is becoming critical to their investigations.

For both iOS and Android, most Kik artifacts relevant to forensic investigations are stored within SQLite databases, similarly to other mobile chat applications.

For iOS, Kik artifacts can be found at:

/root/var/mobile/Applications/com.kik.chat/Documents/kik.sqlite

For Android, Kik artifacts can be found at:

/data/data/kik.android/databases/kikdatabase.db

These databases store details on the Kik user’s contacts, messages and attachments sent and received through the Kik Messenger application; however, they are structured very differently.

The Key Artifacts That Need to Be Found When Investigating Kik Messenger

1) Kik Contacts

Kik stores user contacts within the SQLite database, in a table called KIKcontactsTable (Android) or ZKIKUSER (iOS). This list contains valuable information for all the user’s contacts and can vary depending if they are using the Android or iOS application.

The database for both Android and iOS contains a user name and display name for each contact. The user name is a unique identifier for every Kik user. The display name, on the other hand, is the name shown in the user’s chat window, which can be modified by the user at any time. The user name can also be verified with the JID column – a unique identifier appearing in an email address format, ending in an underscore, a 3 character string, and a “@talk.kik.com” domain. For example, if my user name was jmcquaid, my JID would be “jmcquaid_rbs@talk.kik.com” where “rbs” could be a different string value used internally by Kik. In our testing, we have found multiple string values in the JID and while many of them are common across users, we cannot determine their meaning. They are likely used to categorize users internally within the Kik servers.

[Image1]

The Kik contacts tables can also contain profile picture links and timestamps, as well as group and block lists (depending on which application is used).

2) Kik Messages

Given that Kik is a messaging application, it’s likely that the most valuable evidence will be found in the messages themselves.  Messages are stored in the messagesTable (Android)  or the ZKIKMESSAGE table (iOS).

All messages appear together in the messages table, which can be challenging to sift through if multiple conversations occurred at the same time. To analyze these conversations on Android, investigators need to refer to partner_jid, which will identify who the conversation was with, and was_me, which will indicated which party sent or received the message. Additionally, the read_state column will indicate whether or not the user has read a given message (a value of 500 means read while 400 means unread). In reference to iOS, the ZUSER column refers to the conversation partner, while the ZTYPE column identifies the sender and receiver.

[Image 2]

While both applications have similar features, the artifacts recovered from each operating system will differ slightly as a result of their respective SQLite database structures.

3) Kik Attachments

Kik Messenger also supports the transfer of photos or attachments. Photos – sent from either the camera or gallery – are stored on the mobile device as a JPG with no file extension. These files are named with a GUID and referenced in the attachment table for the SQLite database.

[Image 3}

It is also worth noting an attachment can include a message; however, the messages and attachments are sent separately in the Kik database. The attachments are represented in the message table as a (null) message but will link to a GUID in the attachments table.

Making Kik Messenger Analysis Easier with Internet Evidence Finder (IEF)

Internet Evidence Finder (IEF) is able to recover Kik contacts, messages, and attachments from iOS and Android devices with the use of our Mobile Artifacts Module. It will parse the SQLite database for the artifacts listed above to identify details such as sender, receiver, message, attachment, timestamps, as well as several other values found in the database. IEF will also try to carve this data from unallocated space in the event that some of the data has been deleted, potentially providing investigators with additional messages and artifacts that aren’t found in the SQLite database tables.

Here’s a screenshot of Kik artifacts recovered by IEF:

[Image 4]


  1. Shows whether the message was sent or received by the user
  2. Unique identifier for the other Kik user in conversation.
  3. Shows the message status
  4. Contents of the message (this message was an attachment so there is no body)
  5. Timestamp details\
  6. Attachment thumbnail

The ability to recover Kik Messenger artifacts has proven valuable for IEF users. We will continue to update and add additional artifacts as new features are included in the application.

As always, please let me know if you have any questions, suggestions or requests. I can be reached by email at jamie(dot)mcquaid(at)magnetforensics(dot)com.

Here are some related resources you might also be interested in:

    1. Read the next blog in our series: Recovering Whatsapp Forensic Artifacts
    2. See what IEF is all about: Attend a Demo
    3. Try IEF for Free:

Jamie McQuaid
Forensics Consultant, Magnet Forensics


Recovering WhatsApp Forensic Artifacts

$
0
0

This is the third blog post in a series of five about recovering third-party mobile chat applications for your digital forensics investigations.

Another popular mobile chat application is WhatsApp. Like Kik Messenger, WhatsApp is cross-platform instant messenger service that has over 600 million users. It was purchased by Facebook in February 2014 and continues to grow in popularity.

Why Are WhatsApp Artifacts Important to Your Mobile Forensics Investigations?

Much like other mobile chat applications, WhatsApp contacts, messages, and attachments can be valuable to examiners looking to recover evidence for a variety of different investigation types. Whether you’re analyzing the mobile device of a suspect or a victim, these chat artifacts can contain valuable information to help solve a case.

The Key Artifacts That Need to Be Found When Investigating WhatsApp

Android

For Android devices, there are two SQLite databases of value for investigators recovering WhatsApp artifacts: msgstore.db and wa.db. The msgstore.db contains details on any chat conversations between a user and their contacts. Wa.db stores information on all the WhatsApp user’s contacts. Both of these databases can be found under the databases folder at the following locations:

/data/data/com.whatsapp/databases/msgstore.db

/data/data/com.whatsapp/databases/wa.db

The msgstore.db is a relatively simple SQLite database with two tables: chat_list and messages. The messages table contains a listing of all the messages that a user sends or receives from his/her contacts. Unlike Kik or BBM, where a user is required to have a unique username or PIN, WhatsApp uses the user’s phone number as a unique identifier for both the user and their contacts. This table will include the contact’s phone number, message contents, message status, timestamps, and any details around attachments included in the message. Attachments being sent through WhatsApp have their own table entry and the message contents will contain a null entry with a thumbnail and link to the photo/image being shared. This attachment is stored directly in the msgstore.db file. Additionally, the table may contain latitude and longitude coordinates for messages being sent, allowing the investigator to map out the geolocation details of a user.

[Image1]

The chat_list table contains a listing of all the phone numbers that a user communicated with; however, this is not a complete listing of the user’s contacts. For that we must look at the wa.db.

The wa.db contains a complete listing of a WhatsApp user’s contacts including phone number, display name, timestamp, and any other information given upon registering with WhatsApp.

In order to gain access the the msgstore.db and wa.db, an investigator must root or get a physical acquisition of the Android device otherwise, WhatsApp also stores a copy of the msgstore.db on the SD card, which is used for backups at the following location:

/sdcard/WhatsApp/Databases/msgstore.db.crypt

One caveat with this file is that it is encrypted and must be decrypted prior to analysis. WhatsApp uses several different types of encryption on this database depending on the version of WhatsApp being used.

Recovering WhatsApp contacts, messages, and attachments on Android is relatively straightforward once you have access to the appropriate databases. The process is similar in iOS with some minor differences.

iOS

Unlike Android, which uses multiple SQLite databases, iOS stores all relevant WhatsApp data in one database called ChatStorage.sqlite, stored in the following location:

net.whatsapp.WhatsApp/Documents/ChatStorage.sqlite

The ZWAMESSAGE and ZWAMEDIAITEM tables are excellent locations for collecting items of evidentiary value including messages, sender, recipient, timestamps, geolocation data, and the path/location of any media being shared between two contacts. Many of the same artifacts mentioned for Android are found in these locations; however the table names and structure may be different.

In addition to the ChatStorage.sqlite database, there is also a Contacts.sqlite database in the same location. While there are some extra details about a user’s WhatsApp contacts, this database does not include the JID for each contact that uniquely identifies the user to the WhatsApp servers.

Making WhatsApp Analysis Easier with Internet Evidence Finder (IEF)

IEF supports the recovery of messages, contacts, and attachments from WhatsApp conversations on both Android and iOS. It will parse and carve the artifacts mentioned above and organize them for the investigator in a format that is easy to read and analyze. Below is a sample output from an Android WhatsApp message:

[Image2]

  1. Sender and receiver details
  2. The message contents
  3. Message status
  4. All available timestamps
  5. Geolocation data (if available)
  6. Thumbnail/attachment image and details

In addition to recovering the information listed above, IEF also has a unique feature which helps investigators automatically sort and display WhatsApp chat conversations just as the suspect or victim would have viewed them on their device. This feature is called Chat Threading.

[Image3]

The example above shows a WhatsApp chat conversation as it would be seen using the IEF Chat Threading feature, which supports for both iOS and Android conversations.

Using IEF to recover WhatsApp artifacts from iOS and Android devices can help examiners quickly analyze conversations that might be valuable to an investigation. By searching and organizing the SQLite databases into sortable columns, and using features such as Chat Threading, investigators can easily evaluate the data.

As always, please let me know if you have any questions, suggestions or requests. I can be reached by email at jamie(dot)mcquaid(at)magnetforensics(dot)com.

Here are some related resources you might also be interested in:

    1. Read the next blog in our series: Recovering Blackberry Messenger Forensic Artifacts
    2. See what IEF is all about: Attend a Demo
    3. Try IEF for Free:

Jamie McQuaid
Forensics Consultant, Magnet Forensics

Recovering BlackBerry Messenger Forensic Artifacts

$
0
0

This is the fourth blog post in a series of five about recovering third-party mobile chat applications for your digital forensics investigations.

BlackBerry Messenger (BBM) was the original mobile messaging application, geared towards business users and productive consumers. Originally available only on BlackBerry devices, BBM has since gone cross-platform and is now accessible to Android and iOS users.

Why are BBM Artifacts Important to Your Mobile Forensics Investigations?

While consumer interest in BlackBerry devices has been on the decline, the recent OS extension of BBM has increased the application’s user-base substantially. It’s become widely popular in North America, but even more noteworthy is the adoption of BBM in countries such as Indonesia and South Africa, where it is the number one mobile chat application.

The Key Artifacts That Need to Be Found When Investigating BBM

Imaging and gaining root access to BlackBerry devices can be challenging, making it difficult to retrieve key artifacts from its operating system. The analysis of BBM artifacts from Android and iOS, on the other hand, is relatively straightforward.

BBM artifacts are stored in a SQLite database called master.db, which can be found in the following locations:

For Android, BBM artifacts can be found at:

/data/data/com.bbm/files/bbmcore/master.db

For iOS, BBM artifacts can be found at:

/private/var/mobile/Applications/%GUID%/Library/bbmcore/master.db

The master.db database contains several tables that provide a wealth of information on a user’s BBM contacts, invitations, messages, file transfers, profiles, and GPS data (if enabled on the device). This data is unencrypted on the device and can be viewed with any SQLite viewer.

There are quite a few tables of interest that store the data mentioned above. The TextMessages table contains the messages along with timestamps and other relevant data. The Contacts, Profile and Users tables store contact and user details including profile pictures and registration details. The FileTransfers and FileTransferData store data on any files that were transferred between BBM users. There are some additional tables found in the master.db database that might be of forensic value to an investigator.

The screenshot below is an example of the detailed information available in the TextMessages table for a BBM conversation between two parties. Included in this information is message content, timestamps for sent and received messages, status, state (whether the message has been delivered, read, etc.), PINs, participants, and attachments (if applicable).

BBM for iOS and Android has also recently been updated to include BBM Channels. Previously only available on BlackBerry devices, BBM Channels allows users to subscribe to various “channels” of interest such as a famous person, brand, or organization. Users can interact with that channel by posting and responding to comments and questions.

There are various tables located within the master.db file which will identify channels that a user has subscribed to. Specifically, investigators should examine TableChannels, ChannelPosts, and ChannelComments for artifacts that may be relevant to their case.

Recovering BBM artifacts with Internet Evidence Finder (IEF)

IEF is able to recover BBM evidence from both iOS and Android devices. The software parses data from the master.db database and displays the information within the report viewer, under categories for BBM Messages, Profiles, and Contacts.

From there, IEF will further parse display name, PIN number, personal message, last update (date/time), profile picture, location, and time zone details from any profile or contact listed in master.db. IEF will also display the type, status, state, display name, PIN, sent/received date and time, content, conversation ID, participants, and attachments for any messages it recovers. Any message data stored in unallocated space can also be recovered by IEF, potentially locating valuable deleted conversation details.


  1. Message delivery details
  2. User details
  3. Timestamp information
  4. Message contents
  5. Chat participants

The recovery of BBM artifacts from iOS and Android can be quite useful for an investigator dealing with potential mobile chat evidence. IEF is able to parse and carve valuable data from the master.db database, helping investigators recover the necessary evidence quickly and efficiently.

As always, please let me know if you have any questions, suggestions or requests. I can be reached by email at jamie(dot)mcquaid(at)magnetforensics(dot)com.

Here are some related resources you might also be interested in:

  1. Read the next blog in our series: Using Dynamic App Finder to Recover More Mobile Artifacts
  2. See what IEF is all about: Attend a Demo
  3. Try IEF for Free:

Jamie McQuaid
Forensics Consultant, Magnet Forensics

Using Dynamic App Finder to Recover More Mobile Artifacts

$
0
0

This is the final blog post in a series of five about recovering third-party mobile chat applications for your digital forensics investigations.

Data recovered from mobile chat apps is critical to many forensic investigations. However, with thousands of mobile chat apps in use today and a steady stream of new apps emerging, identifying, recovering and analyzing mobile chat data has become a challenging and time consuming duty for forensic professionals.

Internet Evidence Finder (IEF) recovers many of the most popular chat applications including BBM, Kik Messenger, WhatsApp, Viber, LINE, Google Hangouts, and many more. We continue to add additional apps as fast as possible, however it’s nearly impossible to support every chat application out there. Often investigators will come across a less popular app, or even a custom app created by a suspect that isn’t supported by any tool, but will still require examination.

Dynamic App Finder is a feature of IEF’s mobile module that helps address this problem. DAF searches for any potential mobile chat app databases located on images or file dumps of iOS or Android mobile devices. It identifies the app name, and then maps the four key fields required to interpret results from most chat apps:

  1. Sender,
  2. Receiver,
  3. Date/time, and
  4. Message

[Image1]

At the conclusion of an IEF search, Dynamic App Finder displays the names of the discovered chat apps along with the recommended field mapping for each chat database. Field mappings can be accepted as displayed or modified, and are saved by IEF for use in future cases.  Full search results with all recovered records for each chat app are displayed in IEF Report Viewer.

Dynamic App Finder enables examiners to find chat messages from potentially thousands of apps, regardless of how new or obscure they might be.

As always, please let me know if you have any questions, suggestions or requests. I can be reached by email at jamie(dot)mcquaid(at)magnetforensics(dot)com.

Here are some related resources you might also be interested in:

    1. See what IEF is all about: Attend a Demo
    2. Try IEF for Free:

Jamie McQuaid
Forensics Consultant, Magnet Forensics

Improving Your Mobile Forensics Workflow

$
0
0

This is the first blog post in a series of three about using IEF and Cellebrite to get more mobile evidence for your digital forensics investigations.

Finding and analyzing evidence found on mobile devices may be the most important skill today’s digital forensics examiner can possess. Mobile devices have engrained themselves into our personal and professional lives; become our lifeline to the outside world, and primary way we connect with our networks.  We exchange emails with colleagues, chat with friends, browse the internet, and even do our daily banking using applications loaded onto our smartphones and tablets.  As a result, mobile devices (and the applications they contain) have become forensic goldmines of evidence – often times more valuable than a suspect’s work or personal computer.

When it comes to your mobile forensics toolkit, you’ve likely become comfortable using tools like Cellebrite’s UFED to process most of your cases.  Cellebrite is especially good at acquiring an image from an impressive range of device models, but how do you go about finding evidence from the important third-party applications loaded on them?

An Improved Mobile Forensics Workflow

Back in the spring of 2012, we heard rumblings among the forensics community that recovering evidence from a range of third party applications on iOS and Android devices was difficult. The tools that were out there did a great job acquiring images from a variety of device models, but the capability to analyze those images and pull a range of relevant artifacts was missing.  That’s when we decided to add a mobile module to our digital forensics software, Internet Evidence Finder that would allow an investigator to run a search on a mobile image to look for hundreds of mobile applications.

Soon after the launch of our mobile module, customer feedback started rolling in.  IEF’s new capabilities had changed their mobile forensics workflow, and enabled customers to find more mobile evidence.

Here’s How They’re Doing It

Step 1:  Acquire a mobile image with Cellebrite UFED (or another acquisition tool)

Step 2:  Run IEF against the image – our automated search will look for 165+ types of mobile artifacts
*Whether you’re able to get a physical acquisition, logical acquisition, or file dump, IEF supports output from the UFED for many different devices, including iOS and Android devices. 

Step 3:  Start analysis in IEF Report viewer, where you can review search results that are organized by category, and contain all of the important artifact fields

Step 4:  Export reports to share preliminary insights, or include in your final forensics report of findings

To recap, here’s a workflow visual:

Why Should You Add IEF to Your Mobile Investigative Workflow?

Some people might question why they should incorporate IEF into their mobile analysis after the acquisition stage, as Cellebrite also gets data from third-party applications. The answer; each tool returns different results, and specializes in different areas (as is the case with all of the tools in your kit).  Cellebrite is the best solution for acquiring mobile images from a wide variety of devices, while IEF returns the most evidence from third-party applications used on the most common devices.

Here’s some recent customer feedback:

“We are currently using other mobile forensic tools, but they don’t recover the Internet-based apps, like BBM. I recently investigated a Samsung S4 mini, which displayed no BBMs; but with IEF, I recovered almost 7000 messages which cracked the case.”

“Generally, Physical Analyzer does a good job parsing out my chip offs, but it can’t get video.  IEF is able to grab video and does a better job with the Internet artifacts, especially Kik Messenger.” 

The reality is you have to see it to believe it.  We challenge you to use your acquisition tool of choice (like Cellebrite’s UFED) with IEF, and see what you get!

In my next post in this series, I’ll show you exactly how to use IEF and Cellebrite to acquire and analyze Android devices to get more digital evidence, then move on to iOS.

As always, please let me know if you have any questions, suggestions or comments. I can be reached by email at jamie(dot)mcquaid(at)magnetforensics(dot)com.

Here are some related resources you might be interested in:

  1. Read the next blog in our series: How to Use IEF and Cellebrite to Find More Evidence on Android Devices
  2. See IEF’s Mobile Module in Action: Attend a Demo
  3. Try IEF and our Mobile Module for Free:

Jamie McQuaid
Forensics Consultant, Magnet Forensics

How To Use IEF and Cellebrite to Find More Evidence On Android Devices

$
0
0

This is the second blog post in a series of three about using IEF and Cellebrite to get more mobile evidence for your digital forensics investigations.

In my first blog post in this series, I discussed the desire among the mobile forensics community to find more mobile evidence, especially from third-party applications. Investigators seem to have image acquisition covered with tools like Cellebrite’s UFED, but want to know how to pull more third-party app evidence.

Here’s the workflow we recommend:

With this in mind, here are step by step instructions on how to use IEF and Cellebrite together to acquire and analyze Android devices including physical acquisitions, file system extractions and quick file dumps.

Physical Acquisition

To demonstrate the physical acquisition process, I chose to physically acquire a Samsung Galaxy S Relay 4G with our Cellebrite UFED (pictured below).

When doing a physical acquisition, the UFED will attempt to root the mobile device and image all the available data, including all partitions and unallocated space. To begin the acquisition process, connect the device to the UFED and select the correct device model. The Cellebrite system will then take you through a series of options, including defining a target location to store the retrieved data. Once all the options have been selected, the UFED will begin pulling data from device. The mobile image is stored in fragmented .bin files as raw data, along with a file containing case details with a .ufd extension.

Logical Acquisition

You might choose to do a logical acquisition of an Android device when a physical acquisition is not possible or required. Starting with the Cellebrite UFED, you can choose to “Extract Phone Data” or “File System Extraction,” depending on whether or not you want to retrieve just the user files or the entire file system. Similar to the physical acquisition process, Cellebrite requires you to select the model of phone and the output target.

For a file dump, you need to select which items you would like to copy (call logs, SMS, calendar, contacts, etc.) and Cellebrite will then upload software to the device, enabling it to pull down this data as a backup. To demonstrate a logical acquisition, I chose an HTC One and dumped the data to a USB stick. Once complete, the investigator is provided with a folder containing the data below.

For a file system acquisition, you will be given a .ufd file and a zip archive containing device contents.

Logical acquisitions and file dumps will pull quite a bit of data for the investigator; however, a physical acquisition is always recommended to maximize the recovery of any potential deleted data located in unallocated space.

Analysis with IEF

Now that you have acquired the UFED image, you can upload your data from Cellebrite to IEF to begin analysis. This process will differ slightly depending on the type of image you have acquired (physical, file system, or file dump). For a physical image, open IEF and select “Mobile.” Then choose the correct OS for your image (for our example, we will select “Android”), and click “Image”.

For the physical acquisition, you will find a folder with a number of .bin files and a .ufd file (as noted earlier). The .ufd file is used by the Cellebrite software to load up the case details and images.  To analyze the image using IEF, you will need to access the .bin files. If the file is fragmented due to size, select the first one and IEF will automatically load the additional bin files.

If you performed a file system acquisition, you will need to locate and select the zip archive that was created by Cellebrite. IEF will then proceed to extract the archive and automatically begin searching the recovered contents.

Finally, if you chose to extract the phone data as a file dump, you will want to select “File Dump” instead of “Image” when completing the setup options, then browse to the folder containing the dumped data.

Once the desired image is loaded, we can then analyze it just like any other IEF examination. Be sure to select all the artifacts you wish to search for and include any case details relevant to your investigation. IEF will run its search and load the results into IEF Report Viewer for analysis.

From the Report Viewer, results will be sorted and categorized for the investigator. In addition to retrieving data from native applications, IEF will also pull artifacts from third-party apps installed on the device.

Find More Mobile Evidence When You Use IEF & Cellebrite’s UFED

Forensic investigators must be prepared to acquire images from a range of mobile devices; then analyze them to find both native and third-party app data. The more effective your workflow and toolset is at all stages of an investigation, the more chance you have of finding more mobile evidence.

We challenge you to use your acquisition tool of choice (like Cellebrite’s UFED) with IEF, and see what you get!

As always, please let me know if you have any questions, suggestions or comments. I can be reached by email at jamie(dot)mcquaid(at)magnetforensics(dot)com.

Here are some related resources you might be interested in:

  1. Read the next blog in our series: How to Use IEF and Cellebrite to Find More Evidence on iOS Devices
  2. See IEF’s Mobile Module in Action: Attend a Demo
  3. Try IEF and our Mobile Module for Free:

Jamie McQuaid
Forensics Consultant, Magnet Forensics

How To Use IEF and Cellebrite to Find More Evidence On iOS Devices

$
0
0

This is the third blog post in a series of three about using IEF and Cellebrite to get more mobile evidence for your digital forensics investigations.

In my previous blog post in this series, I explained how to find more mobile evidence on Android devices using IEF and Cellebrite.  Today, we’ll walk through the same steps for iOS.

Here’s the workflow we recommend:

With this in mind, here are step by step instructions on how to use IEF and Cellebrite together to acquire and analyze iOS devices including physical and logical acquisitions to get more mobile evidence.

Physical Acquisition

Cellebrite is able to physically acquire iPhone 4 devices or older using the Physical Analyzer software installed on your examination machine. To begin the acquisition process, open the software and select “iOS Device Extraction” under the “Extract” folder.

A tutorial will begin that will walk you through the acquisition. Follow the detailed instructions noted on the screen to enter recovery mode, load the custom bootloader, and begin the extraction.

Once everything is loaded and prepared, the physical extraction will begin.

Once the extraction is complete, you will be given a .ufd file containing details about the device and search results. Instead of using a bunch of fragmented .bin files like Android physical extractions, Cellebrite creates one large .img file for iOS devices which can be loaded into IEF for analysis.

Logical Acquisition

Similar to the Android acquisitions, Cellebrite has logical options for file system extractions (copying an entire file system) and file dumps (copying only relevant user data such as call logs, contacts SMS, pictures, etc.). As mentioned before, logical acquisition is the only option for obtaining an image from an iPhone 4s device or newer. Like Android logical acquisitions, Cellebrite uploads software to the mobile device in order to pull down the requested data.

For a file system extraction, all logical data is pulled down from the iOS device by Cellebrite and presented in several files noted below. In this example, I have logically imaged an iPhone 5. All of the contents are stored in zip files and depending on the size of the acquisition, you may notice several other zip archives ending in z01, z02, etc. These files are fragmented into 2GB chunks in order to support file size limitations of certain file systems such as FAT32. You will also find a .ufd file which contains acquisition details created by Cellebrite.

When conducting a file dump from an iOS device, Cellebrite will recover data pertaining to SMS, call logs, pictures, etc. The results will also include backed up data, as well as several html reports detailing the results of the recovered data. Pictured below are the results I obtained from performing a file dump on the same iPhone 5 used for the file system extraction.

At this point, we can take our images (in whatever form we chose) and input this data into IEF for a detailed analysis and recovery.

iOS Analysis with IEF

To begin your analysis, upload the newly created Cellebrite image into the IEF. If you created a physical dump, you will need to use the .img file created during the physical acquisition. If you created a logical image, add the first zip archive from the file system extraction or load in the relevant files from the file dump that you wish to examine.

Once IEF is open, select “Mobile” and choose “iOS” as the operating system. For a physical or file system extraction, select “Image” as your source. This will allow you to select either the .img file from a physical acquisition or the .zip archives from a file system extraction. For a file dump, you will instead choose “File Dump” and select the relevant folder. After your image is loaded, you can proceed to select which artifacts you wish to search for in iOS and enter any case details necessary. Finally, you can select the “Find Evidence” button in IEF and being your search.

Once your search is complete, you can analyze the data just like any other investigation with IEF. The artifacts will be extracted and categorized for the investigator and all the details will be sorted into columns for easy analysis and organization.

Find More Mobile Evidence When You Use IEF & Cellebrite’s UFED

Forensic investigators must be prepared to acquire images from a range of mobile devices; then analyze them to find both native and thridy party app data. The more effective your workflow and tool set is at all stages of an investigation, the more chance you have of finding more mobile evidence.

We challenge you to use your acquisition tool of choice (like Cellebrite’s UFED) with IEF, and see what you get!

As always, please let me know if you have any questions, suggestions or comments. I can be reached by email at jamie(dot)mcquaid(at)magnetforensics(dot)com.

Here are some related resources you might be interested in:

  1. See IEF’s Mobile Module in Action: Attend a Demo
  2. Try IEF and our Mobile Module for Free:

Jamie McQuaid
Forensics Consultant, Magnet Forensics

Speeding Up the Investigation of Employee Policy Violations

$
0
0

If you’re a forensics professional working in a corporate environment, investigating employee policy violations like time theft or inappropriate use of the Internet tend to be a part of your everyday work.

While these investigations are critical to protecting your company’s assets and interests, they can be repetitive and time consuming, and you’d like to find a way to get them off your desk (in less time).

By watching this webinar, you’ll learn tips & tricks to help you identify if an employee has been:

  1. Accessing inappropriate websites like pornography or gambling
  2. Misusing company time
  3. Using company resources for personal benefit

Investigating Mobile Dating Applications in the Tinder Age

$
0
0

This is the second blog post in a series of six about the new features included in IEF v6.5

Investigations involving mobile devices have greatly increased over the past few years. In a recent blog series, we discussed how third-party mobile chat applications contain a wealth of evidence that can make or break your case. But over the last few months, a new type of social networking/chat application has emerged in popularity: the location-based mobile dating application.

Tinder, Grindr, Growlr and other apps that promote dating and meeting random people within your geographical area have become very popular with teens and young adults. Some call these applications geo-social networking apps, or lifestyle apps, and while they each have their own functions and features, typically these apps contain an element of IM/chat, picture and file sharing, and geolocation details to determine your proximity to the individuals you’re interacting with.

These apps were never intended to be used maliciously, but given their rise in popularity, they have made headlines around the world for facilitating dangerous situations:

Philadelphia police issue safety warnings to Grindr and Tinder users 

Waukesha man arrested on suspicion of sex assault of 12-year-old

This post will touch on a few of the more popular location-based mobile dating apps, and will show you how to recover valuable data from these types of applications.

Tinder

Tinder is a very popular matchmaking app that uses your Facebook profile to present pictures and information about you to people within a specified radius of your current location (using your phone’s GPS). Users are presented with pictures of potential matches in their area and they can choose whether to swipe right and accept them as a match, or left to deny. If the other person also accepts you as a potential match, then you are able to start chatting.

Most people will agree that there are risks involved with meeting people online, especially when your location is included. Tinder does not provide your exact location, but it will list the distance of someone within your given radius. Forensically, if you’re ever tasked with examining a device with Tinder installed, there are a number of items that you can recover for your investigation.

Like many mobile applications, the majority of your data will be found in SQLite databases. For iOS devices the data can be found in Tinder2.sqlite at the following path:

Private\var\mobile\Applications\Library\Application Support\Tinder\Tinder2.sqlite

Similarly for Android devices, the SQLite database is called tinder.db and the path can be found below:

/data/data/com.tinder/databases/tinder.db

Both databases are similar in structure and will typically contain quite a bit of valuable data. There are a few tables in particular that you will want to investigate, including the messages, matches, photos, and users tables. The screenshot below shows how the tables and messages columns are sorted for an Android Tinder database.

With the release of v6.5, IEF is now able to analyze Tinder artifacts for both iOS and Android devices. The four main categories of artifacts recovered are accounts, matches, messages, and photos.

Account data will include details about the Tinder account owner including a unique user ID, a biography, birth date, distance (which is always 0 for the account owner), gender, first name and last activity date. Matches refer to anyone who has agreed to be a match with you (as described above). IEF will recover match data, including user ID, username, gender, creation and last activity timestamps, message count, any draft messages, and whether they have viewed your profile or not. Tinder messages are pretty straight forward and similar to any mobile chat application. IEF will provide the user ID, match ID, message contents, and message sent timestamps. Finally, IEF is also able to assist in recovering Tinder photos. The photos themselves are not stored on the local device, but they are stored online at images.gotinder.com. If your examination machine is connected to the internet, and you have enabled image downloading in IEF, the software will automatically download the Tinder photos to your case.

Tinder is a widely popular app, but as with any social networking or matchmaking app, it contains a level of risk that user’s must be aware of. If you ever come across an investigation involving Tinder on either iOS or Android, IEF is an excellent tool to help recover the relevant data for examiners.

Grindr/Growlr

While popular, Tinder isn’t the only matchmaking application available on mobile devices. Grindr and Growlr are location-based apps similar in function to Tinder and other mobile dating applications, but are geared towards the gay and bi-sexual communities. Similar to Tinder, these apps promote meeting random people in your geographical area and can pose risk to the people who use them.

From a forensics standpoint, much of this data is stored in SQLite databases. Grindr and Growlr data can be found in the following locations for iOS and Android devices:

Grindr

iOS – /mobile/Applications/%GUID%/Documents/chatdb.sql

Android – /data/data/com.grindrapp.android/grindr.db

Growlr

iOS – /mobile/Applications/%GUID%/Documents/db.sqlite

Android – /data/data/com.initechapps.growlr/*.db (the database name is different based on user)

IEF will recover the messages, buddies (contacts), notes, etc. for both Grindr and Growlr for iOS and Android devices. The results are organized for the examiner in a report that is easy to read and sort through.

Both Grindr and Growlr are relatively easy apps to analyze, if you know where to look. The biggest challenge is building awareness amongst examiners so they understand how these apps operate and what evidence can be recovered.

Meet24

Meet24 is another location-based mobile dating and chat app rising in popularity amongst teens. Unlike the other apps discussed here, Meet24 does not use the SQLite databases to store its data. The app is a basic frontend for mobile browsers, meaning very little information is stored on the local device beyond some basic browser artifacts.

For Android, Meet24 will store some cached browser data at the following location:

/data/data/com.wildec.meet/cache/webviewCacheChromium

Support for this app was added to IEF v6.5 at the request of some of our law enforcement customers, who were investigating an increasing number of cases involving Meet24. IEF can retrieve cached pictures and website visits from acquired devices, but since much of the data for this app is stored directly on the Meet24 service, investigators may want to reach out the app developers directly to access additional data.

Snapchat

Snapchat is a photo and video sharing application allowing senders to define how long a recipient can view the message, before it disappears. While Snapchat isn’t necessarily a matchmaking or dating application, many users will often meet over Tinder and continue communicating through Snapchat or similar services. This allows users to send photos, or snaps, which will then disappear from a user’s device.

Unfortunately for the user, much of this data can be recovered from both iOS and Android devices. iOS will reveal only a limited amount of data, however when analyzing Snapchat artifacts on an Android device, examiners are able to recover quite a bit more data. The data is found at the following path:

/data/data/com.snapchat.android/databases/tcspahn.db and /cache/received_image_snaps/.

IEF is able to recover chat messages, logs, friends, pictures, videos, as well as a log of any snaps that were sent by the user.

Looking a little closer, we are able to see a wealth of information from these Snapchat artifacts, including message contents, timestamps, sender, receiver, as well as a number of options and statuses for the message.

Similarly, when looking at recovered pictures and video, Snapchat stores both the logs and images, which can be recovered. You will not always be able to recover the actual image but there should at least be a log of the activity found within the database. The extension for any pictures changes to .jpg.nomedia, but can still be easily recovered from the received_image_snaps path.

Due to the increased popularity of these mobile dating apps, it is quite likely forensic examiners will come across application data for Tinder, Grindr/Growlr, or Snapchat in their investigations. It is essential for anyone investigating these types of cases to be aware of the popular apps frequently used and the data that can be recovered. You can never be sure when a message, picture, or video recovered from one of these apps could be the deciding factor in your investigation.

Please let me know if you have any questions, suggestions or requests. I can be reached by email at jamie(dot)mcquaid(at)magnetforensics(dot)com.

Here are some related resources you might also be interested in:

  1. Read the next blog in our series: Recovering Live Systems Artifacts with IEF
  2. New to IEF: Request a 30-day trial
  3. Current customers: Upgrade to IEF v6.5 

Jamie McQuaid
Forensics Consultant, Magnet Forensics

Recovering Live System Artifacts with IEF

$
0
0

This is the third blog post in a series of six about the new features included in IEF v6.5

The collection of volatile data has become an essential component of a forensic examiner’s processes. While traditional forensic practices have always focused around avoiding any modification of evidence in order to preserve the integrity of the data, this is no longer an option for many investigations. Capturing memory and other live system artifacts is essential to understanding the activity on a system, and can sometimes be the only source of relevant evidence for a case.

Many times, I have worked on malware or intrusion cases where the only evidence found on a live system was in memory. If I had followed the traditional forensic practices of shutting down the computer, I would have destroyed the only clue to understanding how the infection took place.

Internet Evidence Finder (IEF) has had a Triage product for quite some time to assist in analyzing live systems when working in the field.  New with version 6.5, IEF’s Triage capabilities have been re-packaged as an add-on module that includes even more functionality (including the recovery of live system artifacts) that can assist investigators perform live system forensics and collect and analyze volatile evidence.

When it comes to live system artifacts, IEF can now collect data for any logged on user, network connections and interfaces, running processes, scheduled tasks, and services.

Logged On Users

The first live artifact that we’re going to look at is “Logged On Users”. As the title suggests, this will report details on any users that are logged into the system when the search was conducted. IEF will report the following information:

  1. Account Type
  2. Account Status (eg. Disabled, locked out, local or domain,
  3. Domain (or hostname if not connected to a domain)
  4. User name (first and last)
  5. The user’s SID
  6. Logon Type
  7. Password Information (Change, Expire, Required)
  8. IP Address
  9. Installed Timestamp
  10. Last Login Timestamp
  11. Artifact capture Timestamp

Network Connections

Next, we have network connection which can be quite valuable when investigating malware or intrusion cases. IEF will report all TCP and UDP connections for any IPv4 and IPv6 interfaces found on the system. Both the local and remote IP and ports are reported along with the state, process, and program that is using the connection.

Network Interfaces

The next artifact is Network Interfaces. IEF will list all network adapters found on the system including Ethernet, wireless, Bluetooth, virtual adapters, and many others. The example below shows the details that are reported by my local Ethernet adapter. Depending on the type of adapter, IP addresses, MAC addresses, and DHCP settings (including gateway, DNS, and lease timestamps) are all reported in a clean, easy to sort manner.

Running Processes

Running processes are another excellent artifact when investigating a malware or intrusion case. IEF will report the process, description, path for the executable, process and parent process IDs, user, timestamps, and several other artifacts of potential value to investigators.


Scheduled Tasks

IEF will also list all the scheduled tasks which are reported by a Windows system. Below you can see that it will collect the following items:

  1. Task Name
  2. A description of the task
  3. The status of the task
  4. The trigger or frequency of the selected task
  5. Timestamps for the next and last run date
  6. Results for the last time the task was run
  7. The action to be performed
  8. The privilege level for the task
  9. Additional options and settings
  10. Whether the task is hidden or not
  11. Who created the task
  12. When the task was created

Services

Finally, we have services. IEF can now report on any services on the system and their current status. Pairing this information with the other live artifacts previously mentioned helps identify unknown activity on a user’s system.

With support for these new live artifacts, examiners will be able to collect more volatile data quicker, and avoid running multiple tools when triaging a live system. By grouping many of these artifacts together, investigators can piece together events for an incident to understand how a potential intrusion occurred. For example, by identifying an unknown network connection and linking that to a given process, investigators can easily discover potential malware.  Or, by looking at the scheduled task which is a common persistence mechanism, examiners can identify how malware survives a reboot.

If you’d like to see all of the features of our new Triage Module, you can read more here.

Please let me know if you have any questions, suggestions or requests. I can be reached by email at jamie(dot)mcquaid(at)magnetforensics(dot)com.

Here are some related resources you might also be interested in:

  1. Read the next blog in our series: Improved Analysis Features in v6.5
  2. New to IEF: Request a 30-day trial
  3. Current customers: Upgrade to IEF v6.5

Jamie McQuaid
Forensics Consultant, Magnet Forensics


Improved Analysis Features in IEF v6.5

$
0
0

This is the fourth blog post in a series of six about the new features included in IEF v6.5

With the release of IEF v6.5, we’ve added a number of key features to help you analyze evidence more efficiently. In this blog post, I’ll highlight some of the main features and demonstrate how they can help with your current investigations.

Added Hashing Support

Earlier this year, we introduced hashing support to IEF, allowing investigators to easily categorize known files or import Media Hash sets into their cases. With the release of IEF v6.5, we’ve expanded our hashing support by providing users with the ability to add File Hash sets.

In particular, you can now import hash sets from the National Software Reference Library (NRSL) Whitelist, which is hash values that represent known-good operating system files. .  The NSRL Whitelist is commonly used by forensic practitioners to eliminate unaltered standardized files from an investigation.  The latest NSRL release includes hash values for many Windows operating systems and other applications.  Adding this hash list to the File Hash Sets within IEF will filter out  files known not to provide evidentiary value, dramatically reducing the amount of data recovered you will need to analyze.

Bookmarking Comments and Tags

With the release of IEF v6.5, users will now be able to add text comments and/or tags to bookmarked artifacts. This increased functionality allows you to better manage your evidence for quicker review and reporting.

Bookmarking, tagging and adding comments to individual artifacts allows you to effectively keep track of evidence and create reports based on the particulars of your case.  For instance, users could use bookmarking tags to track and manage evidence relating to a particular suspect.  Investigators can then sort bookmarks by tag to quickly and efficiently analyze evidence that relates to a particular grouping. By incorporating comments, investigators can share important insights on bookmarked artifacts.  For an in-depth look at bookmarking and tagging in IEF, check our blog on Adding Tags & Comments to Bookmarks in IEF Report Viewer.

Timeline Improvements

A number of new capabilities have been added to IEF’s Timeline feature to make artifact analysis easier. When viewing data in Timeline, users can simply click on an artifact to instantly view the artifact in Report Viewer. This allows investigators to quickly access additional information, about a particular file, that is not available within the Timeline View.

We have also included the tagging and comment functionality in the Timeline view.  Similar to the bookmarks, the tags and comments created within Timeline will automatically be added to the case in Report Viewer.

Finally, users can now hide individual columns of data within Timeline, allowing them to exclude non-relevant data and focus only on artifacts important for their case.  There are two methods for hiding individual file columns from the Timeline Users can either access the “Show and Hide Columns” option in the Tools menu, or right click on the individual artifact column (listed in the All Results section) and add that column to the Hide Column list.

Multi-level Searching

We have added multi-level searching capabilities to IEF, a feature that many  of our customers have asked for.   Prior to v6.5, users were limited to  conducting only single keyword searches.. Investigators can now run multi-level searches, meaning they can use the results of an initial keyword search to run a subsequent search.  This can be done by adding a list of keywords in the Tools/Search area, or by adding a single keyword to the search box.

Once you run an initial keyword search in IEF, a new Search Hits window will appear with your results. From here, you can now run a secondary search by adding a keyword into the search bar.  Conducting a secondary search will narrow down your search results and show only those the results that contain the initial and search results.

Please let me know if you have any questions, suggestions or requests. I can be reached by email at ryan(dot)duquette(at)magnetforensics(dot)com.

Here are some related resources you might also be interested in:

  1. Read the next blog in our series: Adding Tags & Comments to Bookmarks in IEF Report Viewer
  2. New to IEF: Request a 30-day trial
  3. Current customers: Upgrade to IEF v6.5

Ryan Duquette
Senior Manager of Forensics, Magnet Forensics

Adding Tags & Comments to Bookmarks in IEF Report Viewer

$
0
0

This is the fifth blog post in a series of six about the new features included in IEF v6.5

In the fouth blog post in this series, I highlighted all of the new analysis features included in IEF v6.5.  This post will go more in-depth into enhancements made to our bookmarking feature, that will allow you to effectively organize the evidence involved in your case, and present reports that are customized to your requirements.

Bookmarking and Editing Comments

We’ve had many requests to add the capability to comment on individual artifact entries that have been bookmarked in IEF Report Viewer.  With the release of v6.5, you can now bookmark an entry by right-clicking on it, then selecting ‘Bookmark and Edit Comment’.  This will automatically save the item, and allow you to comment on it.

Adding comments directly to an entry can be used for a variety of reasons:  you can add comments to highlight important information about a particular artifact, include additional information that may not be listed in the artifact details view, or leave a note for another investigator you’re collaborating with on the case. Here’s an example: 

When you share your findings with another investigator using IEF’s Portable Case feature (that allows them to see all recovered evidence in IEF Report Viewer), they can also edit the comments to add their thoughts, which makes collaborating with other stakeholders quick and painless:

Bookmarking and Tagging

When using IEF v6.5 to analyze evidence, you can now add customized tags to bookmarked items based on the evidence contained in your case.   Does your case involve two suspects?   Were there multiple people using the computer you’re analyzing?   Under these circumstances, creating custom tags for individuals, or for categories of evidence allow you to quickly sort evidence into manageable blocks of data.

Adding a Tag is easy:  all you have to do is right-click on the bookmarked item you want to tag, click on ‘Tag As…’, then add the item to a pre-existing category, or create a new one.   And if your evidence pertains to multiple suspects, you can tag an item into multiple categories.

In the below example, I’ve created tags for two suspects:

Sorting by Tags and Comments

There are multiple ways to quickly sort your evidence by the tag categories you created.   When you are viewing evidence within the bookmark view, one way is to sort items by Bookmark Tag.   This will show you all of the evidence in your case that has been tagged.   As you can see in the following example, you can also see the beginning section of any comments that may have been added to a bookmarked item:

If you want to get even more granular in your searching and viewing of tagged evidence, IEF v6.5 allows you to view only the evidence with a specific tag.

You also have the option to create reports that show all of the evidence related to a specific bookmark tag.   For example, if you wanted to create a separate report showing evidence that relates to one suspect, here’s what it could look like:

Timeline Tagging and Commenting

There are multiple ways you can use IEF Timeline for tagging and commenting on individual artifact entries.   You can create comments and tags within IEF Timeline the exact same way you can in IEF Report Viewer.   Right clicking on any individual entry within timeline allows you to choose to either “Bookmark and Edit Comment”, “Bookmark and Tag as.”, or if the item is already bookmarked you will have the options to only “Edit Comment” or “Tag As.”

Once again, you can tag items into one or multiple tag categories.   Similar to IEF’s bookmarking feature, any tags or comments you add to a bookmark, will be automatically transferred to IEF Report Viewer.

Another great option to view Timeline information on one suspect (or tag category) is to follow the steps mentioned above in the “Sorting by Tags and comments” by viewing evidence in relation to one (or more) tag.   Once you are viewing only one (or more) tags, you can then view a timeline for only that tag(s).

As shown above, the new Tagging and Commenting functionality offered in v6.5 is a dramatic advancement from the traditional Bookmarking features in earlier releases.   Tagging and Commenting allows you as an investigator to not only dive deeper into your evidence, but also to customize your reports based on categories of data important to your case.

Please let me know if you have any questions, suggestions or requests. I can be reached by email at ryan(dot)duquette(at)magnetforensics(dot)com.

Here are some related resources you might also be interested in:

  1. Read the next blog in our series: Recovering Evidence from F2FS File Systems with IEF
  2. New to IEF: Request a 30-day trial
  3. Current customers: Upgrade to IEF v6.5

Ryan Duquette
Senior Manager of Forensics, Magnet Forensics


Recovering Evidence from F2FS File Systems with IEF

$
0
0

This is the sixth and final blog post in a about the new features included in IEF v6.5

In Internet Evidence Finder (IEF) v6.5 we are now offering support for the F2FS file system.  The F2FS (Flash-Friendly File System) was originally created by Samsung and is still in development today.  The F2FS file system takes into account features of NAND flash-memory-based systems such as SD cards and solid state drives.  Currently, the F2FS file system is used on some versions of Motorola Moto G and Moto X mobile phones.  If you have tried to analyze one of these phones without software that supports F2FS, you would quickly realize that you won’t get a complete view of the important data.  F2FS is a unique file system that remains unsupported by almost all forensics tools today.

In previous versions of IEF you could run a search on a mobile image running an F2FS file system, but only at the Sector Level (since F2FS files systems weren’t officially supported).

With the release of IEF v6.5, support for the F2FS file system has been added, and it is now recognized as a source of evidence that can be searched.   You are given the option of conducting a Full Search (which is the default option), a Quick Search, or once again a Sector Level Search.

As you can see below, IEF will search the entire disk, recognizing the F2FS  file system and therefore search through various areas of the image.

IEF’s Dynamic App Finder will also try and recover artifacts from obscure or unsupported third-party mobile chat apps it encounters.

Here’s a screenshot of the artifacts that can be recovered by an IEF search from a mobile phone running an F2FS file system:

The team at Magnet Forensics takes great pride in identifying new technologies (like F2FS), and providing you with the best digital forensics tools to find and analyze evidence that could be critical to your investigation.

Please let me know if you have any questions, suggestions or requests. I can be reached by email at ryan(dot)duquette(at)magnetforensics(dot)com.

Here are some related resources you might also be interested in:

  1. New to IEF: Request a 30-day trial
  2. Current customers: Upgrade to IEF v6.5

Ryan Duquette
Senior Manager of Forensics, Magnet Forensics

Viewing all 1197 articles
Browse latest View live