Magnet AXIOM 4.0 introduced powerful new ways to customize and streamline your reports and exports, including new artifact export functionality to give you the flexibility to choose exactly which artifacts and columns to report on, and the ability to create export templates to allow for faster exporting on each case you work!
Since then, we’ve added several new great exporting features to help you better control how your exports are generated, communicate important details on your findings, and customize your reports based on the needs of the case and your stakeholders.
Improved Control Over Your Exports
Sometimes when exporting ZIP files, it’s useful to utilize a flat file structure from your point of export so that you don’t have to look through preceding folders to find the evidence you’re looking for. Other times, leaving the full folder structure intact is best if you’re looking to continue working with the export on other systems. Now, when exporting ZIP files from the File System view in AXIOM using the “save file/folder to zip” option, you can easily choose which is right for you!
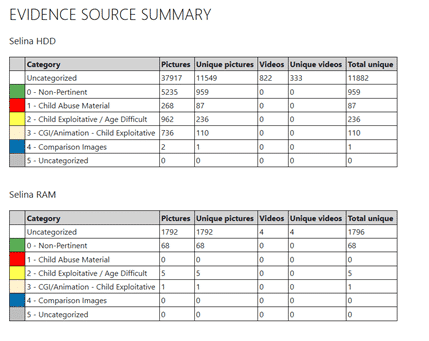
Review Categorized Media by Source
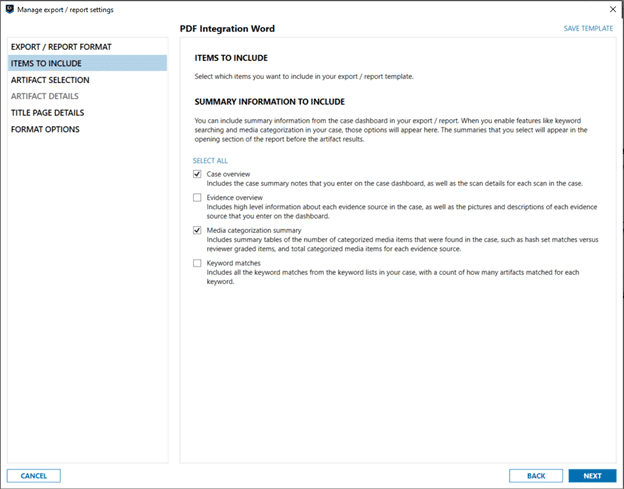
AXIOM’s Media Categorization Summary provides a quick reference of the pictures and video evidence you’ve categorized. This summary now also includes a section that summarizes the media found in the case per evidence source, so in situations where multiple media evidence items might be located across different sources, you can now easily see what media was found where!
Easily Collaborate with Stakeholders
Depending on the case and stakeholder needs, you may or may not wish
to include all the available evidence summaries in your reports – some
information may be deemed too sensitive or simply unnecessary for certain
audiences.
Even better, you can also use this feature on an ad-hoc basis or save your summary preferences as part of any export template for even more efficient workflows!
Get Magnet AXIOM 4.4 Today!
If you’re already using AXIOM, download AXIOM 4.4 over at the Customer Portal. If you want to see how AXIOM 4.4 can help you find the evidence that matters and clearly report your findings to your stakeholder, request a free trial today!
Hi! Jessica Hyde here to share a bit with you about creating Export Templates in Magnet AXIOM. If you are curious about learning about all the new reporting features we’ve recently added to AXIOM, you can check out this blog postand this video.
Create Templates
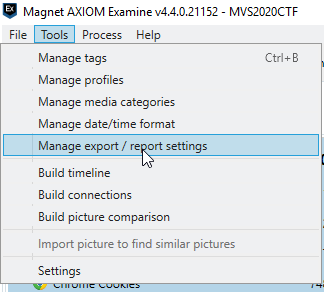
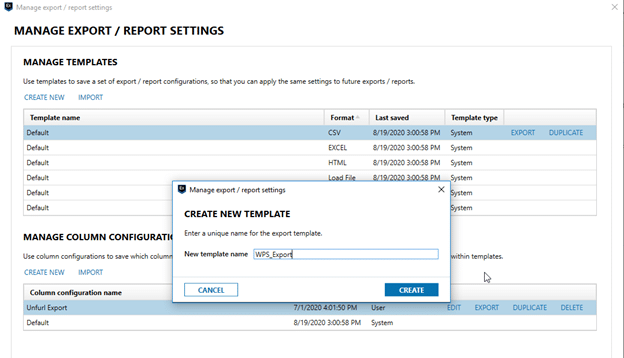
To create a custom export template in AXIOM, first go to Tools menu in the upper left of AXIOM Examine and select Manage export / report settings.
Next you will want to create a new report and name it. In my instance, I wanted to create an export for examiners to use to export URLs for use with MAGNET Web Page Saver, as mentioned in the Using MAGNET Web Page Saver blog. I am calling this WPS_Export.
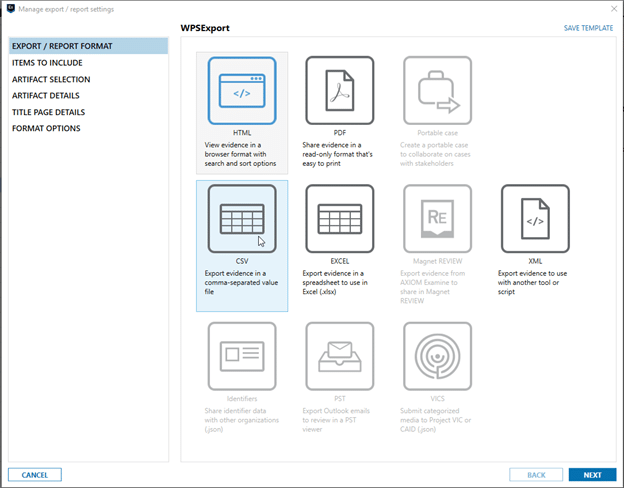
You will then be brought to a screen where you can select the type of report. As mentioned, we want to create a CSV export.
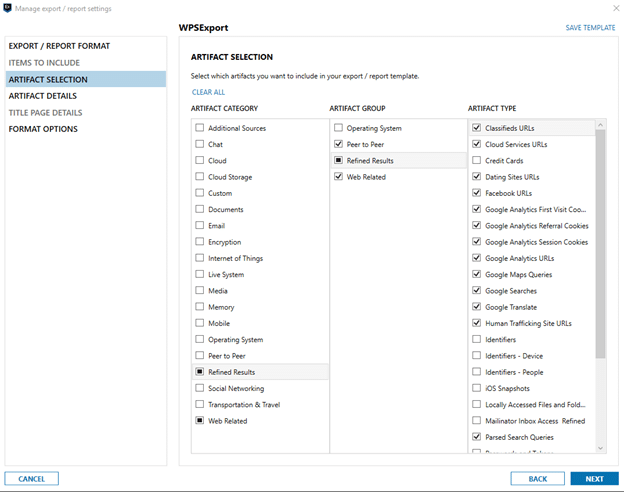
Next, we can select our Artifact categories. In this instance, I am concerned with Refined Results and Web Related because I am creating an export for use with WPS. So, we will deselect each of the other artifacts, and then deselect artifacts that do not contain URLs.
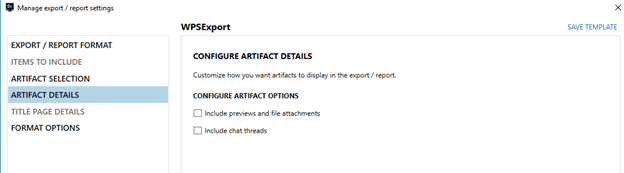
On the next screen we can decide if we want to include attachments alongside the CSV. In this instance, I do not want them so I will uncheck both the previews and file attachments as well as the chat threads.
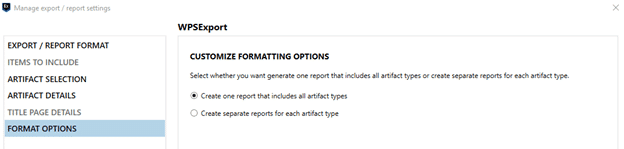
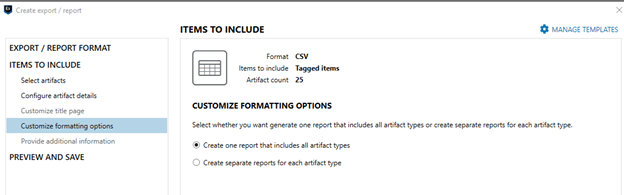
The final screen allows us to select if we will create one report that includes all artifact types or separate reports for each artifact type. In this instance, I am creating this export for ingestion into Magnet WPS, so I will select one report that includes all artifact types.
Now you have completed your report and you can click Save Template. Your template is now ready to for export, duplication, or further editing. If you export, you can share the resulting JSON with your colleagues or others.
In addition to
creating templates, you can also create different column configurations for columns
you wish to include and the order in which you wish to display them. You can
mix and match saved column configurations with different templates.
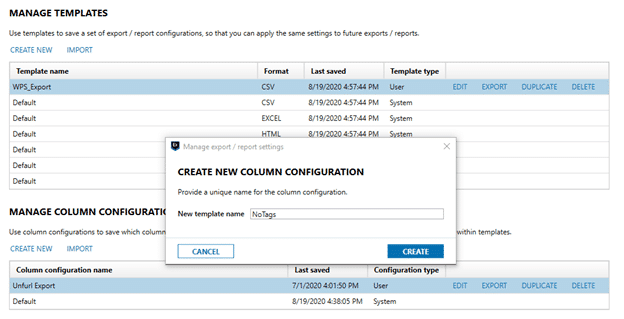
This time select CREATE NEW under the MANAGE COLUMN CONFIGURATION heading and name the template.
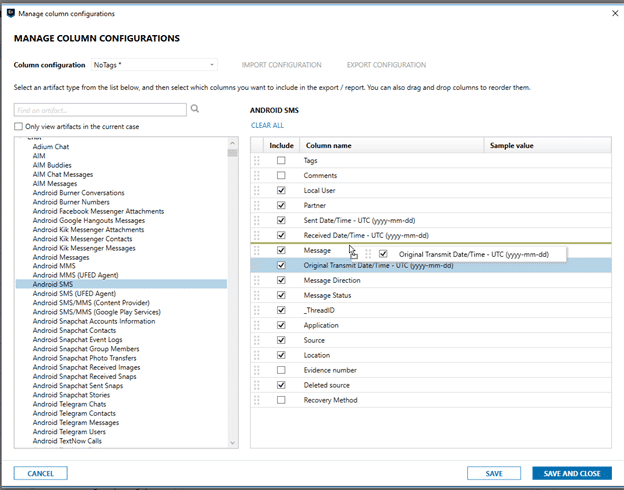
You will now have the option to include, exclude, and move columns as necessary for each column for every artifact. You can search for a specific artifact to edit, view only the artifacts in the current case, or edit each artifact individually—all changes are done in this screen, including reordering of columns as shown below by selecting the dots to the left of the column name and dragging the column to the desired location in the order. Once you are done, click Save and you will be able to export, edit, and duplicate the column configuration just as you did with the template.
Templates can be used to create exports for data ingestion into other tools like Web Page Saver as well as to have common reporting standards for your organization. The ability to have multiple templates allows for the use of different templates for different stakeholders.
I hope this helps with creating custom exports and templates for your organization! If you have any questions or comments, feel free to email me at jessica.hyde@magnetforensics.com.
Hi! Jessica Hyde here to share with you about how to take URLs of interest from Magnet AXIOM for capture with MAGNET Web Page Saver (WPS). MAGNET Web Page Saver is a free stand-alone tool that allows you to navigate to web pages and save the results. You can learn more about MAGNET Web Page Saver in this Tips and Tricks session with our CTO and Founder, Jad Saliba.
This post focuses on exporting content from Magnet AXIOM for use in MAGNET Web Page Saver. The full detailed workflow finding web pages of interest in a case, tag and export those results, capturing those web pages with WPS, and bringing the results back into AXIOM for combined reporting and analysis is demonstrated in this video by Tarah Melton.
This whole workflow may not always be needed—in some instances, you may start the case, export the results to view in WPS and those saved screenshots may be all that is needed. In other instances, you may be conducting searches with WPS to add other elements to a case that exists or a new case.
Identify Websites of Interest and Export
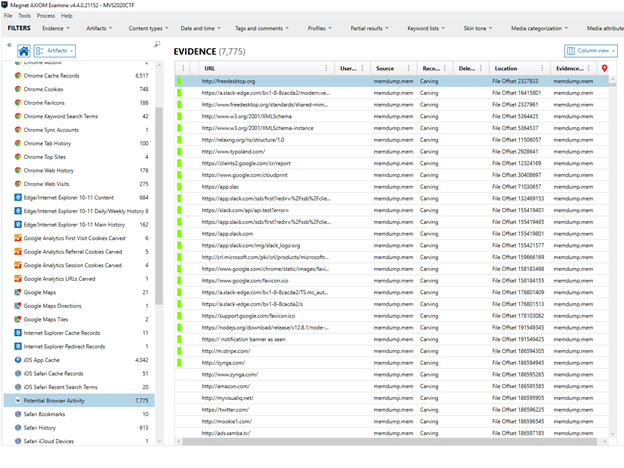
First, you will want to tag any artifacts containing URLs of interest in AXIOM—this could include both Web Related artifacts and/or artifacts in Refined Results. In this example, I tagged several URLs from a memory image from the Potential Browser Activity category.
Figure 1- Tagging relevant web artifacts in AXIOM
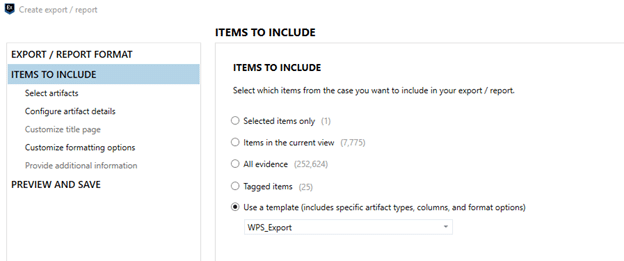
Once you are done, you will want to export these URLs so that they can be imported into WPS. WPS allows for the ingestion of delineated files. For this purpose, we can use a CSV export. In order to do this, I am using a custom export template. Directions on creating your own export templates can be found in this post. Alternatively, you can create a report and create a CSV export for these artifacts as demonstrated by Tarah Melton in this demo video showing how to use AXIOM with WPS.
Figure 2- Using the WPS_Export template
First select the template—the template will automatically apply the appropriate artifacts. Then, you can select tagged items and, if applicable, the tag you designated for URLs you wished to export. By selecting the template first and then selecting tagged items, AXIOM will select only the artifacts identified in the export. If you are a Magnet AUTOMATE customer, you can use this export template in your automation.
On the next screen,
you have the option to configure artifact details and columns. You can leave
the defaults here. The template already knows to not include attachments and
threads. Magnet WPS knows to ignore columns with other content, so you can
simply leave this setting as “All columns”.
On the next screen, select “Create one report that includes all artifact types.” Save the report and you are ready to bring the results into WPS.
Figure 3 – Exporting one CSV for use with WPS
Bringing WPS Export into WPS
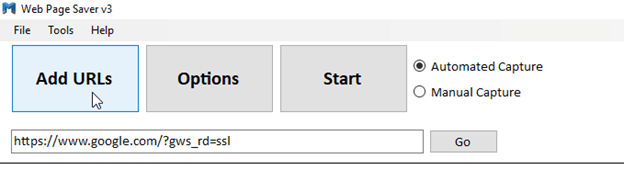
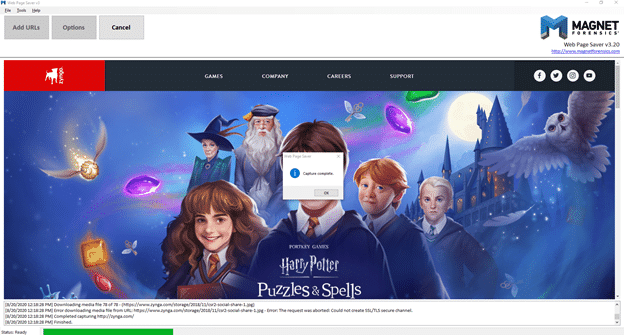
Once you have your export you can now bring it into Magnet Web Page Saver. In WPS, Select Add URLs to get started.
Figure 4- Selecting Add URLs in WPS
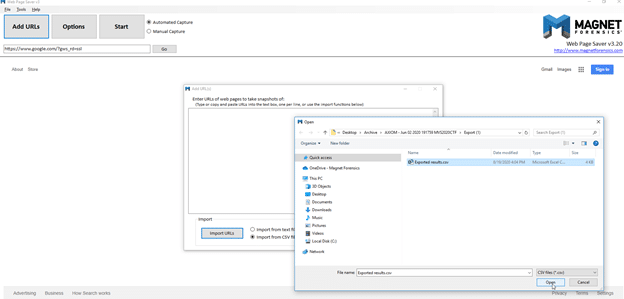
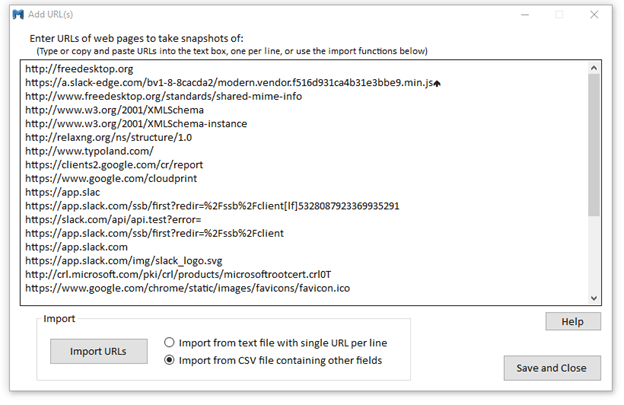
A screen will pop up where you can manually enter URLs or Import URLs. We will select “Import from CSV file containing other fields” to add our export created in AXIOM.
Figure 5 – Adding AXIOM URL export to WPS
Next, select your file and hit Open. The URLs will be extracted from the export and will now display in your add URLs screen. If desired, you can add additional URLS to the bottom of the list. Hit Save and Close once this is complete. Next, WPS scans all the URLs you input and saves the content to the SQLite db.
Figure 6- URLs extracted from AXIOM export
Before hitting Start, you’ll want to verify your options. If you plan to bring your WPS results back into AXIOM, you will want to utilize the SQLite capture format. AXIOM will then be able to parse the resultant SQLite database.
Figure 7- Selecting SQLite
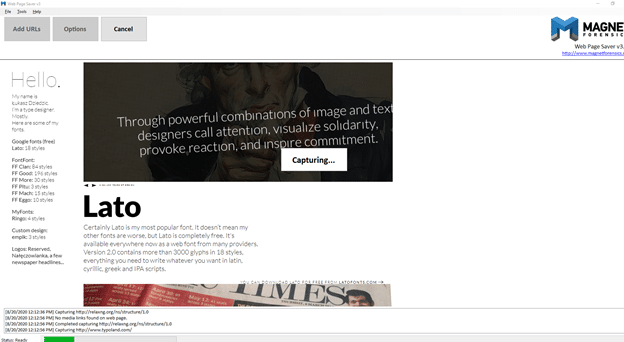
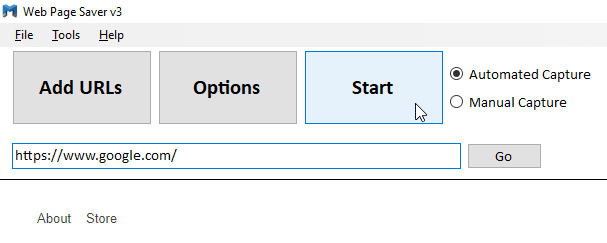
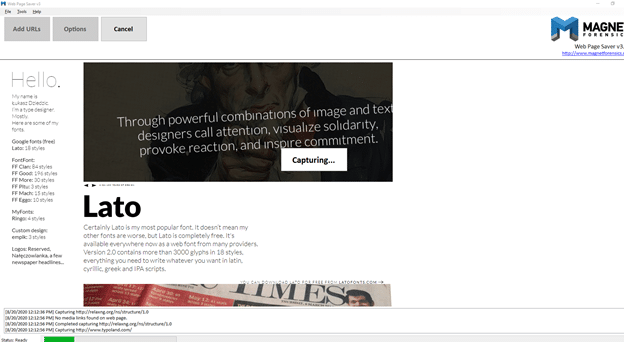
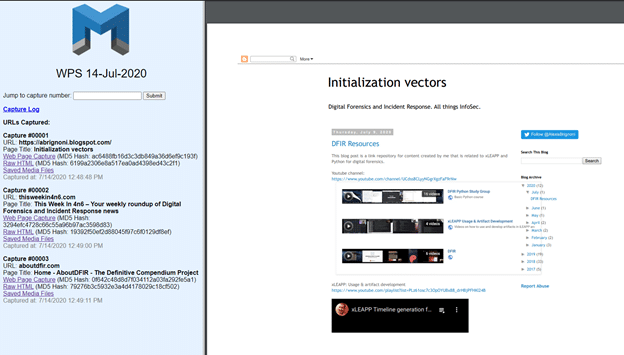
Now it is time to start the capture. Select Start with Automated Capture selected to begin the automated acquisition of all the web pages you requested!
Figure 8- Starting the acquisitionFigure 9- WPS capturing from a list of URLsFigure 10- Completed Capture in WPS
Want to see WPS in action? Download Magnet Web Page Saver for free and give it a try!
Want to bring these results back into the case? Check out the Ingesting Web Page Saver Results into AXIOM blog post for details on this process.
When using Web Page Saver with the intent of ingesting the results into AXIOM, you will want to utilize the SQLite capture format. AXIOM will then be able to parse the resultant SQLite Database. Before hitting Start, verify that the SQLite checkbox has been selected.
Figure 1- Selecting SQLite
Now it is time to start the capture. Select Start with Automated Capture selected to begin the automated acquisition of all the webpages you requested.
Figure 2- Starting the acquisition Figure 3- WPS capturing from a list of URLs Figure 4- Completed Capture in WPS
Bringing WPS Results into AXIOM
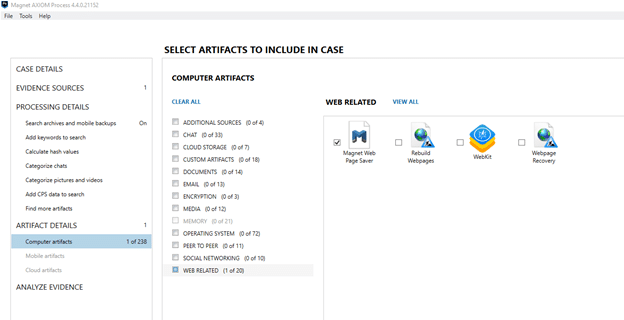
AXIOM 4.4 introduces an artifact specific to parsing Web Page Saver results that were saved as a SQLite DB. You can introduce these results as a source to a new or existing case. Load this source as Computer > Windows > Load Evidence > Files and Folders > File Browser. Then select your SQLite DB. Once you get to artifact details, ensure you are using the MAGNET Web Page Saver artifact—this should be the only artifact necessary for processing this source.
Figure 5- Selecting the Magnet Web Page Saver Artifact in AXIOM
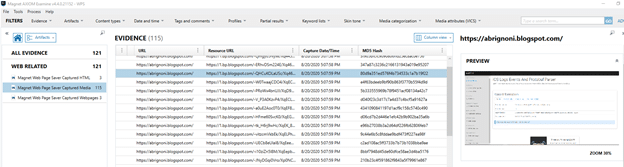
Examine will then open and you will see your MAGNET Web Page Saver results in the Web Related artifacts in AXIOM. You will see three separate artifacts: MAGNET Web Page Saver Captured HTML, MAGNET Web Page Saver Captured Media, and MAGNET Web Page Saver Captured Webpages.
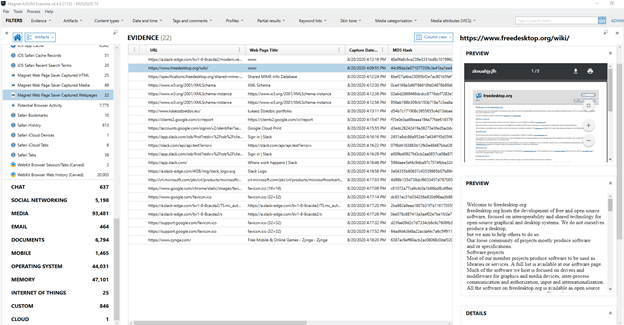
The MAGNET Web Page Saver Captured Webpages artifact will display the preview of the web page, extracted text, URL, and the Captured Date and Time. The capture date and time as well as the resultant MD5 hash may be valuable for the integrity of the data captured for the case.
Figure 6- Magnet Web Page Saver Captured Web Pages artifact
Want to see WPS in action? Download MAGNET Web Page Saver for free and give it a try!
Looking for a more complete workflow where you discover URLs of interest in AXIOM, export them for capture in Web Page Saver and then bring those results back into AXIOM to complete reporting and analysis? Check out this video from Tarah Melton that walks through the entire workflow:
I hope this post is helpful in your analysis of URLs! How are you using MAGNET Web Page Saver in your investigations? Feel free to reach out and let me know at jessica.hyde@magnetforensics.com.
Hi! Jessica Hyde here to share about some updates to Magnet Web Page Saver (WPS), our free stand-alone tool that allows you to save web pages. You can learn more about Magnet Web Page Saver in this Tips and Tricks session with our CTO and Founder, Jad Saliba.
We received a lot of requests for features during that Tips and Tricks session, and as a result made several improvements to WPS that we wanted to be sure to share with you! Some of these requests included adding an MD5 hash for the captured pages and support for Tor Connections.
MD5 Hashing of Scrolling Pages HTML and Saved Media
Figure 1- HTML Report of WPS containing MD5 hashesFigure 2- WPS results with Media Hash values in AXIOM
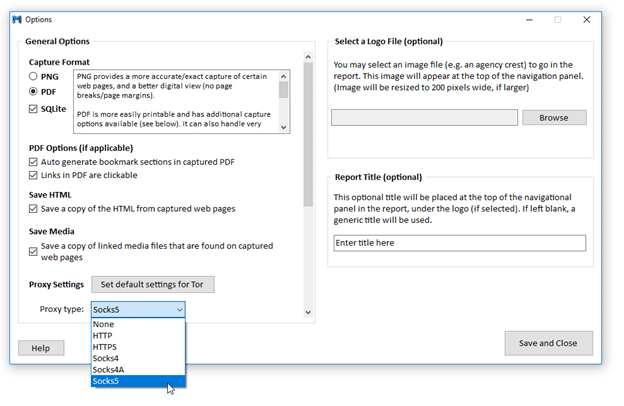
Proxy Support for an Active Tor Connection
Another requested feature was the ability to capture Tor sites. In WPS version 3.2, this capability can be found in the Options menu. From here, you can select the appropriate Proxy type in order to be able to capture these sites.
As investigators, part of our job includes providing an accurate account
on the evidence recovered from the incident under investigation. Including
details down to the look and feel of how a device is setup and how a user
interacted with it goes a long way in providing the context needed for our
casework.
In the
latest release of AXIOM, examiners now can quickly identify and report on how a
user had their applications arranged with the new iOS Home Screen Items
Artifact.
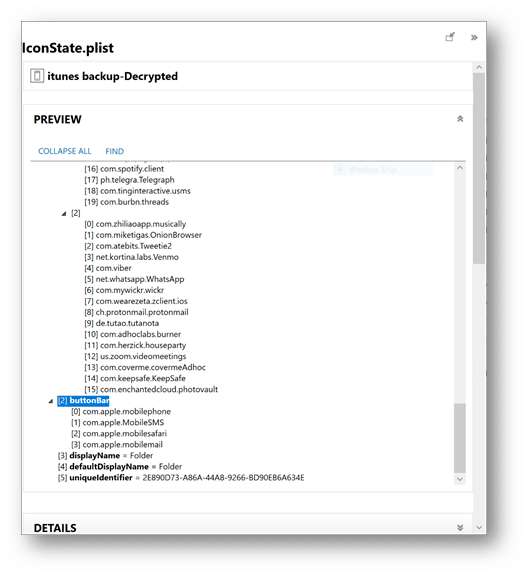
AXIOM will parse the iconstate.plist—which can be found in iTunes
backups, logical, or file system acquisitions—to provide the location of where
and how icons are located on an iOS device.
Examiners can find the plist manually here: private/var/mobile/Library/SpringBoard/ or by simply
clicking on the source link under the details panel from within the iOS Screen
Items Artifact.
The iconstate.plist also contains a key for the buttonBar, which provides information regarding what Apps are found on the device’s button bar.
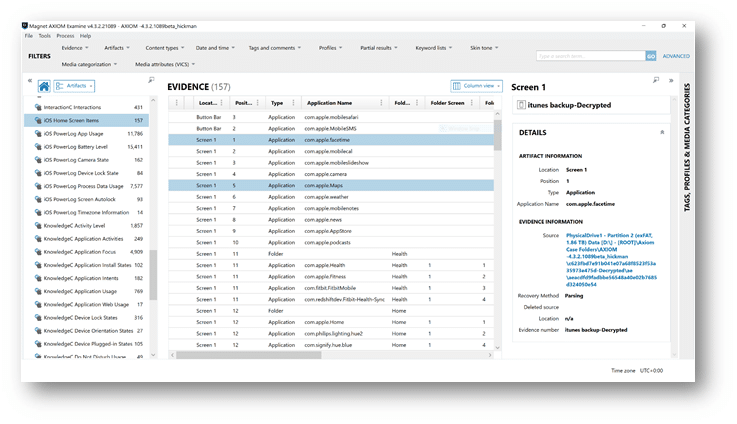
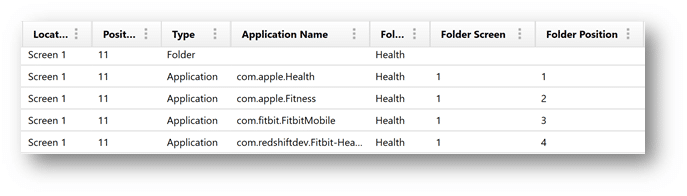
You can find the iOS Home Screen Items Artifact nested under the Operating System Artifacts. AXIOM will provide the examiner with the application name, location (button bar, screen 1, etc.), position, and whether or not it’s located in a folder.
As you can see in the image below, AXIOM will also list the folder with the applications nested inside and their position as well.
If you have any questions on this artifact, or have ideas for new artifacts you’d like to see added to AXIOM, please don’t hesitate to reach out to me at trey.amick@magnetforensics.com.
Malicious activity can devastate the infrastructure it infects, and so it is increasingly important to be able to first identify suspicious behavior so that you can begin remediating its affects. Unfortunately, the goal of malware is to blend in, go unnoticed, and hide from its target so that it can maintain its presence on the target endpoint. One potential way that some malicious actors try to accomplish this task is to manipulate the timestamps of the malicious file(s), a tactic known as timestomping.
The goal of timestomping is to edit the
timestamps being displayed and reported to the end user and incident responders
in an attempt to make it seem as though the file doesn’t fall into the timeline
of other detected malicious activity. When the incident responder starts
reviewing alerts, logs, and other artifacts from the infected machine, a
timestomped file might fall outside of the scope of investigation if the
timestamps are maliciously manipulated. The result could be an undetected
malicious file that can persist on the infected endpoint.
Often, though, this activity can be
detected by comparing multiple timestamps associated within the MFT record corresponding
to the file in question. The NTFS Timestamp Mismatch artifact, new in AXIOM 4.4,
attempts to give you a starting point in the incident response investigations
in which you suspect timestomping may have occurred. Here is how it works!
Within an MFT record of a file stored
within a NTFS endpoint, there are multiple sections, or attributes, that contain
various types of information about a file. For this new artifact, we will be
focusing on the $Standard_Information ($SI) and $File_Name ($FN) attributes. Both
sections of the MFT record contain sets of timestamps: Created, Accessed,
Modified, and MFT Modified.
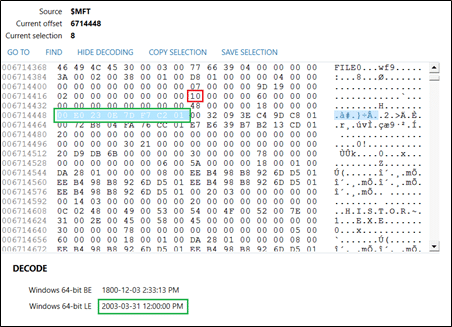
The $SI section of the MFT record is indicated with the value 0x10, as outlined in red below, and the Created timestamp is highlighted and decoded as well in green. The $SI timestamps are what Windows would display the end user as well as what most forensic tools will display as far as dates/times stamps in the File System view.
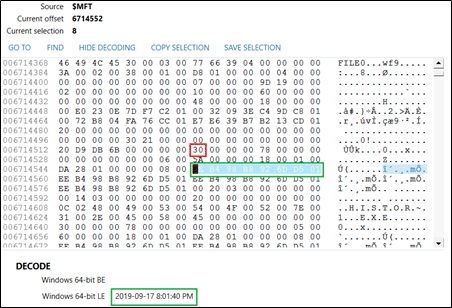
Outlined below in red, the $FN section is indicated with the value 0x30, and the Created timestamp is highlighted and decoded again in green as well. The $FN timestamps in the MFT record are only modified by the Windows kernel and will generally go untouched by antiforensic timestomping tools.
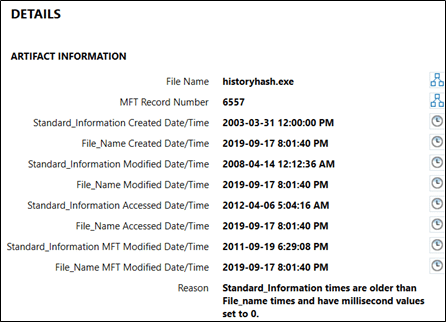
In the above example screenshots, the MFT
record is from a timestamp manipulated file, and you can see that when the
timestamps from both the $SI and $FN are decoded, the difference is worth
noting.
Now, in the NTFS Timestamp Mismatch artifact, AXIOM will automatically analyze both sets of timestamps for evidence of timestomping. Each artifact hit will give you both sets of timestamps, as well as a reason for the artifact hit.
First, this artifact will compare the
timestamps within the MFT Records of files in the file system from both the $SI
and the $FN attributes, and will flag a mismatch when the $SI timestamp is
earlier than the $FN timestamp. Additionally, this artifact will check to see
if the millisecond values in the timestamp are exactly zero, which can also sometimes
be a potential indicator that timestomping activity may have occurred on an
infected system. For a positive hit on this artifact, only one of these
criteria needs to be true, and the reason will be listed in the details panel
in AXIOM Examine.
Keep in mind that this artifact is disabled by default in AXIOM Process, so be sure to select it when processing if you believe that timestamp manipulation may have occurred on your Windows endpoint.
This artifact can help provide you with a starting point if you believe timestomping activity occurred on an infected system and allow you to properly timeline activity on your infected endpoint alongside IDS alerts, network logs, and additional artifacts in your case. Note, however, that there could be legitimate reasons from normal system behavior that could cause this mismatch, as well as ways that malicious activity can circumvent this timestamp difference (for example, as referenced in this MITRE blog).
Be sure to update to the latest version of Magnet AXIOM from the Customer Portal to get all the latest artifact support, including this new NTFS Timestamp Mismatch artifact! If you’re not already using Magnet AXIOM and want to give it a try, request a free trial today!
Magnet AXIOM 4.4 and Magnet AXIOM Cyber 4.4 are now available — upgrade today in-product or over at the Customer Portal.
AXIOM 4.4 introduces built-in artifact support for results
captured with our free MAGNET Web Page Saver tool, the ability to choose the
evidence summaries included in your exports, and several new and updated
artifacts — including Aloha Browser, Evidence of Timestomping, and iOS Screen
Layout.
New in AXIOM & AXIOM Cyber: Web Page Saver Artifact Support
Webpage captures can be another valuable source of evidence and context in your investigations. AXIOM 4.4 includes built-in artifact support for analyzing webpage snapshots captured with our free MAGNET Web Page Saver tool, providing you with a fast and easy way to add webpage data to your case!
You can now export URLs of interest in your case from AXIOM
into MAGNET Web Page Saver, capture the webpage data, and add your results back
into your AXIOM case file for analysis alongside your other evidence.
For more information on how you can use MAGNET Web Page Saver with AXIOM, check out this blog series from Jessica Hyde and how-to video from Tarah Melton:
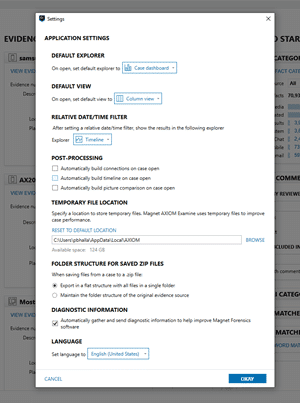
New in AXIOM & AXIOM Cyber: Choose the Evidence Summaries Included in Your Exports
Depending on the case and stakeholder needs, you may or may
not wish to include all the available evidence summaries in your reports.
With AXIOM 4.4., you can now choose which evidence summaries
to include in your HTML and PDF reports, allowing you to better tailor your reporting
for your stakeholders’ needs. Even better, you can also save your summary
preferences as part of any export template for even more efficient workflows!
For more on this feature—and other new export customization features we’ve recently added to AXIOM—check out this blog: Customize your Exports with Magnet AXIOM.
New Evidence of Timestomping Artifact
Malware is meant to blend in and go unnoticed so that it can
maintain its presence on a device. One way that bad actors try to keep their
malware hidden is to manipulate the timestamps of their malicious files, a
tactic known as timestomping.
With AXIOM 4.4, we’ve introduced a new Evidence of Timestomping artifact to help you detect potential timestomping. Check out this blog and how-to video from Tarah Melton for more details:
New iOS Screen Layout Artifact
Details on how a user has set up their device application
icons can provide insights into how a user interacted with their device, giving
you additional context for your investigation.
With our new iOS Screen Layout artifact in AXIOM 4.4,
examiners now can quickly identify and report on how applications were arranged
on a device.
Get Magnet AXIOM 4.4 and Magnet AXIOM Cyber 4.4 Today!
If you’re already using AXIOM, download AXIOM 4.4 or AXIOM Cyber 4.4 over at the Customer Portal. If you want to try AXIOM AXIOM Cyber for yourself, request a free trial today.
In Magnet AXIOM Cyber 4.0, we added the ability to quickly and covertly acquire evidence from Mac endpoints. While many customers rely on AXIOM Cyber for the deployment of the agent used for logically collecting files from endpoints under investigation, we understand the need for flexibility in how agents are deployed.
In this blog, we’ll review how to deploy an agent via command line from a Windows workstation to a Mac being investigated.
If you’re not already using AXIOM Cyber and would like to try it for yourself, request a trial today.
Why Use a Command Line Interface?
You may be wondering, if AXIOM Cyber makes it easy to deploy agents for remote acquisitions, why do I need to use a command line interface instead? Great question! We want to provide as much flexibility as possible for organizations when it comes to using our tools. Perhaps only IT or an End-Point Security Team has access to admin accounts and the authorization to utilize SSH capabilities. With the command line deployment approach, you can create and provide the agent to third-party teams, letting them deploy the agent while you then acquire and process the evidence.
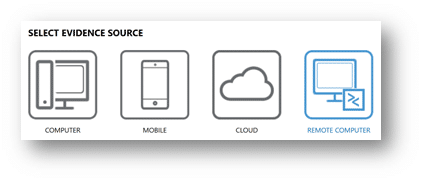
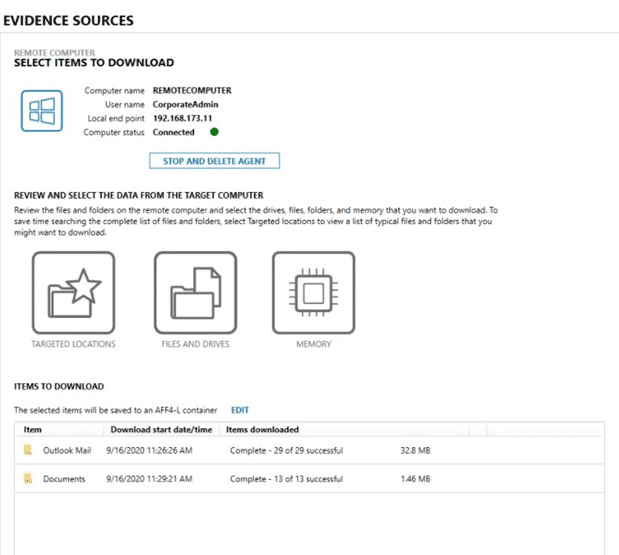
Once alerted that a Mac endpoint needs to be investigated, you’ll start by launching AXIOM Cyber Process and creating a new case. Now that you have a new casefile created, we’ll need to select your evidence source, which in this case will be REMOTE COMPUTER, as seen below.
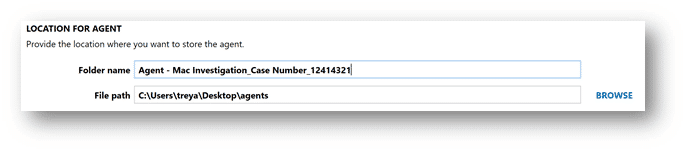
Next, we’ll create a new agent, making sure to select Mac as the operating system. In this exercise, I’m leaving the agent name as the default, Agent, however AXIOM Cyber gives examiners the flexibility to name the agent and include customized metadata as a part of the configuration process. Make sure to take note where you’re saving the agents created, as we’ll need to grab the binaries for the deployment. As you can see below, I have an Agent folder on my desktop setup as my default location to store agents created with AXIOM Cyber.
Now that you’ve created an agent, let’s deploy it using Command Prompt on Windows. In this example, I’ve simply placed the agent on my Desktop. It’s worth noting this agent was deployed to a T-2 based Mac with SIP enabled, running macOS Big Sur (Version 11 Beta). Also, keep in mind Remote Login needs to be enabled on the Mac you’re wishing to collect from. This can be enabled by navigating to:
Launch Command Prompt
cd
Desktop(or to where the agent is located on your local system)
dir (to confirm agent is listed)
Type: sftp user@host or IP
Enter Password
Once connected:
Type: put (drag the agent into CMD
prompt) then hit enter
Command Prompt should now show the agent being
uploaded.
Type: Exit sftp
At this point the agent has successfully been deployed to the Mac under investigation, but we still need to launch it.
From Command Prompt, type: ssh user@host or
IP(can also try ssh user@host /path/to/agent directly. If that fails agent
may not be executable. See steps below to make agent executable and manually
launch)
Enter password
Type: ls -l command to confirm agent is
listed and has RW and Execute privileges
if the agent wouldn’t launch you’ll need to
promote its privileges
Type: chmod 755 Agent
Type: ls -l to confirm updated privileges
Type: ./Agent
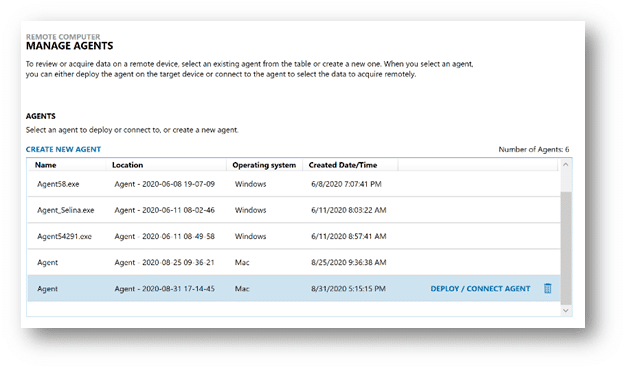
Once you run the last command the agent should successfully be launched and running covertly on the endpoint you’re investigating. At this point you’ll want to head back to AXIOM Cyber and select “Connect Agent” from the list of recently created agents as seen below.
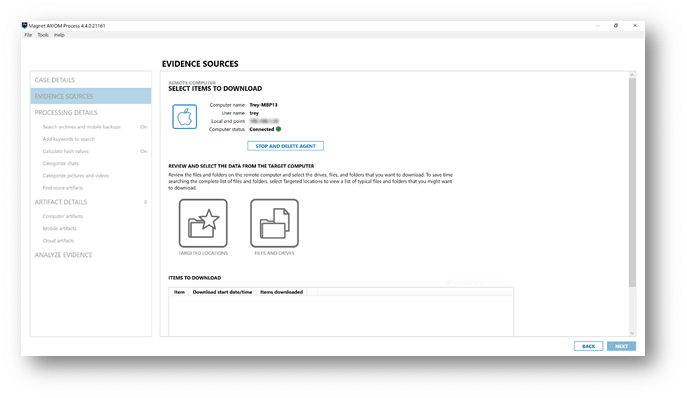
Once connected, simply select between Targeted Locations and/or Files and Drives to collect evidence needed in your investigation.
I’ve been working on a new set of applications but before I begin those, I wanted to take a detour around an application that we’ve all probably come across from time to time, but had often confused me on where and how it stored its data. This application is the “Files” app that Apple added in iOS 11. With iOS 13 (and iPadOS 13) there were several additional features including the downloads directory. Files has also added abilities to generate iCloud share links and collaborate on files on apps such as Pages, Numbers, or Keynote. In addition, third-party applications can also tie into the Files app for the quick access, sharing, and storage of Files on your iOS device. For more information about Apple’s Files app, see this link here.
In order to find the data for this app I decided to use some of my favorite tricks on an iPad I recently set up and jailbroke as per my recent research device post. The easiest place to find where the Files application SHOULD be storing data is to use one of two tricks:
In a forensic image, consult the applicationstate.db file to find the bundleID com.apple.DocumentsApp
From the above graphic, you can see that on this iPad we’re looking for the paths that track back to the listings for Data and Group. Interestingly enough, you can find some files saved on the device twice in these directories depending upon HOW the data got to the Files app.
Starting with the Containers/Data/Application path, there isn’t much there by way of the preferences. There is a folder within the Documents path called Inbox which proves interesting.
These files were sent via AirDrop to the iPad and then when dropped or “opened” with the Files app (as best as Files could). Files that were downloaded to the “On This iPad” location of the Files application were stored in a different location if they were NOT airdropped. Further testing than just the two files that I captured confirmed this. What is the “On This iPad” area?
But what happens if a file isn’t transferred to AirDrop? Where else can we find the data and the folders that are stored within here? In you look in the above graphic, you’ll notice a folder called “Cade.” How can we find this information? If we direct our attention to the AppID directory found within the Containers/Shared/AppGroup directory, we can find a database that can be of some assistance.
The root of this directory holds the database smartfolders.db. This database has several important tables. The filename table can reveal the files that are stored within the “On My iPad” area.
However, you may notice that some of the above files are… missing. So where are they? Well, I’ll get to that in a minute. First, let’s talk about that sneaky fp_folder_item table. What is that I spy in the BLOB data? It’s a binary plist, because, OF COURSE IT IS. Upon opening this, it’s actually an NSKeyedArchiver style (ew) one that can give us quite a bit of information about the info of the file.
By flattening, or deserializing, the Plist file, you can see lots of good info like creation and used dates, file path structure (Cade), and even if the content has been modified or a download has been requested! Awesome stuff!
The hotfolders table of the same database will also store information about the Application Libraries that are tied to the Files app’s On My iPad storage like Pages or Keynote.
Okay so now we know about the files, so where are they?! Turns out, they’re not going to be found (not all of them anyway) in any of the directories that were tracked by cda. To find this I turned to another awesome little dynamic analysis tool, fs-mon. Seriously, if you have a Jailbroken iOS device, go put fs-mon on it now! You can get it from here. After running fs-mon while interacting with some of the files in my Files app as well as using a good old fashioned: ‘find . -name Cade’ command I came across another separate location entirely.
You’re going to want to look for a Shared/AppGroup directory that references group.com.apple.FileProvider.LocalStorage. I would recommend instead of looking for this file, look for the folder “File Provider Storage” as it might be a little easier to find. Once there, THIS is where all the files you had stored locally on the “On my iPad” are going to be found. Here we can find the files that we had saved with their directory structure intact as well as a .Trash folder! Score!
This folder is holding the files that I deleted from the “On My iPad” section. Interestingly enough, they do NOT get put into the “Recently Deleted” screen on the Files app. In my testing, only the files that I had deleted from my iCloud Drive did that.
I think this is a good time to take about the iCloud Drive section. None of the previous paths that I have mentioned are going to have what is stored there. So what is stored there you ask? I’ll show you.
As you can see, some of the files have been downloaded locally and some have not. This will impact what information can be recovered relating to said files. The easiest way to find these files is to do a quick search against your filesystem (either using that ‘find’ command I mentioned earlier or with your tool of choice in your forensic image).
Reviewing this folder, you can see there is another .Trash folder to explore, the Downloads directory associated with files downloaded (by default) in Safari for iOS 13, and files that have been downloaded locally, namely OwlberyResume.pdf and UhOh.numbers. The other files within this directory that were kept as online only, instead have hidden files (. before the name) and the extension of .iCloud. These are nothing more than .plist files. The only information in these .plist files are the name and the size to be honest but interestingly enough that with this information we can track the names and sizes of all the files the user has stored in their iCloud Drive even if we don’t get the files themselves.
That path reminds me of how it’s done on the macOS system. So it seems to me we should probably check out /private/var/mobile/Library/Application Support/CloudDocs too, One there, you’re going to see a pretty close copy to the macOS variant of the same folder. The account.1 file will reveal the DSID or the numeric identifier for the synced iCloud Drive holder. By digging into the session/db folder, you can find the expected client.db and server.db databases that are going to hold information about the files uploaded to iCloud as well as the DEVICES that can upload to iCloud! Score! More information on the files that are being held and where else these files could have originated.
Looking for evidence of data exfiltration via iCloud Drive on the Files app? Check out the client.db’s client_uploads table. Very handy. How about that dropbox areas we saw tied to the iCloud Drive? AXIOM and other tools do a good job parsing out the Dropbox.sqlite database for the application. However, I want to take this a step farther. Reviewing the artifact in AXIOM we can see the data for “WorkDocs.dmg” here:
Hm, not bad, but I want to see if I can find the original file name associated with it. Reviewing the File Provider Storage folder like we did for the original Files app, we can find this:
Okay, getting closer. I can see that I have the numerical ID for this Dropbox user in the path, but that looks like BASE64 to me. So, CyberChef to the rescue! Heading over there and running the paths through a quick From: BASE64 recipe, I get back exactly what I want.
And you guessed it, inside that file is the WorkDocs.dmg in its original named glory. Still need to do some more testing to see if flagging a file directly in the location stores it different than flagging it for offline within the Dropbox app. However, I can say that from my testing the File Provider Storage directory only stored BASE64 values referencing files saved for offline storage from the Files app, NOT the Dropbox app’s “Make Available Offline” option. Also one last tidbit, when you delete a file from the Files app within the Dropbox, it deletes the file, but not the BASE64 name of the file as a folder.
Whew! Okay that might be one of the longer ones and was a lot of run to write and test! Got any more questions about the Files app? Let me know! I’m hoping to revisit it a bit at least to test the differences between live file system and iOS backups as I know that original version of iOS 13 had lots of juicy bits. Curious if Apple has shut any doors to us there but we’ll save that for next time!
This post was authored by Christopher Vance, Manager, Curriculum Development at Magnet Forensics. It also appears on his D20 Forensics Blog.
As you may remember, as part of the Magnet Virtual Summit, we hosted channels for our conversations with the forensic community by partnering with the Digital Forensics Discord Server for our industry talks. With the success of that, we decided that it makes sense to host a Magnet Forensics Discord Server so that we can address Magnet specific content in the same way!
We will be kicking off the Magnet Forensics Discord Server as part of our Virtually Together event on Sept 15-16. During each of the talks, you will have the opportunity to speak with each other as well as speakers after the conclusion of their talks. How do I join these conversations? Join the Magnet Forensics Discord Server here.
We will be using the Magnet Forensics Discord Server for more than just this one event! Moving forward, the server will be the go-to space for other live Magnet events. There will be channels to converse with the Magnet Forensics Examiners during our Tips & Tricks each Thursday at 11:00AM ET as well as during other webinars. Additionally, this is a great place to ask questions about the Weekly Magnet Forensics CTF debuting Oct 5.
The team here at Magnet Forensics has been working hard to continue to bring a fantastic experience, and we wanted to be able to connect with you during virtual sessions. And if you are a fan of the original Digital Forensics Discord Server, so are we! We will continue to have a presence there for industry content as well as connecting on a variety of forensics topics. Not a member of the Digital Forensics Discord Server? Check it out here: https://discordapp.com/invite/JUqe9Ek.
If you are new to the Digital Forensics Discord Server, check out this great post about getting started by Andrew Rathbun. Thank you to Andrew and all the moderators at the Digital Forensics Discord Server for all their support over the last year.
Let me know if you have questions by reaching out to me via
email jessica.hyde@magnetforensics.com.
I look forward to seeing you on both the Magnet Forensics Discord Server and
the Digital Forensics Discord Server.
Magnet Forensics is committed to supporting law enforcement with innovative digital forensics solutions for experts in the lab, agency stakeholders, and frontline officers. We’re grateful to be able to give back to the law enforcement community, including several free tools to help make examiners jobs easier.
That’s why we’re excited to share that we’ve now made it easier to empower frontline officers to collect and report on fleeting digital evidence from consenting victims with the availability of Magnet SHIELD as a free tool!
Magnet SHIELD works on devices running Windows 10 OS and allows officers on the scene to:
Capture Evidence Simply — Quickly get photo, video, and chat evidence with an external or internal camera or by connecting to the victim or witness’s mobile phone, or memory card.
Allow Witness to Share — Build trust and maintain privacy with victims and witnesses by letting them select the photos, videos, and chats they want to share.
Preserve Fleeting Evidence — Increase your chances to get victims and witnesses to consent to sharing evidence right at the scene instead of relying on them to hand over their phone.
Help Reduce Lab Time — Nobody wants to see devices sit in a queue. Help reduce backlogs by removing the need to send a device for a simple extraction and capture what is needed for your case.
Additionally, SHIELD automatically produces a
standardized PDF report on all digital evidence collected from the field.
Officers can quickly email the evidence report to prosecutors or upload both
the evidence and report into their RMS or digital evidence repository.
How to Get Magnet SHIELD
Head over to the Magnet SHIELD page and fill out the form to request your free copy of Magnet SHIELD. Once you are approved, you will receive a download link.
Have any questions about SHIELD? Check out our FAQ sheet here or email us at shield@magnetforesics.com.
Apple is about to release two new OS upgrades in the form of iOS 14 and macOS 11 (whoa, that’s weird to say) this fall. With new OS versions is always going to come a lot of new artifact testing. I’ve always been fascinated with tracking browser preferences and due to the nature of how Safari operates, I feel that it’s one of the most important browsers to track and understand the preferences of.
Apple likes to make sure that there’s a level of protection between a user and granting permission for an application to do something. This is tracked as part of Apple’s “Transparency, Consent, and Control” and tracked within the TCC.db across macOS and iOS. These databases are always a hot point of investigation for me because I’m always curious as to what permissions the application has asked for, as well as what permissions the user has granted. This can help guide me toward specific things to look for that may have been generated by an application.
For Safari, Apple also wants to extend that same protection and control to its users. This is done in the form of pop-ups that appear at the top of Safari asking a user if they want to extend specific preferences for a website to do a specific task. In the days of online conferencing and video chatting, its important to know if a site has been asking for certain information from the user and whether or not the user has accepted. But I’m getting ahead of myself. Let’s start at 0.
Recently I got an update notification for Safari 14. Safari 14 is the version that will ship as part of iOS 14 and macOS 11. After updating, I started checking on some preferences to make sure they hadn’t moved. Earlier this summer, I wrote a blog post on the main Magnet Forensics’ blog to discuss some of my findings on Safari preference data. (Link: ) I figured that with Safari 14 updated, it’s good to just revamp the post and give everyone a rundown of location values of specific files and how they can play info your investigations.
Let’s start with a baseline. Safari, by default, records the following preferences:
The biggest issues we see here is how the default settings can complicate an investigation. Three points specifically I always like to mention when it comes to active investigations are as follows:
History: Safari for macOS will only keep 1 years worth of web history (by default). This differs from the 30 days of history that iOS keeps.
Downloads: Safari only tracks the last 20 downloads in the Downloads.plist file, but this setting keeps that information only to the last 1 day as well. Meaning that by default only the last day’s downloads will be available for review.
Open Safe Files: If you’re trying to prove if the user “opened” a file this can complicate things. Items that Gatekeeper deems “safe” it will automatically open after download. (Gee officer, I didn’t know that video had bad stuff in it. I never played it.) Safari could still open a file FOR the user even if the user never intended to.
These preferences can be found in ~/Library/Containers/com.apple.Safari/Data/Library/Preferences/com.apple.Safari.plist. The interesting thing about this plist file is that many of the preferences will NOT be present in this file if they have never been changed from the default. For example, if the user has never changed the following settings, there will not be a record referencing them in the plist:
History Storage Time
Download Storage Time
Download Locations
Search Engine
Open “Safe” Files setting
For this next test I have gone through and changed a bunch of settings. You can see the new settings here:
Changing the settings then presents several new keys that aren’t in the original file. Doing a side-by-side comparison of the original to the new gives me several interesting values to track. The following values were added to my plist file only after they were changed. [Note: I just realized HomePage snuck in there. That one is always present even if it’s the default. Sorry!] After I changed them back to their default values, they still remained present in the file. Presence of one of these keys means that a user has changed from the default before!
The DownloadsClearingPolicy is obviously not a boolean like some of the others. It references the value in the dropdown for the preference for “Remove history items: ” in the Safari preferences window.
When Safari Quits = 1 Upon successful download = 2 Manually = 0After one day = 3 [Default]
SearchProviderIdentifier is referencing one of the listed search engines on the Search tab of preferences.
Remove history items will reflect the number of days it’s supposed to keep it with 365,000 being the option for “Manually.”
Now on to the site preferences managed for each URL that we visit. Every time a location requests one of several permissions, a user is presented with a pop-up window at the top of Safari to either allow or deny said permission (just like our applications).
Some of these preferences are managed within a database, while others are managed in plist files. Regardless, all of the per-site preference managing files can be found in the directory ~/Libary/Safari/ and we’ll evaluate each of the files for their goodies below. If a user goes to the Websites tab of their Safari preferences they can see a listing of all the requested permissions on the left as well as what website was granted/asked/denied permission on the right. It is important to realize that some permissions are NOT granted permanently and must be accepted each and every time. This could explain why information is not always present in these files.
The first place to check is the PerSitePreferences.db file found within ~/Library/Safari. This file tracks the bulk of the preferences. Preferences can be found in the preference_values table and the ones I’ve been able to map so far are:
PerSitePreferencesPopUpWindow
PerSitePreferencesGeolocation
PerSitePreferencesDownloads
PerSitePreferencesAutoplay
I think the first three preferences will be the most frequent ones requested by web sites (at least in my browsing experience). Downloads was the heaviest populated because every time a file wanted to be downloaded, it first had to pass a test. NOTE: When the Global preference for “Ask every time” on download location was set, this did NOT ask for permission and did not populate in the database. That’s a big one to check for before getting here.
Each value is listed in the database table with a domain, preference, preference_value, and a timestamp value. In my testing the timestamp was always NULL. The preference_value reflects a 0, 1, or 2. These numbers however change for what the preference is reflecting (ugh…).
For PerSitePreferencesDownloads:
Allow = 0
Ask = 1
Deny = 2
For PerSitePreferencesPopUpWindow:
Block = 1
Allow = 2
For PerSitePreferencesGeolocation:
Ask = 0
Deny = 1
Allow = 2
For PerSitePreferencesAutoPlay:
Allow All Auto-Play = 0
Stop Media with Sound = 1
Never Auto-Play = 2
The next preference file is to track the Page Zoom. While possibly not the most important, we’re here, so we might as well take a look. This is tracked within the PerSiteZoomPreferences.plist inside the same Safari directory. Each URL will be listed along with a PageZoom and TextZoom value. These values are represented in smaller numbers but correspond to a percentage (ie 1.15 = 115% and 1.75 = 175%).
The Notifications permission is tracked in the UserNotificationPermissions.plist file in the same directory. This files uses a boolean value to track whether or not notifications are allowed to pass through to the macOS Notification Center from Safari as well as when this permission was added by the user. 0 = Deny / 1 = Allow
And now, the moment you’ve been waiting for. How do we track if Safari has permission to use my Camera, Microphone, or to share my screen? With all of the web-based conferencing and video calling going on, I felt like this one was the most fascinating. Once I got into how Apple was storing the data, it was!
All three permissions can be tracked using the UserMediaPermission.plist file. Regardless of what permission has been allowed or denied, it will be given a listing in this file. A URL and a timestamp recorded in Apple/Mac Absolute Time will be listed for when the permission was granted and expires. The permission value however is actually a bit mask (which is a fun term a developer recently taught me). Essentially, each value is assigned a number and then that number corresponds to possibly one or more values added together. Some values didn’t appear to be used in my testing.
Note: Permissions for screen sharing can only be set to Deny or Ask. The default value is always Ask and you can’t set that causing a value for it to be populated.
Let’s look at some examples.
Example One: Screensharing is denied. No other permissions changed.
Example Two: Camera and Microphone are allowed, no other permissions requested.
Example Three: Camera, Microphone, and Screen Sharing are all denied.
—————————————————————— As promised here’s the TL;DR version in chart form. Operating System : macOS 10.15.6 / macOS 11Application: Safari 14.0 Target: Preferences
Stores multiple global safari preferences like home page, recent web searches, data and history keep rates, and whether to open files automatically upon download.
~/Library/Safari
PerSitePreferences.db > preference_values
Stores information on preferences for Downloads, Geolocation, PopUps, and Autoplays.
~/Library/Safari
PerSiteZoomPreferences.plist
Tracks zoom levels for text and page views.
~/Library/Safari
UserNotificationPreferences.plist
Tracks which URLs are allowed to display notifications.
~/Library/Safari
UserMediaPreferences.plist
Tracks which websites are allowed/denied permission for Camera, Microphone, or Screen Sharing.
This post was authored by Christopher Vance, Manager, Curriculum Development at Magnet Forensics. It also appears on his D20 Forensics Blog.
The volume of digital data and the amount of applications available to users on Windows, MacOS, and mobile devices can be incredibly overwhelming. As such, commercial tools are understandably unable to keep up with the variety of new and updated applications when parsing your evidence sources. Additionally, in your forensic lab in your organization, you may be dealing with multiple sources of data on top of your forensic images, such as network logs, output from other forensics tools, etc. Luckily when using Magnet AXIOM, we’ve allowed for the ability to create, use, and share custom artifacts for those times when you come across data unsupported in AXIOM.
With custom artifacts, you can process unsupported data from your evidence to analyze alongside the hundreds of artifacts that AXIOM already supports! The Artifact Exchange on the Magnet Forensics Resource Center will provide you with details of how to create your own custom artifacts to equip and inspire you to write and share. You can write custom artifacts in either XML or Python, or simply use the Magnet Custom Artifact Generator (MCAG) which makes custom artifact creation somewhat effortless! But, you don’t have to create your own to utilize the already dozens of custom artifacts available in the Artifact Exchange. You can immediately download and utilize this collections of custom artifacts in your examinations, created by folks throughout the DFIR community, and we’re aiming to highlight just a few!
ILEAPP Parsing
One huge benefit of Custom Artifacts is the ability to utilize the output from other tools in your toolkit and review the data alongside AXIOM’s artifact support as well! Known in the DFIR community for his many contributions, Alexis Brignoni is also the largest contributor to the Artifact Exchange as well (thanks Alexis!). Among the many Custom Artifacts that he’s written and submitted over the years is the collection associated with the output from his own forensic parser, ILEAPP. Using these custom artifacts, you can now process the output from ILEAPP, allowing you to view and analyze Connected Devices, Account Data, Calendar Data, and more, all within AXIOM This is a great way to validate output from various tools easily within one user interface.
Bulk Extractor
Magnet’s own Jad Saliba provided a number of custom artifacts on the Artifact Exchange, most recently adding the ability to process Bulk Extractor output into AXIOM. If you’re familiar with Bulk Extractor, you may be aware that the output from Bulk Extractor is generated into a variety of text files, all of which can provide tons of useful data from your case. The Artifact Exchange has two custom artifacts to load these text files as an evidence source and give you a unified view of all the data output within AXIOM. This also allows you to sort, filter, and easily analyze all of the Bulk Extractor data. Just add the entire Bulk Extractor output folder as evidence, where the collection of text file output was saved to, and the custom artifacts written by Jad will appropriately run against the applicable files. AXIOM will also denote which Bulk Extractor text file the data was processed from, as seen in the screenshot below.
Powershell History
If you find yourself analyzing a Windows endpoint and need an artifact to show what commands were run in Powershell by a savvy user, you’re covered! Yogesh Khatri authored a custom artifact to parse the Powershell command history from the ConsoleHost_history.txt file. This can definitely provide insight into the activities of a user, and can be especially useful if they were utilizing Powershell for nefarious reasons.
BlueCoat Proxy Logs
Find yourself analyzing logs from various sources when a case arises? If you are dealing with BlueCoat Proxy Logs, don’t worry! Trey Amick has a custom artifact for you! Simply add your log evidence into your case and process this custom artifact for an easy way to view and analyze this log data.
Download and Submit Custom Artifacts at the Artifact Exchange
Hop on over to the Artifact Exchange today to download these and more custom artifacts for your examinations, written by the DFIR community, for the DFIR community! And don’t forget to submit your own custom artifacts that you’ve created for your own examinations. You never know who might need those results in their casework, and how far reaching your impact could be!
Well, I thought I was going to take a break this week from mobile but Apple decided that wouldn’t be the case. It dropped iOS 14 this week on us after its big announcement event on Tuesday. While we didn’t get any new iPhones, they did announce some swanky new watches and iPads. They also announced that iOS 14 would be dropped the following day. Obviously I had to take a look.
Starting prior to the launch of iOS 14, I took a couple of backups of my test iPad. One with encryption and one without. All was expected to be with iOS 13.7. After downloading iOS 14 (or iPadOS 14 if you want to get super technical), I proceeded the same. Took two backups, one with encryption, and one without. Here are some preliminary thoughts on the data and procedures with more to come over the coming posts.
[Note: all of the backups were taken either using iTunes on Windows or the built-in functionality of Finder in macOS 10.15.6 I also attempted using several versions of libimobiledevice but it wasn’t able to generate backups.]
To see a bigger picture I also took my daily driver iPhone which I upgraded to iOS 14 for the same spin. Didn’t grab a 13.7 to compare it to, but still parsed it for information and all was I generally expected.
Encryption
Encrypting the backups worked the same in iOS 14 as it did in 13.7. It still requires the use of the PIN code or password in order to set a backup encryption password on the device. Decrypting the data also seemed to use the same method as it did in 13.7. I used AXIOM to decrypt and parse the backups and it worked just as expected.
Encryption vs No Encryption
As in iOS 13.7, several data points were only available with backup encryption enabled. These were:
Keychain
Healthkit
Call Logs
Safari History
Artifact Locations
While I’m sure we’ll continue to find data in different places for a while to come, I wanted to highlight some of the BIG artifacts and where they live. For the most part, these all seemed to be exactly where they were expected to be with iOS 13.7.
Other Safari Data: AppDomain-com.apple.mobilesafari
Library/Preferences/com.apple.mobilesafari.plist
Library/Safari/[Same PerSitePreferences.db and UserMediaPermissions.plist as mentioned in blog post here]
[iPadOS]Downloads/Downloads.plist
My Voicemails, Calendar, and even data from my Files app (mentioned here) all seemed to be in the right places too. And while the numbers don’t line up perfectly in the following screenshots (because I had to push a clean IPSW of iOS 14 to my device and restore from a backup, plus a teeny bit of extra checking on a few things in 14), you should be able to see that unlike a lot of developers buildings apps for iOS14, it shouldn’t catch us too off-guard.
Full Filesystem Images
If you’ve already got a way to obtain full filesystem images for iOS 14, what awaits you? Well, good news it seems. The important stuff that you’d want like location data, KnowledgeC, and PowerLog information all seem to be in place.
I’ve seen a few other things that are going to require a bit more in-depth research so keep an eye out for those. There’s still some things to look at with widgets and other “@” mentions in group threads but that’s still to come. iOS 14 isn’t done with us yet, there’s still several other features like AppClips that might come in to play as more developers start to release iOS 14 applications that can take advantage of these things. The good news final note? For once, I feel less like the mouse and more like the cat in this little game we play with Apple OS releases. Until next time folks!
This post was authored by Christopher Vance, Manager, Curriculum Development at Magnet Forensics. It also appears on his D20 Forensics Blog.
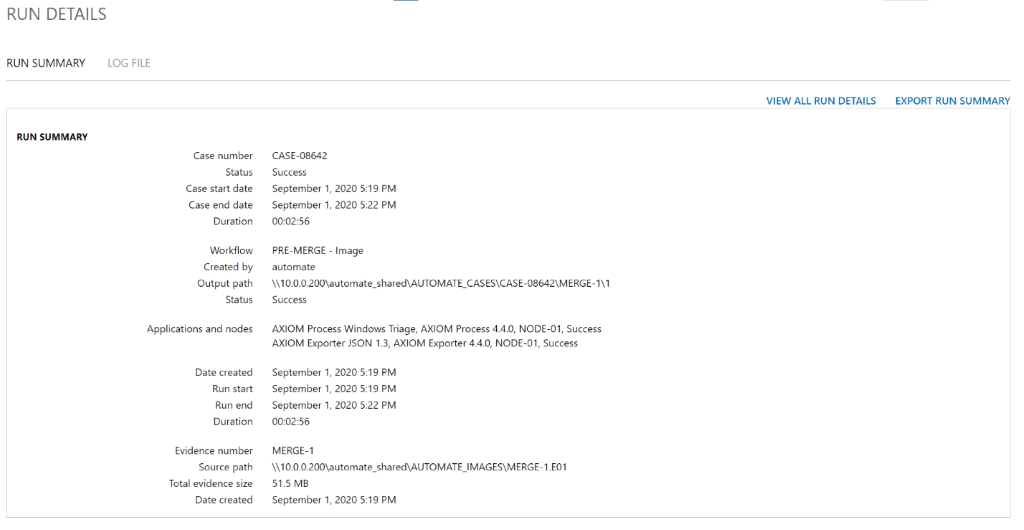
With Magnet AUTOMATE 2.4, you can now improve your lab’s auditing and validation capabilities with new Case Run Detail Summary and Log Files.
This new feature is particularly important for labs that are standards accredited or working towards accreditation, such as ISO 17025 or BS 10008. By capturing and retaining case processing details, examiners can now easily explain how original data was extracted, processed and ingested.
Manually recording the application name, application version number and processing details is time-consuming and cumbersome. However, it’s essential that examiners record this information for auditing and traceability purposes, especially for lab’s that are ISO-accredited or working towards accreditation.
One of the main benefits of automation in digital forensics is to remove as much of the manual, time-consuming, and repetitive tasks as possible so that examiners can focus their skills where it matters most – on complex analysis and reporting.
Now in AUTOMATE 2.4, for each case run executed in AUTOMATE, the nodes, application name, and application version used for that processing run are automatically recorded without any examiner intervention or manual activity. This helps lab’s meet specific standards guidelines effortlessly and removes the chance for human-error that can naturally occur when examiners are required to manually record processing details.
Examiners need to easily understand and look up these details for auditing and traceability purposes. However, if down the line they need to re-run the case and they get different results, they can validate which version of software was initially used that may have caused this difference.
Moving forward, system administrators can record the version number of each application installed on a processing node, from the Nodes and Applications set-up interface:
After processing, an examiner can now view the Run Details by clicking “Show Details” next to a run, which now include the applications and nodes used the process the data in addition to previous data points such as the case number, status, case start and end time, duration, workflow used, and who created the case run.
It’s important that we continue to enhance the user experience of AXIOM to help our customers’ ability to effectively and efficiently seek the truth in their digital forensics investigations. In the latest release of AXIOM 4.5, we improved our searching functionality throughout! Here’s what you can expect when you perform searches after upgrading to AXIOM 4.5.
Lucene Speeds with Advanced Searching
The release of AXIOM 4.0 brought significantly
improved searching and filtering speeds in AXIOM Examine with the integration of Lucene,
making for a smoother user experience and saving you time in your casework! The
enhanced speeds were only applicable when using the global search box, until now!
In AXIOM 4.5, the advanced searching functions, such as proximity searching, whole
words, case sensitivity, and multiple search terms, will now have Lucene speeds
behind it as well!
To utilize the much improved searching speeds, additional indexing of the text found within your case must occur. When you open a case in AXIOM Examine, you will notice at the bottom of your AXIOM Examine window that the Search Index will begin to build automatically.
You will have to option to cancel, but we recommend you don’t! It does not take much time to build this index, and can still navigate through AXIOM and work your case while indexing is taking place. Plus, in our internal testing with a 2.2 million artifact case, we found the advanced searching speeds were on average 37 times faster, depending on the search criteria and number of hits being returned. The more hits, the more significant speed improvements you’ll likely see. In some cases, we saw up to 120 times faster returns!
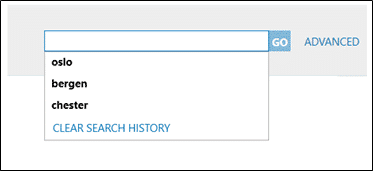
Search History and Autocomplete
Also added into AXIOM 4.5 is a search history and autocomplete capability when using the global search box in AXIOM Examine. As you run searches throughout your examination, that search history will be saved, and you will be able to see a dropdown of your previous searches. This will allow for easy access if you want to apply them to your case another time. You can also clear that search history if you no longer wish to see old searches.
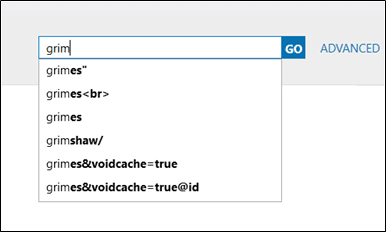
Additionally, as you type into the global search box, you’ll see a drop down with autocomplete suggestions from the artifacts in your case. The autocomplete functionality will give you have an idea of things you might want to search for and hits that you might get returned, even before the search is made!
“Find” Function in Document Artifacts
A final improvement you’ll find in AXIOM 4.5 is being able to search within rendered documents, using a Find link at the top of the preview. You can search for a string within that document, and AXIOM will highlight all occurrences within the preview. Plus, you can easily jump to each occurrence using the arrows in the search box!
We hope these enhancements to keyword searching improve your efficiency and effectiveness in your casework! If you’re already using AXIOM, download AXIOM 4.5 over at the Customer Portal. If you want to see how Magnet AXIOM can help you find the evidence that matters, request a free trial today!
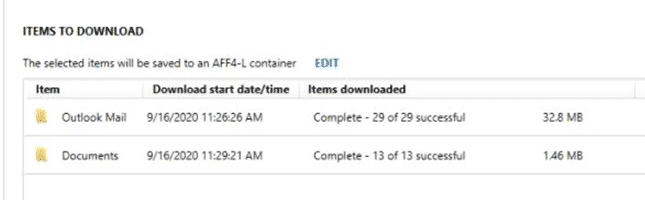
Hi, Jessica Hyde here, Director of Forensics. We are excited to announce the introduction of logical forensic containers via AFF4-L in AXIOM Cyber 4.5! When you now use AXIOM Cyber to make logical acquisitions of files and folders or process memory, the default container will be AFF4-L. You can however still choose to use .zip as your container if that is what you prefer.
Figure 1 Remote Acquisition to an AFF4-L containerFigure 2 Logical acquisition to AFF4-L
We previously added support for AFF4 physical images from MacQuisition in version 3.7 and support for AFF4 from other sources like Evimetry in AXIOM Cyber 4.2. Now we are bringing logical support of AFF4, AFF4-L, support to AXIOM Cyber 4.5. We are excited to comply with AFF4-L v1.1, bringing the standard from journal publications in 2019 into a forensic tool in 2020. This is the first vendor neutral standard for logical images based on the AFF4 format.
AFF4 logical containers have several advantages over using non-forensic standard containers. The primary advantages include forensic soundness, time, compression, and future portability of a shared format. Kevin Brightwell and I wrote a blog post regarding our views on AFF4 and AFF4-L and our encouragement for the community to take up the standard for logical images that explains much of these differences.
As the targeted acquisitions AXIOM Cyber creates with remote acquisition, it makes sense to store these raw files in logical container. AFF4-L provides for a forensics container in a vendor agnostic, non-proprietary format. We are happy to now be able to store raw files from remote acquisition of files and process memory in this format.
In terms of size of image, there are major gains with AFF4-L as compared to the same logical files being stored in a .zip container. This could lead to major savings in terms of storage. Here is an example of the compression. We took the same image of logical files from a Mac. The traditional .zip container was 8.4GB. The same resultant image in AFF4-L was 4GB.
Figure 3 .zip image from Mac MiniFigure 4 .aff4 image of same Mac mini
The AFF4-L format is robust. And we are excited to have
implemented many of the features including the compression gains. We look
forward to introducing the time gains associated with striping in future
releases.
The specification in the paper was easy to follow. We encourage others in the community to adopt this standard. As it is a public open source standard, we look forward to the future portability of these images as additional tools begin to support the standard. The community was entirely helpful with issues when we ran into them. We look forward to contributing documentation back to the community. To learn more about the community and AFF4, check out the documentation, overview, and github repository for the project at https://github.com/aff4/.
We are so excited to bring forth acceptance of AFF4 and AFF4-L as an open source, non-proprietary format that is tested, validated, peer-reviewed and open to anyone for both physical and logical images. If you have any questions please feel free to reach out to me, jessica.hyde@magnetforensics.com with your comments or questions about our AFF4 or AFF4-L integration.
AFF4-L References
Schatz, B. L. (2019). AFF4-L: A Scalable Open Logical Evidence Container. Digital Investigation, 29. doi:10.1016/j.diin.2019.04.016
Magnet AXIOM 4.5 and Magnet AXIOM Cyber 4.5 are now available — upgrade today within AXIOM/AXIOM Cyber or over at Customer Portal.
With AXIOM 4.5 and AXIOM Cyber 4.5, we’ve made search performance improvements to speed up investigations and updated Portable Case so it’s easier to share case evidence with non-technical stakeholders. And with AXIOM Cyber 4.5, you can now create and ingest AFF4 Logical containers.
Find out more about these new features, along with new and
updated artifact support below.
New in AXIOM & AXIOM Cyber: Portable Case Updates Help You Easily Share Case Evidence
If you’re using Portable Case in AXIOM and AXIOM Cyber, we’ve now introduced a new Case Dashboard view. This view provides an at-a-glance summary of your evidence so others can quickly review the case. This is especially helpful if you’re sharing evidence for review with non-technical stakeholders, who will be able to quickly understand:
Artifact categories
Keyword matches
Tags and Comments
Evidence overview
Case processing details
And more!
New in AXIOM & AXIOM Cyber: Search Performance Improvements to Speed Up Investigations
AXIOM 4.5 will help make your examinations even faster! We’ve
made significant improvements to performance when filtering advanced keyword
searches, speeding up your search return times—by an average of 37 times faster
based on our internal testing!—and saving you valuable time in your investigations.
We’ve also added two other new features to help streamline
your searches:
Auto complete for keyword searches based on the artifacts in your case
Searching and highlighting keywords within Document and HTML previews
AFF4-L is a vendor-neutral, open standard designed
specifically for forensic imaging, giving you confidence that the integrity of
your evidence is maintained.
Both AXIOM and AXIOM Cyber also support the ingestion of AFF4-L images generated by other tools.
In addition to support for Google Takeout and Facebook user data downloads, AXIOM now supports processing of Skype User Data download packages. Now you can easily add Skype user data downloads from co-operative witnesses or victims to your case and analyze them alongside your other evidence sources.
New Artifacts
Application Preferences (Apple)
FeatureUsage (Windows)
Google Calendar (Apple)
Mi Browser (Android)
Mint Browser (Android)
Signal (Windows)
Wickr (Windows)
Artifact Updates
Apple Maps (Apple)
Discord (Apple)
Google Duo (Android)
Google Meet (Android)
KakaoTalk (Android)
Rebuilt Desktop (Windows)
Safari (Apple)
Safari Preferences (Apple)
Secret Photo Vault (Apple)
Text Me (Apple)
TikTok (Apple)
Wickr Me (Android)
Yahoo Mail (Apple)
Get Magnet AXIOM 4.5 and Magnet AXIOM Cyber 4.5 Today!
If you’re already using AXIOM, download AXIOM 4.5 or AXIOM Cyber 4.5 over at the Customer Portal. If you want to try AXIOM 4.5 or AXIOM Cyber 4.5 for yourself, request a free trial today.